• Skip to primary navigation
  • Skip to main content
  • Skip to primary sidebar
NameHero's Gaming Blog

NameHero's Gaming Blog

In-Game Tutorials, Gaming Server Guides, & More!

  • AI Agents
    • OpenClaw
    • Claude Code
    • n8n
    • Hermes Agent
    • Open WebUI
    • Docker
  • Hosting
    • Web Hosting
    • WordPress Hosting
    • WooCommerce Hosting
    • Enterprise Hosting
    • Email Hosting
    • HeroicGuard
    • GPU Hosting
    • Website Builder
  • VPS
    • Managed VPS
    • Unmanaged VPS
    • Flex VPS
  • Reseller
  • Gaming
    • Minecraft Hosting
    • Palworld Hosting
    • Rust Hosting
    • Soulmask Hosting
    • Stardew Valley Hosting
    • Terraria Hosting
    • DayZ Hosting
    • Project Zomboid Hosting
    • Hytale Hosting
  • Domains
  • Account
  • Blog Home
  • Categories
  • Authors

How To Install Optifine

Max Moeller

Published on: October 4, 2024

Categories: Minecraft 3

Optifine is a legendary Minecraft mod client. It’s known for delving deep into your game’s files and modifying them so much that you’re given a ton of extra graphics options. This mod client is great for installing Shaders to enhance your game’s visuals, as well as for increasing your in-game performance.

This guide will cover most of what you need to know about Optifine, including how to install It, how to use it with Minecraft Forge, and more.

Table of Contents
  • Prefer To Watch Instead of Read? Check Out Our New Video!
  • How To Install Optifine
    • How to Download Optifine Installer
    • Optifine Installation Process
      • 1. Open The Optifine Installer Jar File
      • 2. Choose An Install Folder
      • 3. Click OK
      • 4. Launch Optifine Minecraft Through the Minecraft Launcher
      • 5. Click Play
      • 6. Check for the Modded label
      • 7. Check Options
  • What You Should Know About Installing Optifine
    • What Is Minecraft Forge?
    • How To Install Forge
      • 1. Head to the Forge Website
      • 2. Select Your Minecraft Version
      • 3. Download Forge
      • 4. Save the File Where You’d Like
      • 5. Run the Installer
      • 6. Open The Minecraft Launcher
      • 7. Launch the Forge Profile
      • 8. Click on Mods
      • 9. Open the Mods Folder
      • 10. Drag the Optifine Mod to the Mods Folder
      • 11. Restart Minecraft

Updated April 7, 2025

Prefer To Watch Instead of Read? Check Out Our New Video!

How To Install Optifine

To start, you need to download Optifine.

How to Download Optifine Installer

You can download the Optifine installer through its website.
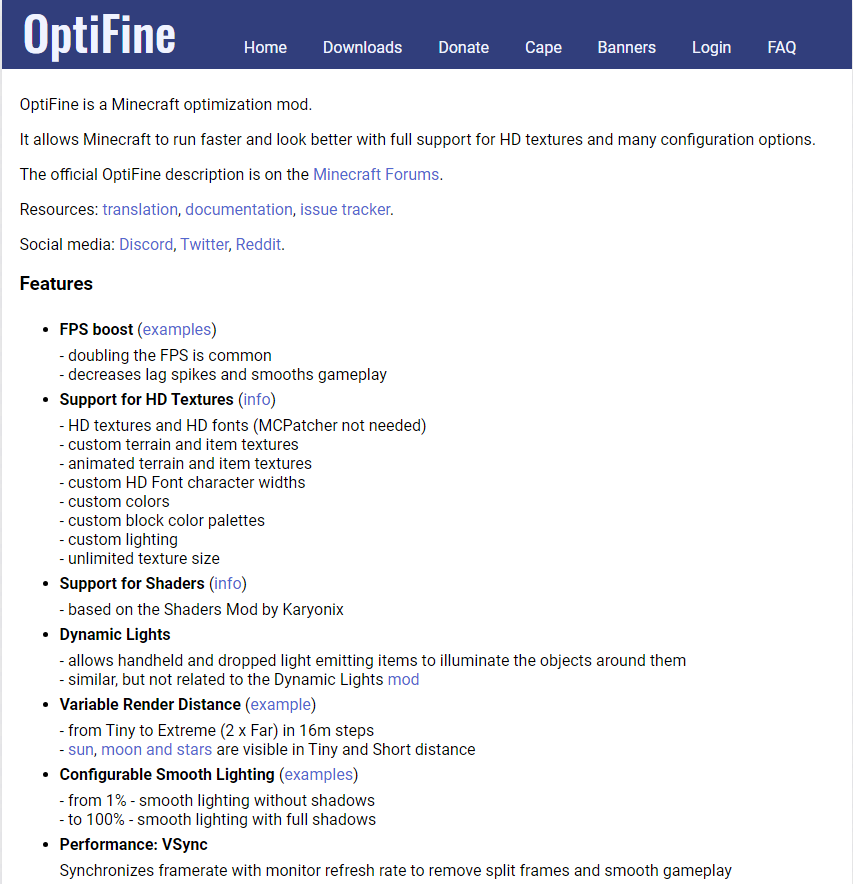
Install Optifine through its website.

Just make sure you download the version that is compatible with your version of Minecraft. You can check your Minecraft version through the Minecraft Launcher.
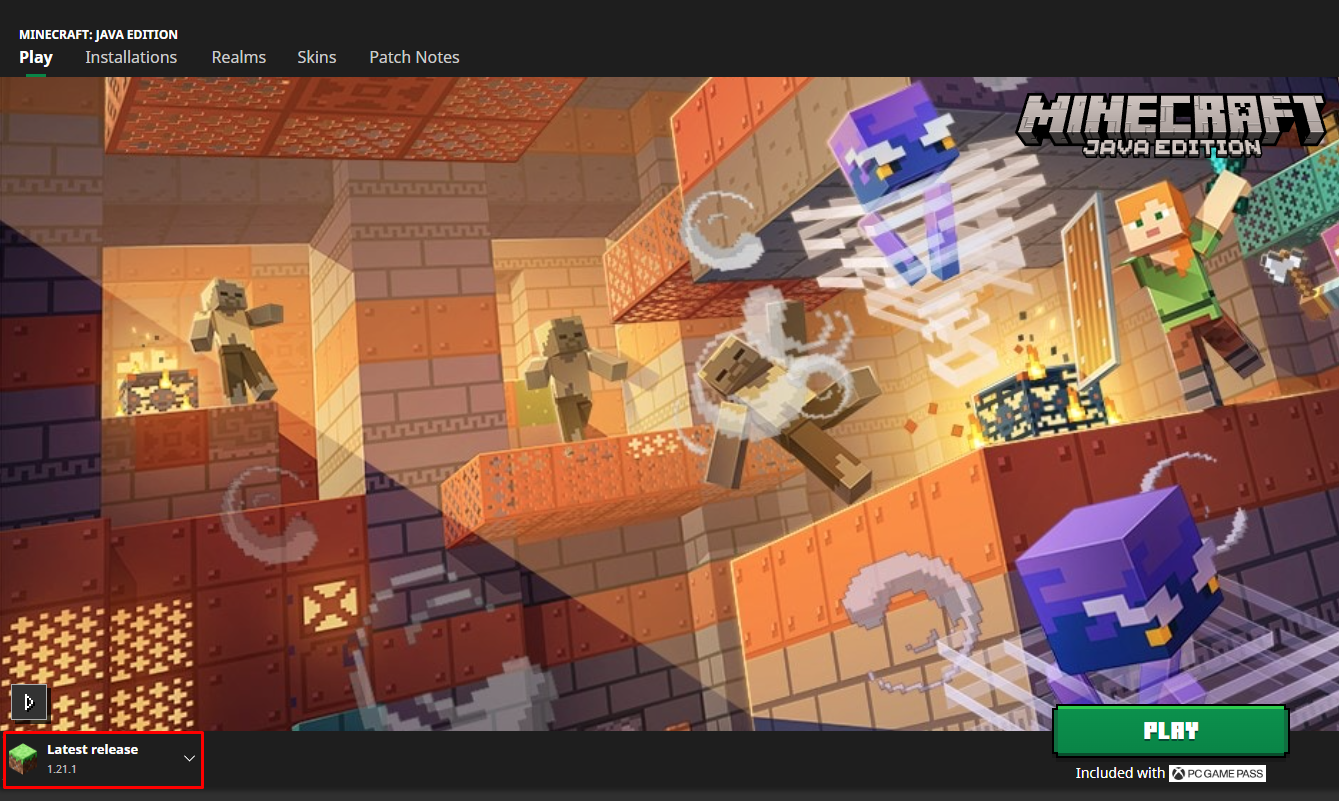
The Minecraft Launcher provides your current version of Minecraft. Make sure your Optifine version matches it.

Once you’ve downloaded the Optifine installer, it’s time to install Optifine. If you’re having trouble learning how to download Optifine, check out our other guide on the topic.

Optifine Installation Process

1. Open The Optifine Installer Jar File

Navigate to where you downloaded the Optifine Installer Jar File and right-click it. Then, click Open.
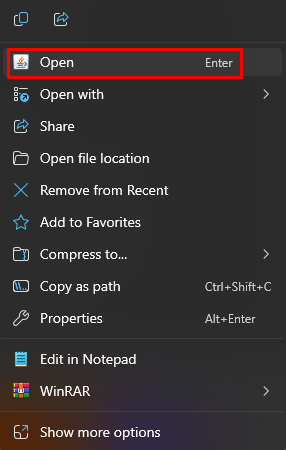
Open the Minecraft Jar File through Windows Explorer.

2. Choose An Install Folder

The Optifine Installer should automatically place Optifine in your Minecraft folder/Minecraft directory. Double-check that the provided folder is correct, then click Install.
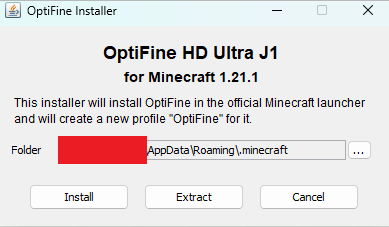
The Optifine file will automatically find your Minecraft folder.

3. Click OK

If Optifine properly installs, you can click OK! Now, it’s time to check if the installation process worked.
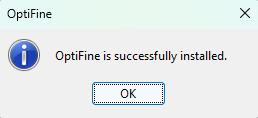
Now you know how to install the Optifine mod client.

4. Launch Optifine Minecraft Through the Minecraft Launcher

Open the Minecraft Launcher, navigate to Minecraft: Java Edition, and select Optifine from the Profile Menu in the bottom left corner. If it doesn’t appear, you may want to retry the Optifine installation process and double-check that you’re installing the correct Optifine version.
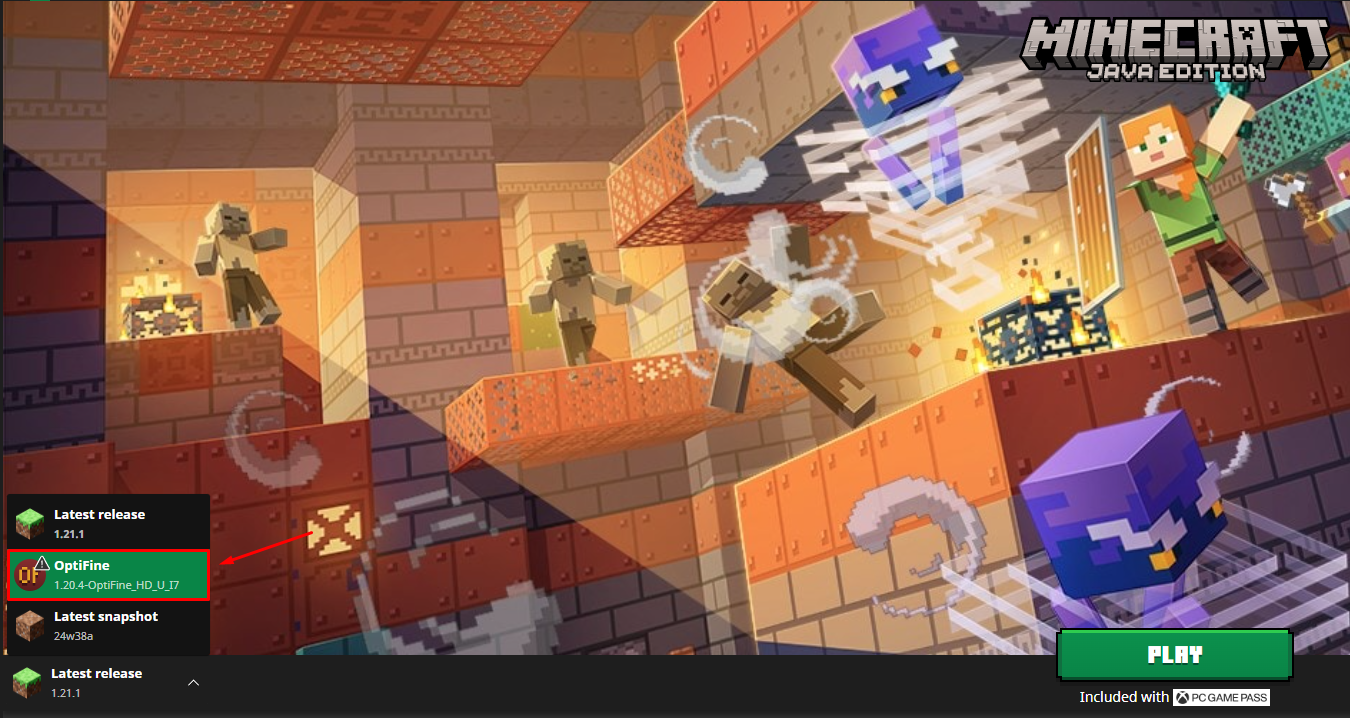
The Optifine profile should appear in the profile selection.

5. Click Play

Click the Play button to test Minecraft Optifine.

6. Check for the Modded label

The first thing you want to look for is the Modded label on the menu’s bottom left.
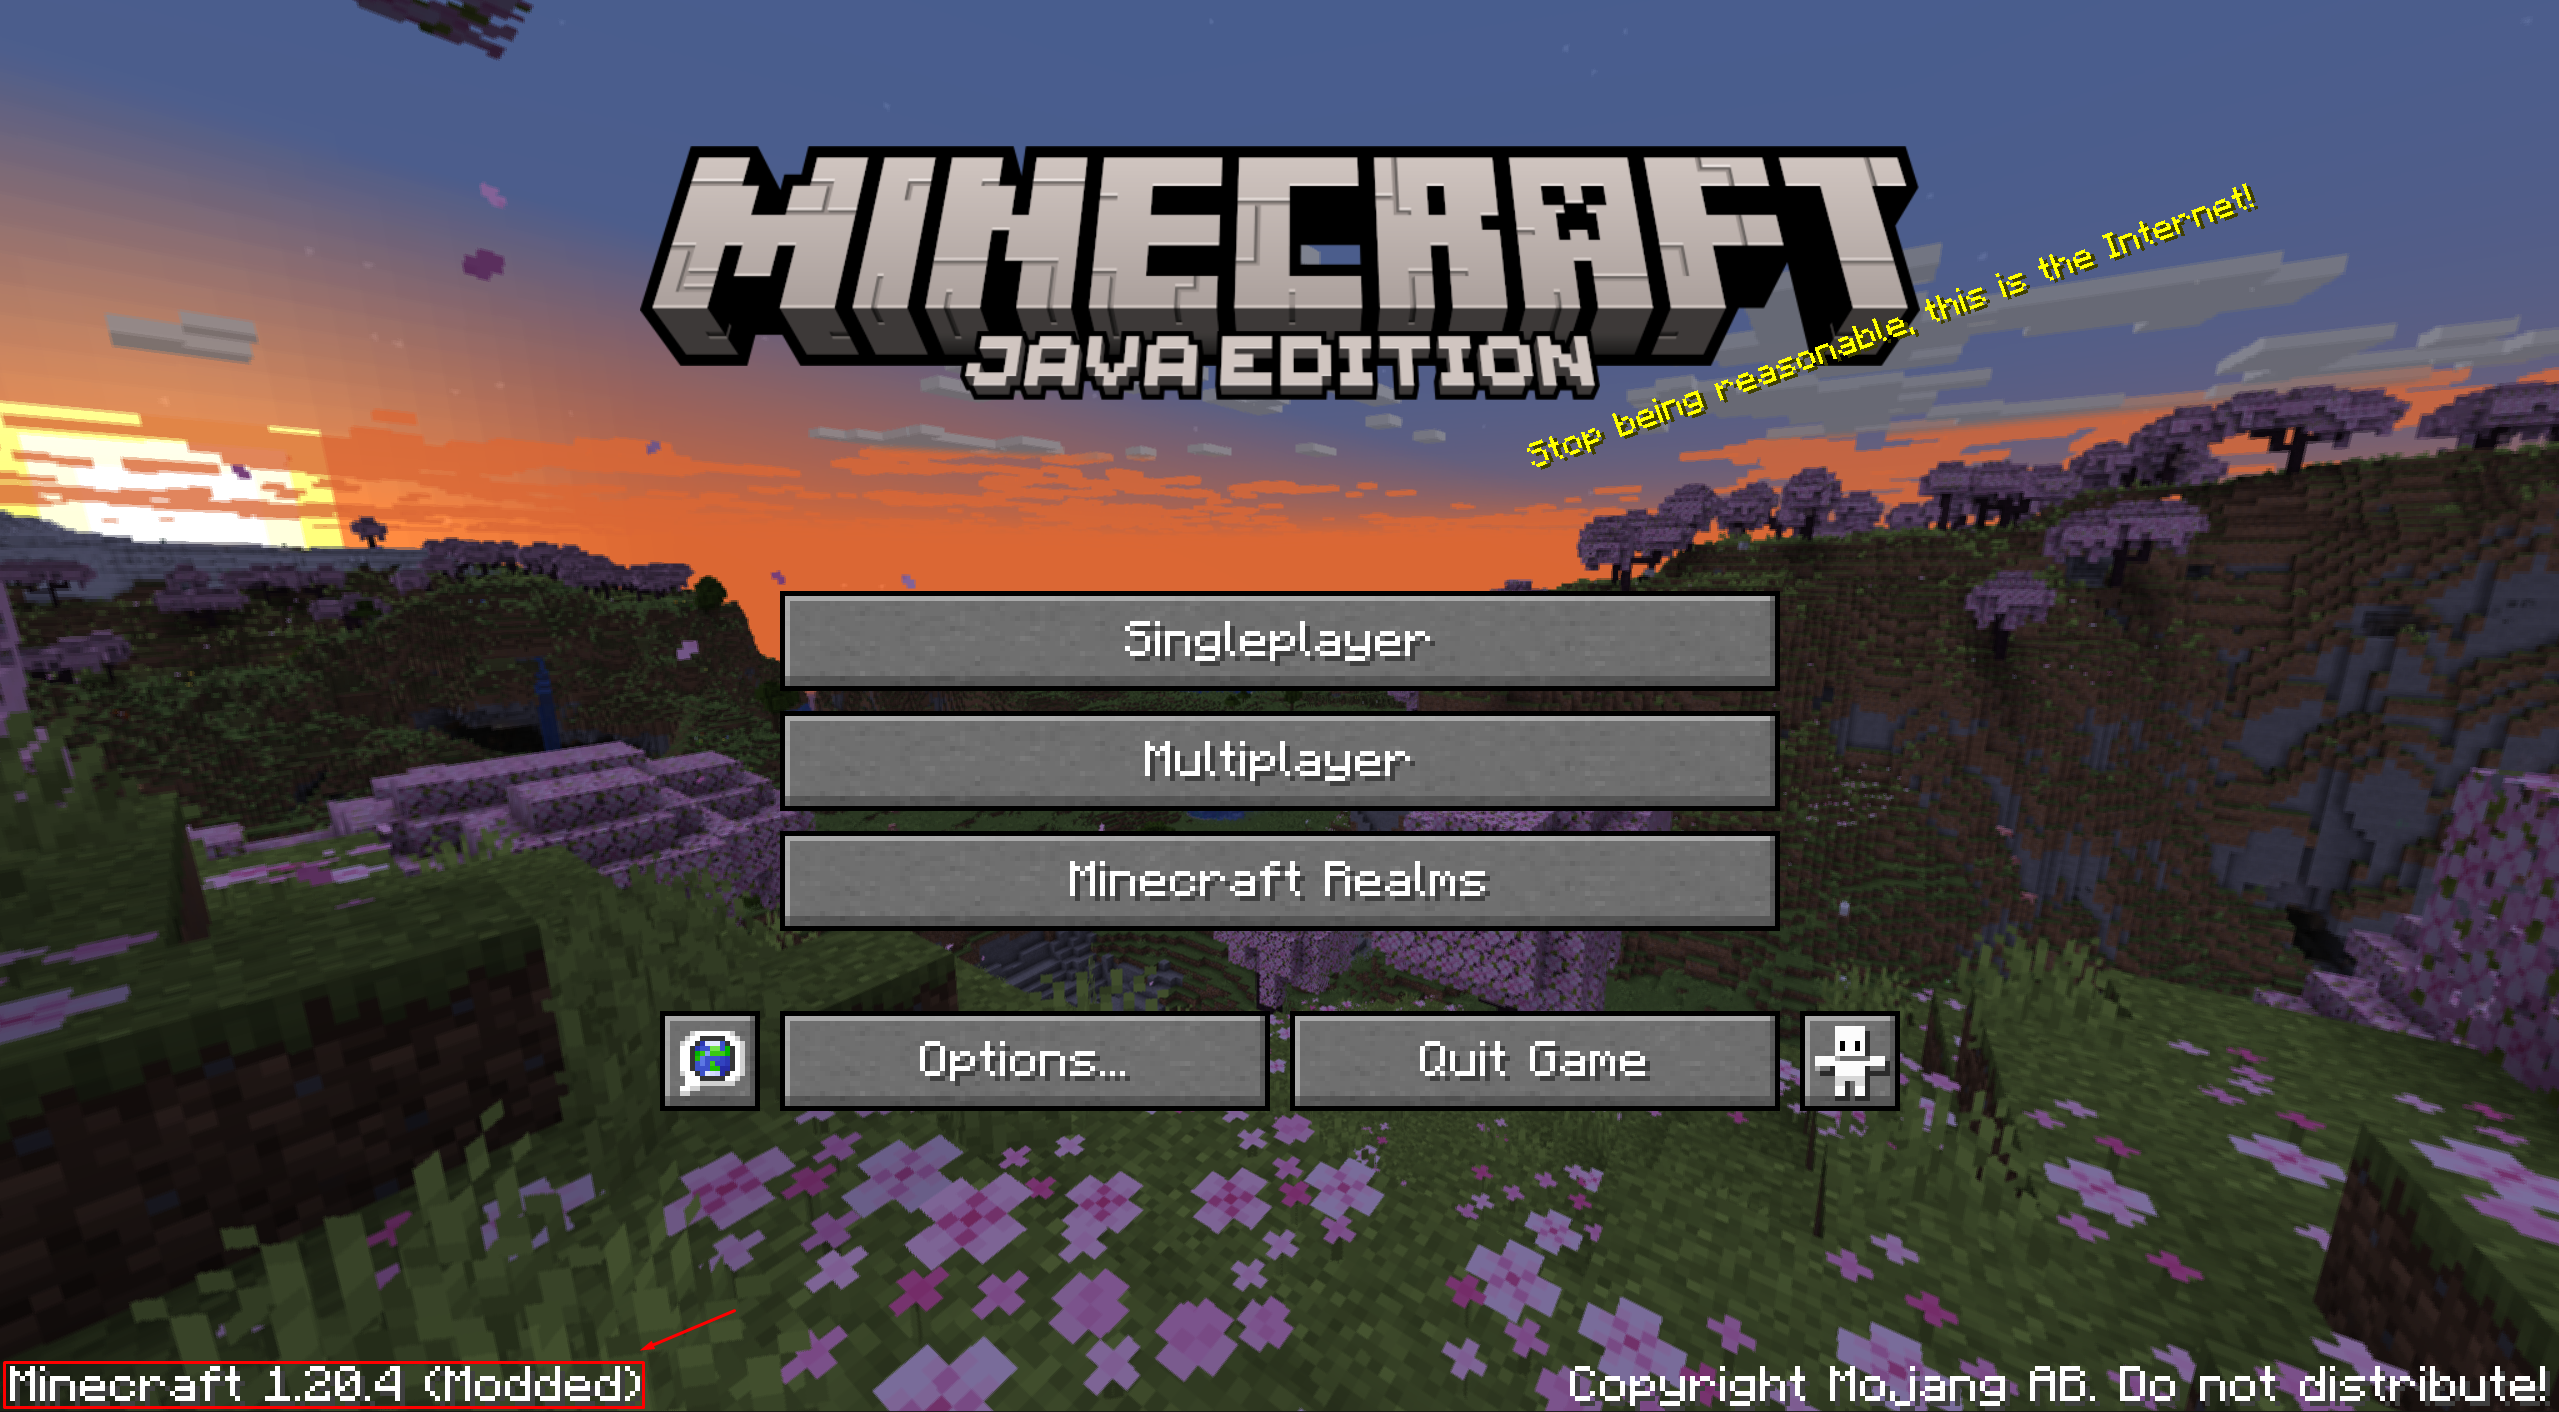
This denotes that you're playing a modded version of Minecraft.

7. Check Options

The Options menu should feature more in-depth customization settings.
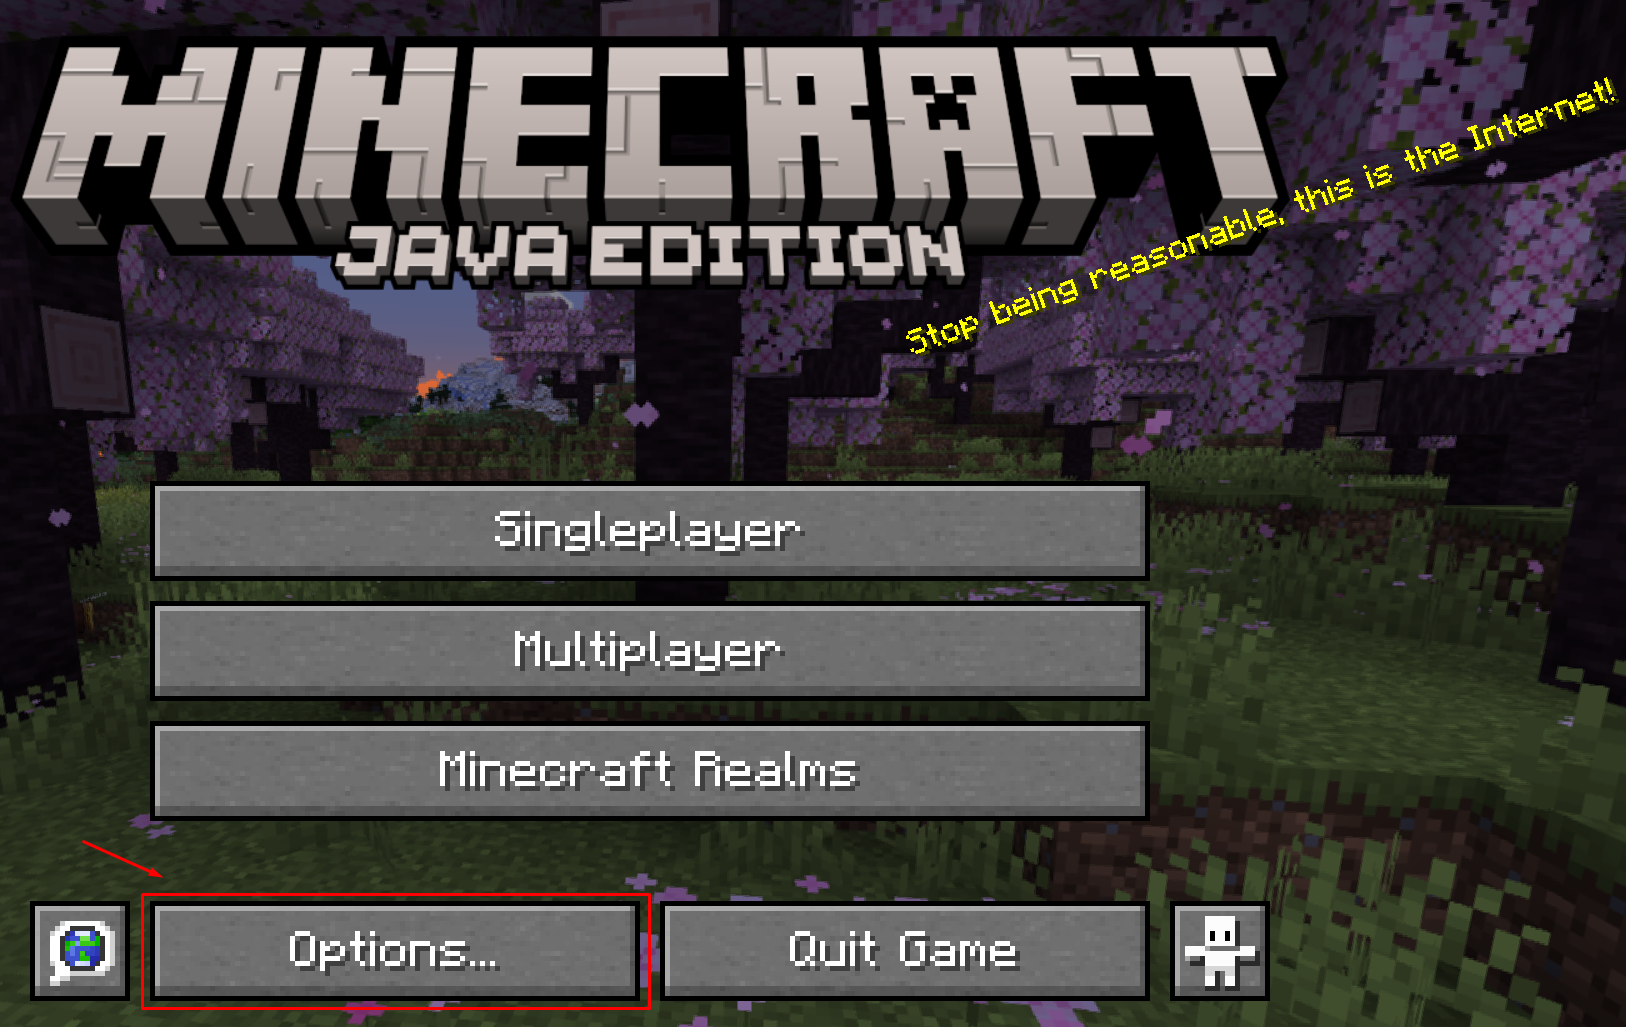
Options includes everything you need to customize your Minecraft experience.

More specifically, check out the Video Settings tab.
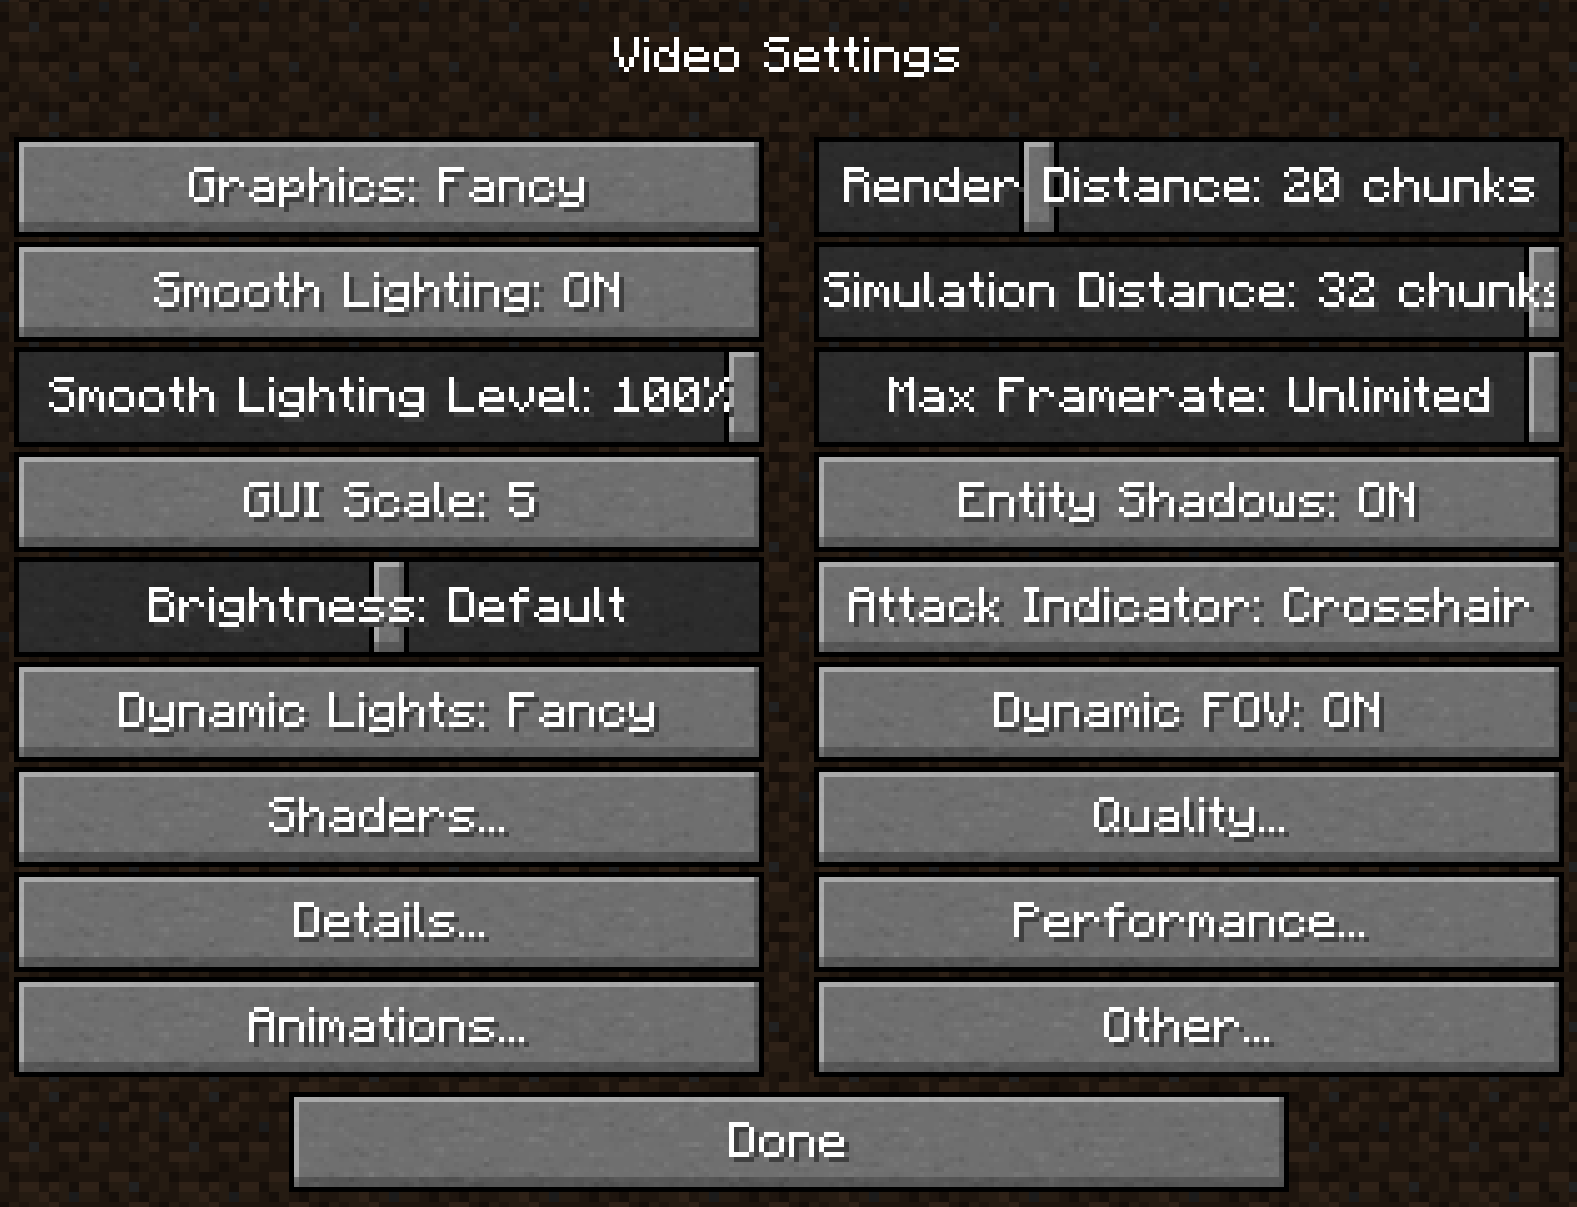
Video Settings should have improved Render Distance and Simulation Distance options, among many others.

You should be all set if your Minecraft Video Settings menu looks like the above.

What You Should Know About Installing Optifine

The thing about installing Optifine is it can be incompatible with other mods that you have installed. This is especially important when it comes to Minecraft Forge.

What Is Minecraft Forge?

Minecraft Forge is a mod manager and launcher for installing, swapping, and otherwise customizing your Minecraft mods experience.

In the past, you would have to use Optifine completely separate from mod managers like Forge. However, there are now versions of Optifine that work with Minecraft Forge versions. Make sure to pick a version that supports Forge.
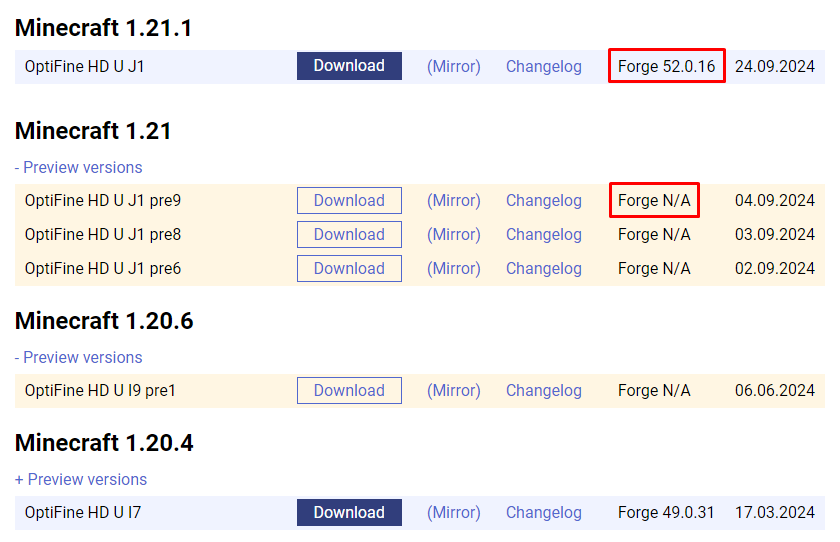
An Optifine version that supports Forge will state it in one of the right-hand columns.

Once you’ve installed an Optifine version compatible with Forge, it’s time to install Forge itself.

How To Install Forge

Before installing Forge, make sure to look up which version of Minecraft you want to play and run it at least once. Running it will make it compatible with Forge.

1. Head to the Forge Website

Navigate to Minecraft Forge.net via this link.
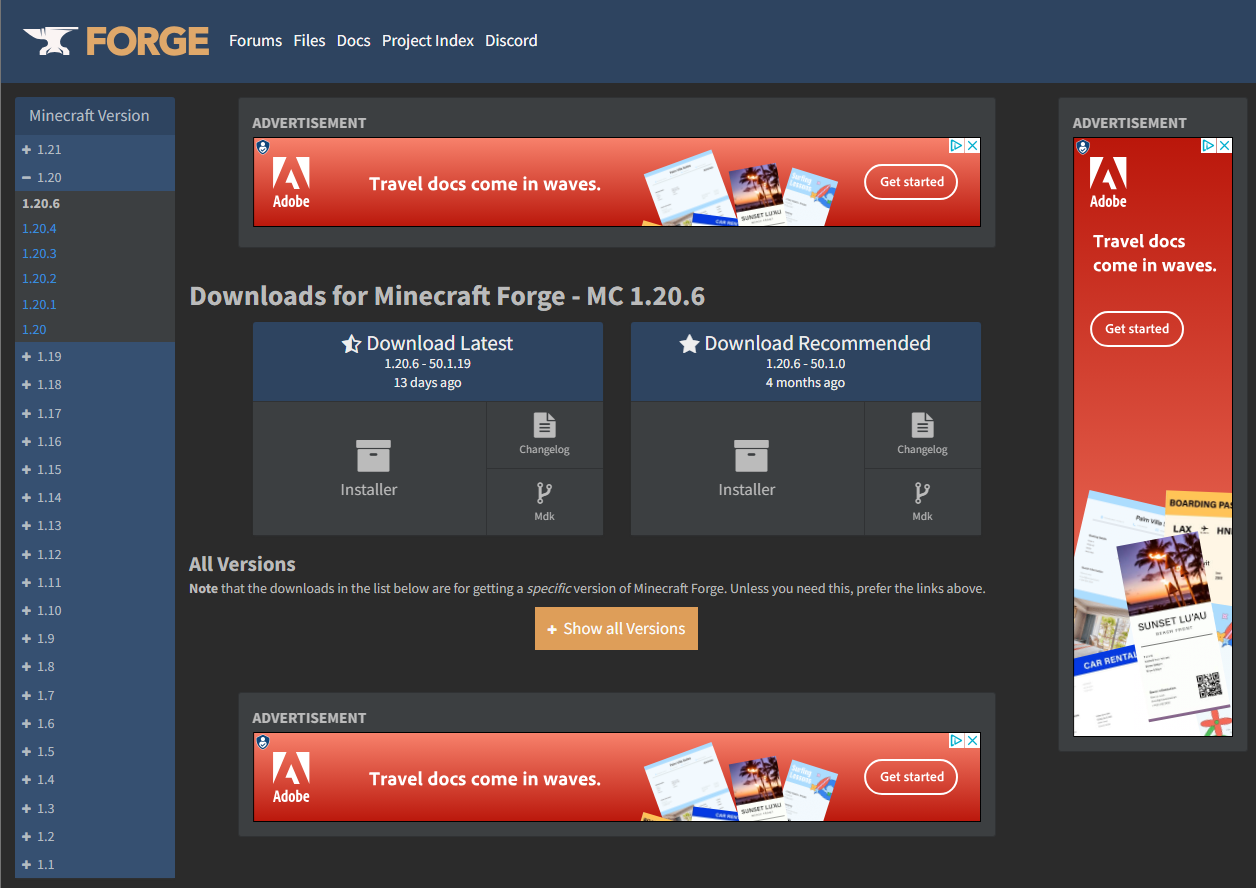
The Forge website provides support for many Minecraft versions.

2. Select Your Minecraft Version

Select your version of Minecraft on the site’s left-hand bar.

Note: As stated in the section above, make sure this Forge version matches the version listed on the Optifine website.
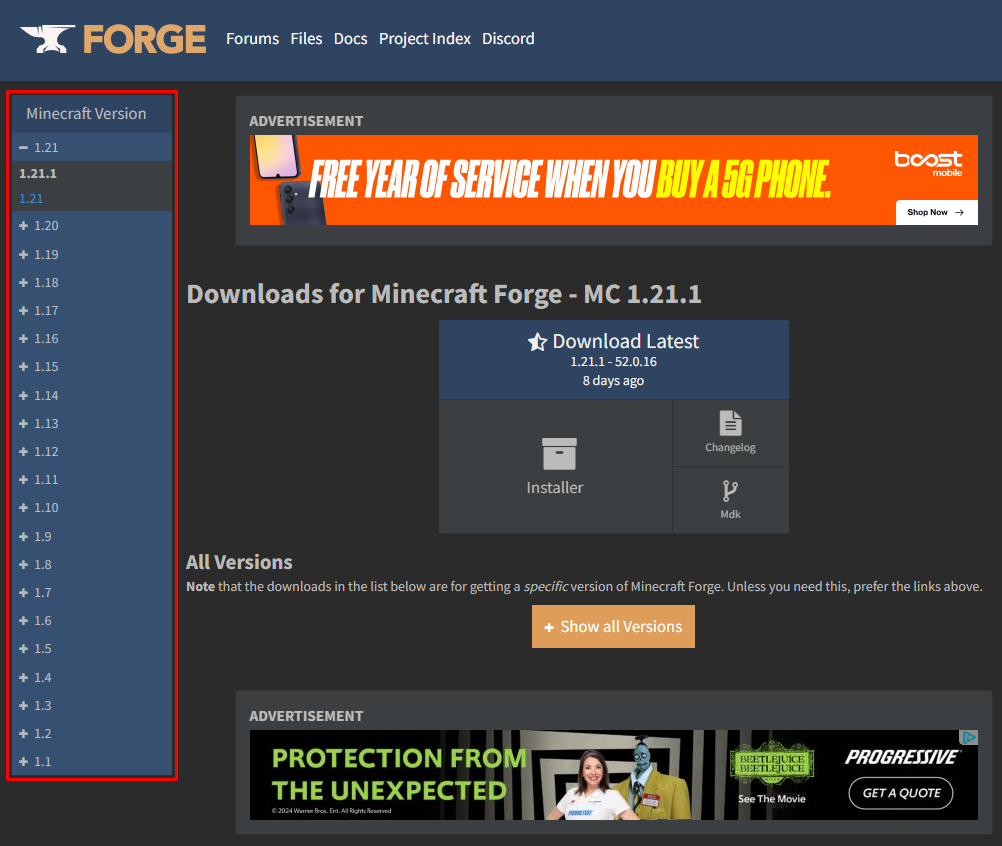
Choose a Forge version via the left-hand sidebar.

3. Download Forge

Click on Installer under Download Latest to download the latest version of Forge.
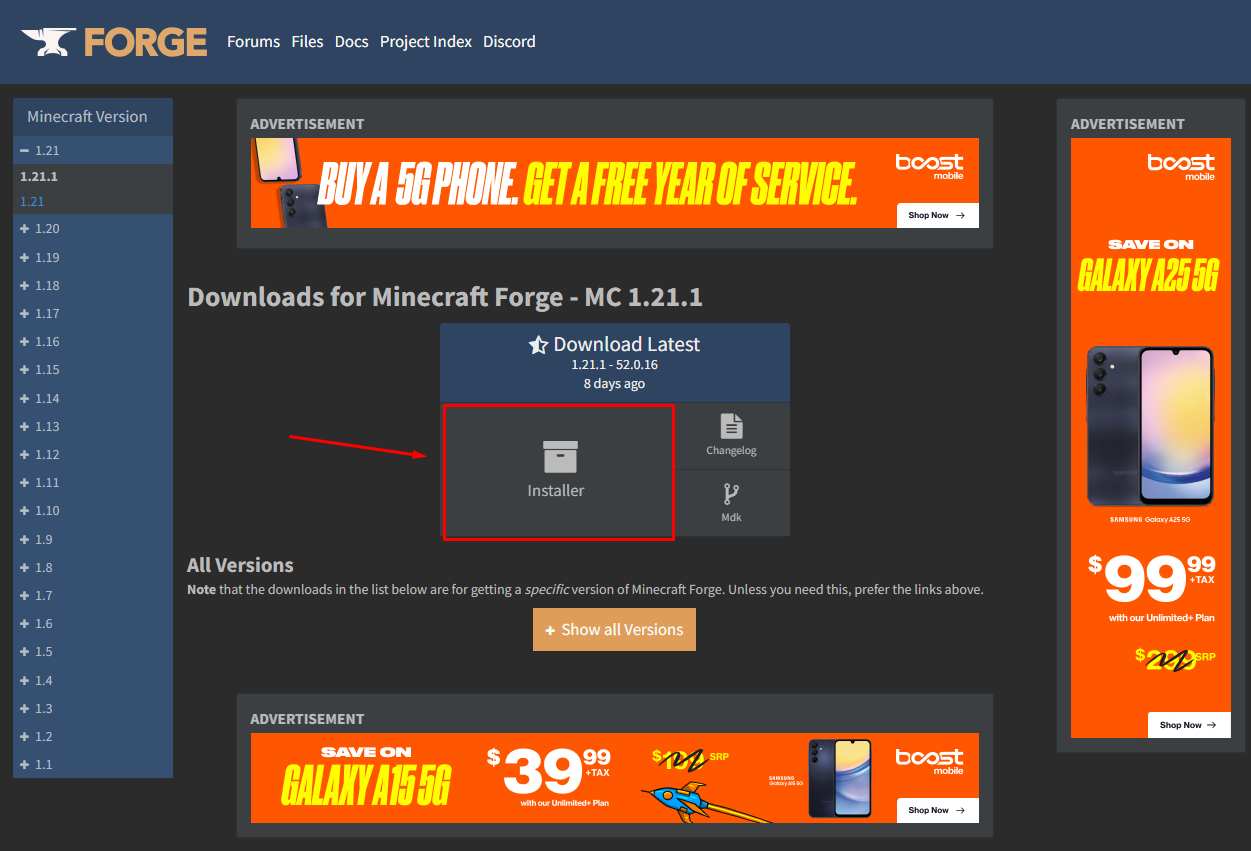
Install the modloader through the Installer button.

4. Save the File Where You’d Like

Save the Jar file wherever you’d like. This is the Forge Installer.

Save the file wherever you'd like.

5. Run the Installer

Run the Forge Installer via the downloaded file. Click Install Client and then click OK.
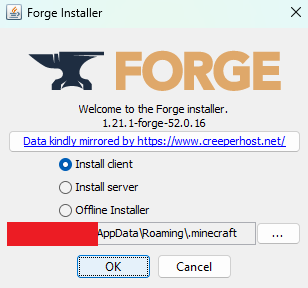
Make sure to select Install Client.

6. Open The Minecraft Launcher

After Forge installs, open the Minecraft Launcher to check if the installation worked properly.

If the installation process worked, Forge will appear as a Minecraft Launcher profile.
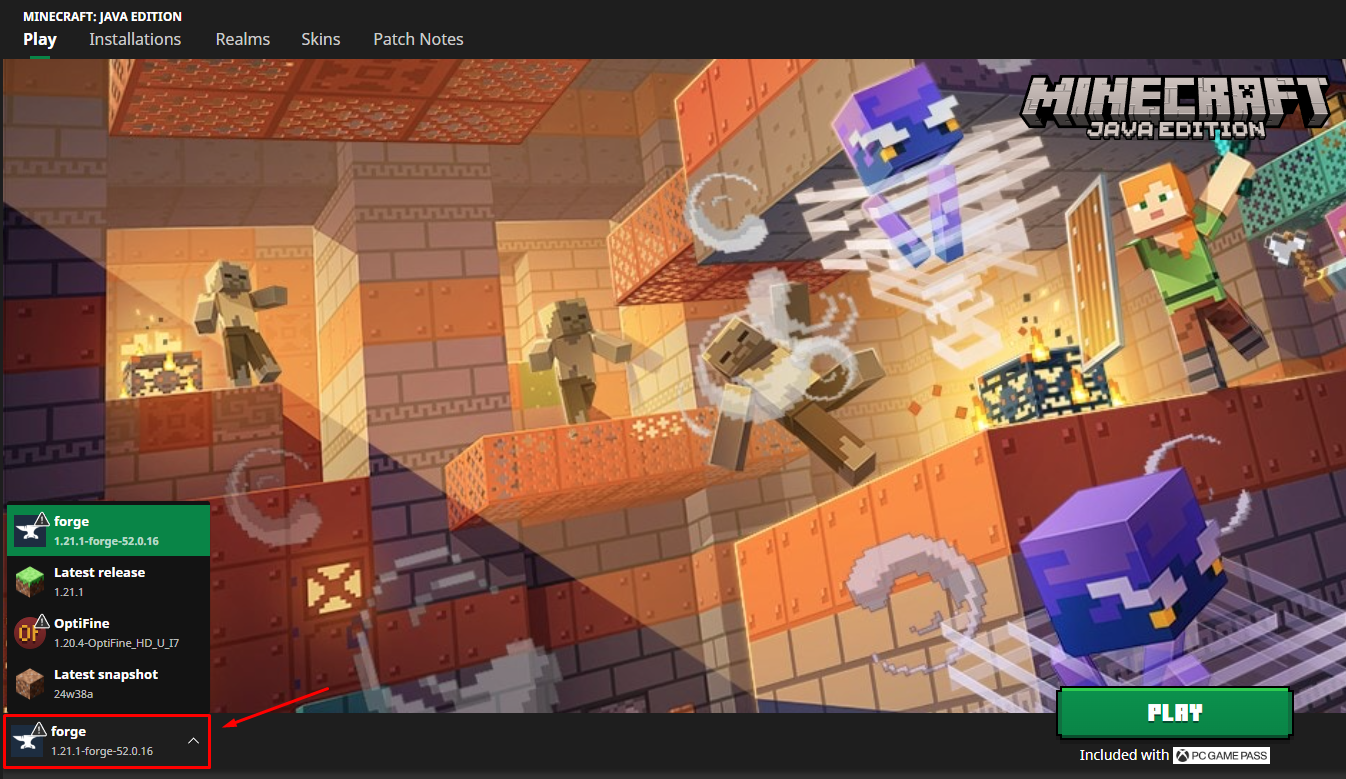
Check the Forge version through the Profile selector.

7. Launch the Forge Profile

Once selected, click Play. Accept the warning window and let the game launch.

8. Click on Mods

Open the Mods section.
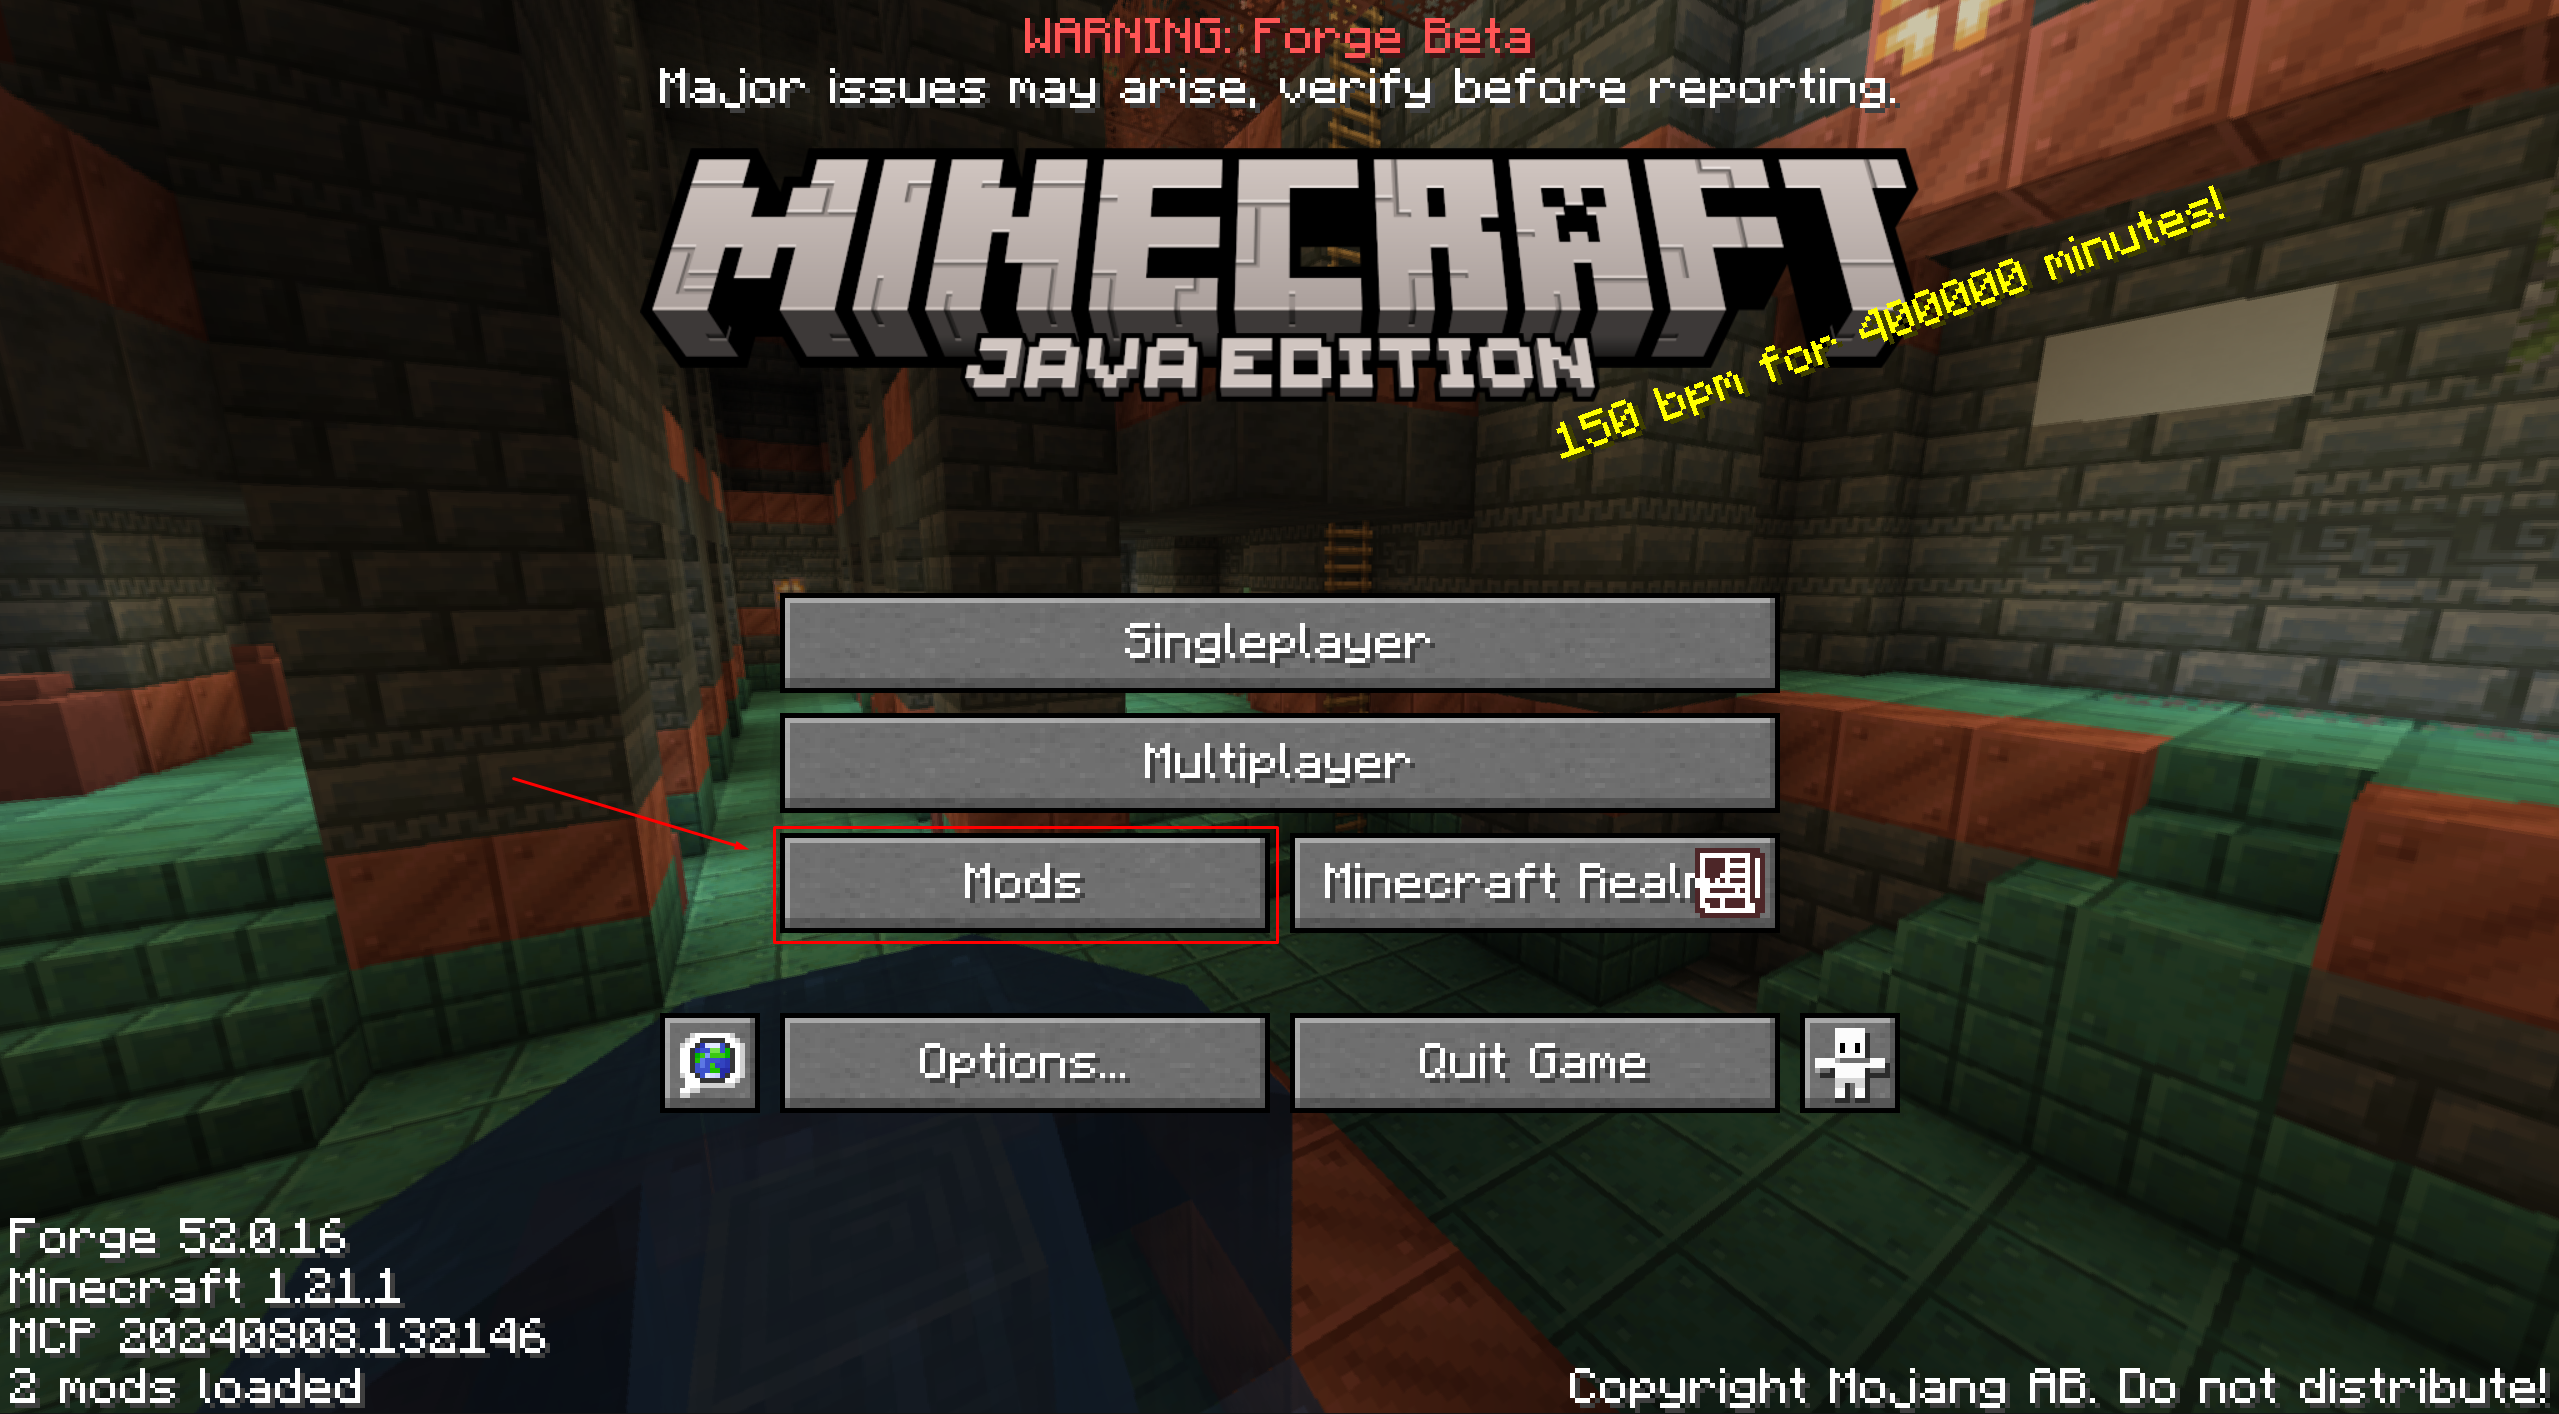
The Mods section allows you to manage which mods you have installed.

9. Open the Mods Folder

From the Mods section, click the Open Mods Folder button.
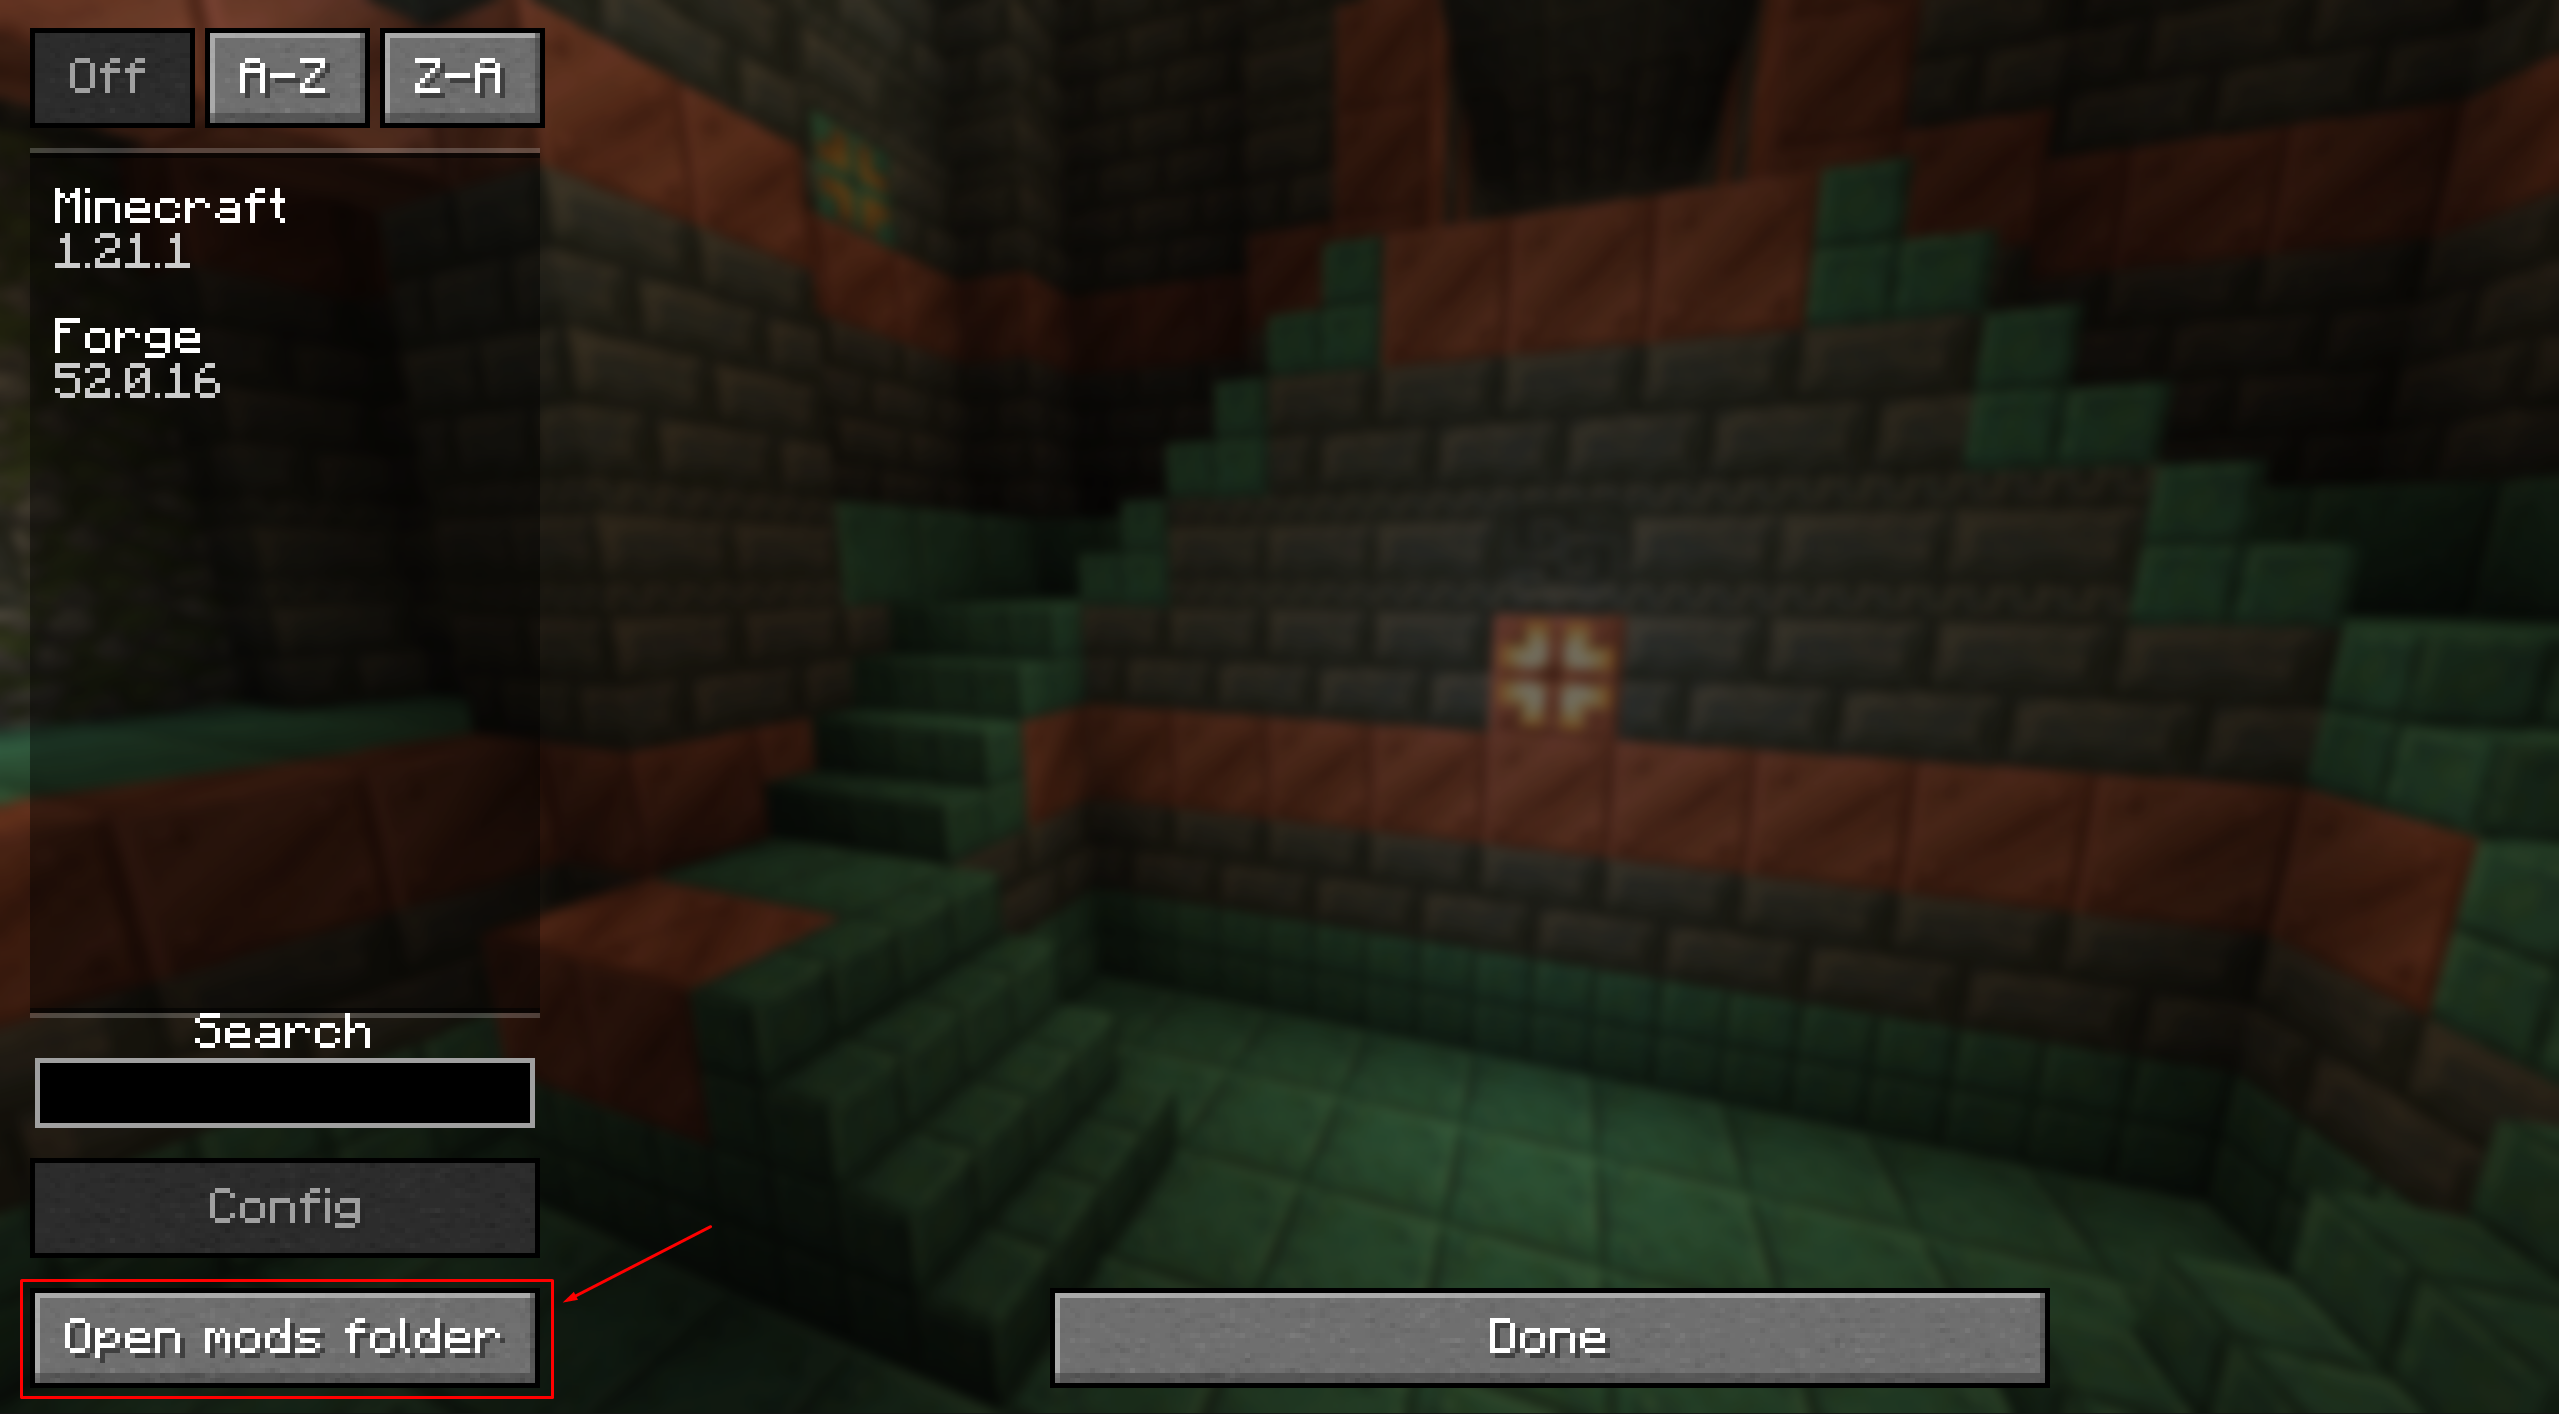
The Mods folder is a place you'll frequent when modding the game.

10. Drag the Optifine Mod to the Mods Folder

Find your Optifine mod installation file and drag it into the Mods Folder.
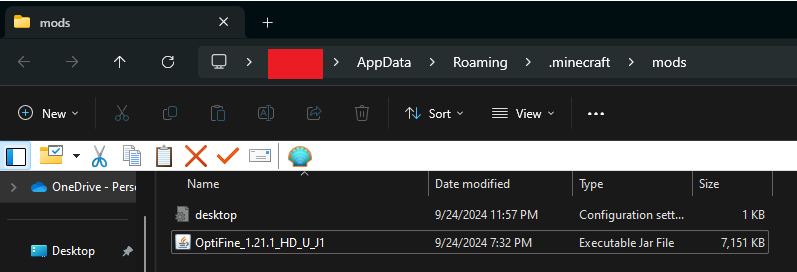
This will install the mod client into your version of Minecraft.

11. Restart Minecraft

Once you’ve dragged Optifine into the Mods Folder, restart Minecraft. Optifine will not appear in the mods list, but your game will provide the advanced options that come with the mod client.

Note: Some mods will not work with Optifine installed. If you’re struggling to make your mods work, try running them without Optifine installed.

Now you can install mods through Forge while also taking advantage of Optifine! Enjoy your increased performance while experimenting with additional game features!

You’re now aware of how to install Optifine! Why not get some friends together and enjoy the performance benefits together?

If you’re looking to play Minecraft online with your friends, NameHero has you covered. Our Minecraft server packages support up to 50 players, support up to seven layers of DDOS protection, and even offer a 72-hour money-back guarantee so you can try them at no risk.

For more information on NameHero servers, check out this page.

Max Moeller

Max is a freelance writer with a love for gaming and technology. He’s always looking for the next big game to play and tinkers with tech in his remaining free time.

Related Posts

How To Fix The getsockopt Minecraft Error: A Quick Guide

Struggling with the getsockopt error in Minecraft? Follow this step-by-step guide to troubleshoot and resolve the issue.

Minecraft 1.21 Mace Enchantments: Breach Enchantment

What does Breach do in Minecraft you may ask? In this article, we will go further in depth on what the Breach enchantment does in Minecraft.

How Long Is a Minecraft Day: A Quick Guide

Discover the length of a Minecraft day and the details of its day/night cycle. Get ready to optimize your gameplay.

Minecraft Preview 1.21.110.20: Everything You Need To Know

Discover the latest features and updates in Minecraft Preview. Stay ahead in your gameplay with our essential guide.

Reader Interactions

Comments

  1. christopher T janney says

    February 15, 2025 at 3:13 pm

    Thank you. Very helpful. One issue I came across is I downloaded the .jar file to a network drive and tried to install from there, getting the angry java message about URI. Moving the .jar file to my local drive and hitting install worked file.

    Reply
    • niobra says

      June 12, 2025 at 3:34 am

      That’s a common issue—Java doesn’t always like running `.jar` files from network locations due to URI restrictions. Moving it to your local drive is the right fix. Glad it worked! For anyone else running into similar problems, you can always download the latest version from the official OptiFine official site.

      Reply
      • Teddy Caruso says

        November 3, 2025 at 3:29 am

        Same issue.

        Reply

Leave a Reply Cancel reply

Your email address will not be published. Required fields are marked *

This site uses Akismet to reduce spam. Learn how your comment data is processed.

Primary Sidebar

Get Started With a Minecraft Server


Looking to create your own gaming server? It only takes a few minutes.

Create Server Learn More

Most Popular Posts

How To Change A Minecraft Skin

How To Find Bastions in Minecraft: The Ultimate Guide

8 Best Minecraft Underground Base Ideas

Minecraft Color Codes: Everything You Need To Know

How To Make A Hardcore Minecraft World (Bedrock Edition): A Complete Guide

The 6 Best Spear Enchantments in Minecraft

Minecraft Ghast Update: A Complete Guide

How To Make A Minecraft Iron Farm

Minecraft Torch Flower: The Complete Guide

How To Make A Water Elevator in Minecraft

Join Our Gaming Discord!

Come hang out or get support!

Top Categories

  • Palworld
  • Minecraft
  • Soulmask
  • Rust
  • Stardew Valley
  • Terraria
  • Hytale
NameHero

NameHero® proudly provides web hosting to over 40,000 customers with 99.9% uptime to over 750,000 websites.

  • Master Card
  • Visa
  • American Express
  • Discover
  • Paypal
Products
  • Web Hosting
  • Managed VPS Hosting
  • Unmanaged VPS Hosting
  • Flex VPS Hosting
  • WordPress Hosting
  • WooCommerce Hosting
  • Reseller Hosting
  • Enterprise Hosting
  • GPU Hosting
  • Email Hosting
  • HeroicGuard
  • Domains
  • Website Builder
  • AI Agent Hosting
Gaming Products
  • Game Hosting
  • Minecraft Hosting
  • Palworld Hosting
  • Rust Hosting
  • Soulmask Hosting
  • Stardew Valley Hosting
  • Terraria Hosting
  • DayZ Hosting
  • Project Zomboid Hosting
  • Hytale Hosting
Help & Support
  • NameHero Blog
  • NameHero Gaming Blog
  • Support
  • Help Center
  • Migrations
  • Affiliates
  • Gaming Affiliates
  • Call 1-855-984-6263
Company
  • About Us
  • Contact Sales
  • Reviews
  • Uptime
  • We're Hiring

Copyright © 2026 Name Hero, LLC. All rights reserved.
NameHero® is a registered trademark.

  • Privacy Policy
  • Terms of Use
  • Acceptable Use Policy
  • Payment Policy
  • DMCA