


It is crucial these days to serve your web traffic through Hypertext Transfer Protocol (HTTPS), the secure version of HTTP which we’re familiar with seeing in our web browsers.
But in order to use this secure protocol to serve our web site data to users we will first require an SSL to be installed on the web site.
A Secure Socket Layer certificate (SSL) is used to encrypt a connection between a user and the website they are visiting. An SSL can also be installed on a systems web, mail, or ftp server and so on to aid in overall server security.
Having this secure connection through HTTPS protocol provides protection to the data being transmitted between the user and the target location.
Installing an SSL on a site starts with creating a CSR (Certificate Signing Request) and Private Key using a tool called OpenSSL.
- What is OpenSSL?
- How to check the OpenSSL version number in Linux
- How to check the OpenSSL version number in Windows
- Updating OpenSSL to its latest version
- How to generate a CSR and Private Key with OpenSSL
- How to create a Self Signed SSL with OpenSSL
- Create a Self Signed Certificate without a CSR using OpenSSL
- Conclusion
What is OpenSSL?
OpenSSL is a command line tool used for securing network communications through encryption by creating an SSL or Secure Socket Layer certificate.
This open source command line tool can be used to generate Certificate Signing Requests (CSRs) and Private Keys for certificate orders as well as creating a Self Signed SSL to secure web servers, email servers and other services.
OpenSSL is typically installed by default on basically every distribution of Linux so there should not be a need to manually install the software on those operating systems.
In this article we’ll be going over how to not only check the OpenSSL version number on your server but also how to generate a Certificate Signing Request (CSR) for creating an SSL to secure your website, web server or email server.
How to check the OpenSSL version number in Linux
In Linux you can check the OpenSSL version number on the command line interface with a simple command.
But first you’ll need to access your Linux system and once logged in, just run the following OpenSSL version command in your terminal:
$ openssl version
After running the above command we will see the version information such as the OpenSSL package version number and date of release:

How to check the OpenSSL version number in Windows
The same command would be used on Windows to check the version information of OpenSSL.
First you will just need to open up the command prompt program then enter in the same as above:
$ openssl version
Updating OpenSSL to its latest version
In regards to updating OpenSSL to the latest version, it is important to note that you should never need to manually upgrade the OpenSSL package to a new version on your Linux system.
The version of the OpenSSL package provided by your system is maintained with patches from the vendor so an update should only ever require a standard “yum update”, “dnf update”, or “apt update”.
If you do install a new version of OpenSSL which is not provided by your system it could result in compatibility issues.
With that being said to maintain compatibility on your system you should use the version provided by your operating systems repositories. Meaning normal system updates/upgrades should also patch your OpenSSL package as well.
How to generate a CSR and Private Key with OpenSSL
If you plan to order an SSL certificate through an issuing vendor such as DigiCert or Global Sign (as example) you will need to provide to them a Certificate Signing Request (CSR) so that the order can be placed.
On the command line interface in Linux we can generate a CSR with a Private Key so an order can be submitted. Within this section we’ll explain how these items can be generated on the command line.
Please note that when creating a CSR you will need to decide the key length desired as well as the algorithm for the key.
1. Gather the needed information for the CSR
Before we generate the CSR and Private Key there will be some information we’ll need to note down first. Below are the items to note as they will need to be entered in during prompts when using the command in Step 2.
The information needed in order to generate a CSR are as follows:
- The domain name or “common name” (use www.example.com to have both www and non www covered for the site)
- City
- State
- Country
- Company Name (Organization Name)
- Company Division or Organizational Unit (i.e Tech, Web, or Marketing)
- Email Address
- Passphrase or “challenge password” (in most cases this can be left blank)
- Optional Company Name (this can be left blank so just hit enter to skip)
2. Generate the CSR and Private Key using your information
In the following example we’ll be creating a CSR and Private Key using the RSA algorithm with a key size of 2048 bits for a domain called example.com.
Keep in mind the needed information from Step 1 as you’ll be prompted to enter it in after executing the following command:
$ openssl req -new -newkey rsa:2048 -nodes -keyout example.com.key -out example.com.csr
Below we see how this command is entered in and then we’re prompted to enter in our information from Step 1:

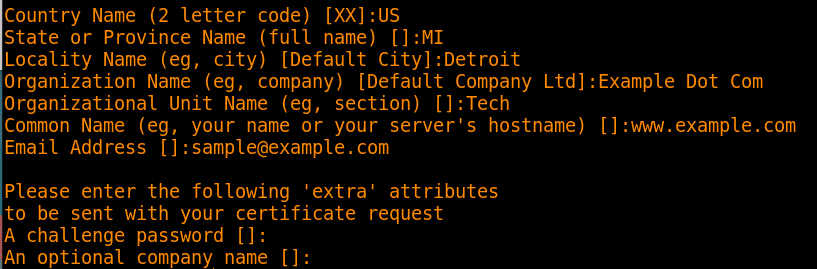
After this has all been entered in, the CSR and Key will be placed into your present working directory:

If you’re planning on purchasing an SSL you would provide the CSR to the issuing vendor while keeping the key safe on your remote server or local system.
After the SSL order has been placed and then verified you can proceed with installation which will require the Private Key.
How to create a Self Signed SSL with OpenSSL
Now if you do not plan to order an SSL through a vendor and only require a Self Signed Certificate to cover services on your server such as the web server, email server and so forth, we’ll go over how to complete the task.
Please note that creating a Self Signed SSL is not suggested for web sites as it will show visitors a warning in browser for the site “not being trusted” due to an unverified SSL being installed.
When an SSL has not been verified through an SSL vendor, such as when creating a Self Signed, this is what will occur.
1. Creating a Private Key with OpenSSL
When proceeding with the following you’ll be prompted to create a passphrase. This passphrase is then used for steps 2 and 3 so be sure to memorize the password/passphrase used in step 1.
First we’re going to create a key with the following command:
$ openssl genrsa -des3 -out example.com.key 2048
2. Creating a CSR with OpenSSL
Now that we’ve created a key we’ll run a command to create a CSR from that key:
$ openssl req -key example.com.key -new -out example.com.csr
3. Creating a Self Signed Certificate with OpenSSL
So now that we have a CSR and Key which allows us to finish things up to create the CRT.
In the below example we’re inputting our CSR and Key to create the CRT and the Self Signed Cert will be valid for 365 days:
$ openssl x509 -signkey example.com.key -in example.com.csr -req -days 365 -out example.com.crt
After completing the above we’re left with the following in our present working directory:

Create a Self Signed Certificate without a CSR using OpenSSL
Alternatively, if you do not need to have a CSR generated and only require the Self Signed Cert and Private Key it can be done by executing the following command:
$ openssl req -x509 -sha512 -nodes -days 365 -newkey rsa:2048 -keyout example.com.key -out example.com.pem
Conclusion
Security is always a top priority and it should start with encrypting the data being transmitted between an end user and a web site. Google as example requires the use of HTTPS for all web sites so if this is not being utilized it will negatively affect your rankings with their search engine.
With that being said it is useful to know the basics of OpenSSL so you’re able to generate CSRs/Certs so that HTTPS can be enforced for your site traffic.
Leave a Reply