
In the backend, Linux systems use a tool called iptables to manage firewall rules. This tool is comprehensive and powerful, but unfortunately, confusing as hell. If we wanted to perform the same operation in iptables that we want to perform in ufw, it’s a lot more complicated, even though ufw is just a wrapper around iptables. Let’s see how to use ufw to open ports.
Using Ufw to Open Port 80
The command to open port 80 in ufw is simple:
sudo ufw allow 80
That’s it! Here’s the output:

But using the tool requires a few things first.
Setting up Ufw
Compared to most Linux tools that often have almost half a century of history behind them, ufw is relatively new (as of today!). It was introduced only in 2008 in the Ubuntu OS, when it was determined that ordinary users needed a simplified way to access and manipulate iptables rules. Indeed, “ufw” itself stands for “Uncomplicated Firewall”. While it accesses and uses iptables under the hood, the user sees none of that complexity.
For reference, if I wanted to perform the same task as before, and open port 80 using iptables, I would have had to do something like this:
sudo iptables -A INPUT -p tcp --dport 80 -j ACCEPT
Compared to ufw, the above code includes the following:
-A: To attach the rule to the “input chain”
-p: To match the tcp protocol
–dport: to match the destination port
-j: to accept the package
All of the above options have their place in the command, but it’s hard not to see that ufw does a much simpler job just with:
sudo ufw allow 80
It’s easier to understand and remember, and it hides all of the underlying complexity. No wonder ufw is so popular! Even if you’re an experienced Linux system administrator, there’s no reason for you to be using iptables directly. And if you’re using Ubuntu, then ufw comes pre-installed.
Installing UFW
As I mentioned above, if you’re using Ubuntu, then ufw should be there automatically on your system. For other OSs, you should check and see if you have it installed using a command like this:
which ufw
If you see something like this:
/usr/sbin/ufw
Then that means ufw is installed. Otherwise, you can install it using your package manager.
Enabling ufw
Even though ufw can be installed on your system, it need not be enabled. You can check to see if ufw is working using the following command:
sudo ufw status
Note, though, that you need to be sudo to run this. Otherwise, you’ll get a message like this:

/usr/sbin/ufwIf ufw isn’t enabled, you’ll get a message like this:
Status: inactive
This means you need to enable it. The command is:
sudo ufw enable
You should get a message warning you that the system might be disrupted, and if you proceed, here’s what you’ll see:
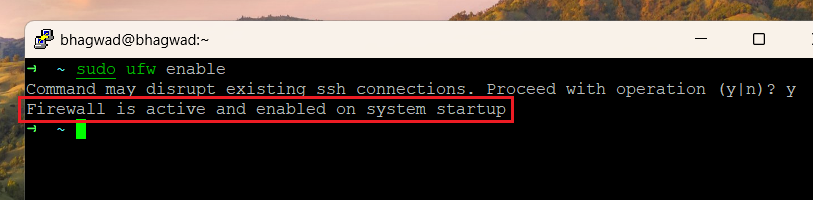
Once it’s enabled, you can check to see the system status like this:
sudo ufw status verbose
The “verbose” argument ensures that ufw makes it clear when there are no rules. Otherwise, you’ll simply get a “Status: active” message. With the verbose argument, here’s what you see when you don’t have any rules set up yet:
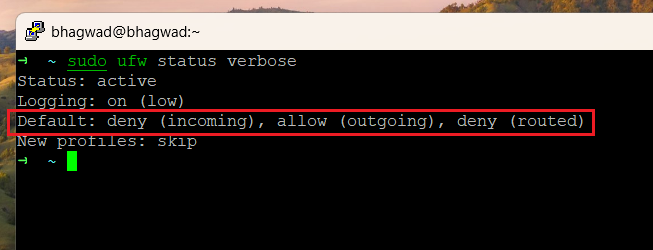
By default, ufw is set up with the rules of denying all incoming connections and allowing all outgoing connections. This is a completely locked-down service to begin with. From here, we can start adding rules such as allowing incoming connections on port 80. After adding port 80 as an allowed port, we can run the status command again and see what happens:

As you can see, now ufw shows us that we’re accepting connections as expected.
How to Check if Port 80 is Open
Sometimes it can be hard to use ufw directly to test whether or not a particular port is open, if there are numerous other ports for databases and other services. Here’s a command that you can use to quickly test whether or not port 80 is open on your server:
sudo ss -tuln | grep :80
This uses the grep tool to search through the list of ports and filter the one that matches your criteria.
Using firewalld Instead of ufw
Another popular firewall tool for abstracting away the complexity of iptables is firewalld – a tool used by other Linux distributions such as CentOS/RHEL. On these systems, if you want to use ufw you need to install it manually. UFW is available as part of the extended package repos that these systems often use. If you want to install ufw on a CentOS server, you can use commands like this:
sudo dnf install epel-release
sudo dnf install ufw
In addition to installation, we’ve already seen how ufw can be installed but not yet active. So, make sure you enable it after installation.
As a quick heads up, for distros like CentOS/RHEL, it’s recommended to stick to firewalld since it’s so tightly integrated into the ecosystem. So, unless you have a specific reason to use ufw, I suggest you stick to firewalld if you must.
Using Application Profiles with ufw
You’ll notice that you have to manually specify the port number – in this case, 80 – in order to open it. Of course, “80” is easy to remember because it’s so common, but there are plenty of applications where you’re not going to remember the exact name of the port you need to open. For such situations, ufw introduces the concept of “Application Profiles”.
What is an Application Profile?
An application profile in ufw, is a mapping of service names to port numbers. Ufw comes with several in-built port numbers, and so you don’t have to remember the specific ports of applications unless you change them from their defaults – not ideal for public-facing applications like a web server, where the access point is standardized.
Some of the default application mappings that come with ufw include Apache and OpenSSH. You can get a list of the applications that ufw comes with by typing the following:
sudo ufw app list
Now, when you want to open the SSH port, you can write:
sudo ufw allow OpenSSH
This way, you don’t have to remember the name of the port. Of course, this is an instance where you might want to change the SSH port as part of hardening your server. The port mappings are stored in the following location:
/etc/ufw/applications.d/
If you change the SSH port, you should create a custom profile in the same location like this:
sudo nano /etc/ufw/applications.d/openssh-server
And input something like this:
[Custom SSH]
title=Custom SSH Port
description=SSH server on a non-standard port
ports=2222/tcp
To change the port from 22 to 2222. Finally, you should update the ufw app list using:
sudo ufw app update
Remember to first enable the new SSH port with:
sudo ufw allow "Custom SSH"
Before you disable the old one. Otherwise, you’ll find yourself locked out of your server!
Conclusion
Ufw is a simple firewall tool for Debian users that abstracts away the complexity of iptables. It’s even simpler to use than firewalld, and you can use application profiles with it to easily manage the ports of various services. But if you’re on CentOS/RHEL, it’s best to stick with firewalld.

I’m a NameHero team member, and an expert on WordPress and web hosting. I’ve been in this industry since 2008. I’ve also developed apps on Android and have written extensive tutorials on managing Linux servers. You can contact me on my website WP-Tweaks.com!
Leave a Reply