
The “jq” command is a built-in tool in Linux that allows us to process JSON files with the same precision and flexibility that a tool like “awk” or “sed” does with text. We’ve seen in earlier tutorials how powerful “awk” can be, and “jq” brings a similar functionality to JSON. JSON is becoming more and more popular these days in a variety of applications. It’s the most flexible data interface standard between disparate applications, making it a powerful currency when systems need to communicate with one another. Even applications that don’t use JSON usually export it when they need to communicate with an external service. So knowing how to use jq is a valuable skill.
Let’s get started.
Basic jq Format
The jq command can have a confusing syntax, so let’s take it step by step. Let’s assume we have a simple JSON file like this, saved in a file called “users.json”.
[
  {
    "name": "Alice",
    "age": 30,
    "city": "Toronto",
    "temp_c": 18.5
  },
  {
    "name": "Bob",
    "age": 25,
    "city": "Vancouver",
    "temp_c": 12.3
  }
]
The above JSON file contains a single array with two objects. These objects contain their own key/value pairs.
Displaying the Entire JSON File
Let’s say you want to display the entire JSON file. You’d use this command:
jq '.' users.json
This gives the following output:

You can see that, by default, the jq command formats its output so you can easily see the various fields and their values. Unlike with the “cat” command, which just shows everything in plain text:

So far, not super impressive. Let’s see what more we can do.
Show Each Element Separately
If you look at the output of the above two screenshots, you’ll see that the entire thing is bound by two square brackets:
[
{…}
{…}
]
This is because in the above example, the JSON file is just one big array containing several objects, and that’s what the output shows. But using the jq command, we can also show each object separately like this:
jq '.[]' users.json
This gives the following output:

Here, the “.[]” syntax has iterated over each object in the larger array and is showing us the values. Note the absence of the opening and closing square brackets at the beginning at the end. The output is just this:
{…}
{…}
Now this might not seem like a big deal, but it’s the foundation for future users of jq. Once we have a method like “.[]” to iterate over the values of a table-like structure, then we can access the data contained in each of those values.
Accessing the Value of Specific Keys in a Series of Objects
Now, let’s say we want to extract the names in the JSON file. We have an array containing two objects, each of which has a “name” field. The command to extract the names is:
jq '.[].name' users.json
This gives us the following output:

Now we see the value of the “.[]” syntax. Because it gave us a series of objects inside the array, we can access the “name” field via “.name” after it. If instead, we had tried to access the names without iterating over the objects inside the array, like this:
jq '.name' users.json
We would get an error:

This is because we’re trying to perform an incompatible operation. There is no “name” key for the single array of objects in the JSON file. That key exists only for the objects inside the array, so we need to list them all first with “.[]” and then use the “.name” expression to get the values of the names.
Filtering Values Based on a Condition
The above two commands allow you to display all the records of the JSON file, even if you’re only looking at a single field, as with the ” jq ‘.[].name’ users.json” command. But the jq command also lets you display only those fields that match specific criteria. For example, let’s say we want to only display those entries in our JSON file where the age of the person is greater than 28. The command to achieve that would be:
jq '.[] | select(.age > 28)' users.json
As shown here:

Here, there’s only one entity with an age greater than 28, so only one record is displayed. The general syntax for the “select” statement is:
select(condition)
Here, “condition” is any statement that evaluates to true or false. The confusing part is that the syntax for these conditions isn’t the standard bash syntax. As we’ve seen in the bash string comparison guide, bash can have strange operators for comparing numbers like “gt”, depending on the context. It also uses “&&”, “||”, and “!” for logical operators.
Jq simply uses standard arithmetical operators like “>” for “greater than”, and its logical operators are “and”, “or”, and “not”. The following are some examples of conditions in jq:
jq '.[] | select(.age > 25 and .city == "Toronto")' users.json
The above statement will check for two conditions simultaneously.
jq '.[] | select(.age < 26 or .city == "Toronto")' users.json
This statement will check to see if either of the two conditions is met
jq '.[] | select(.city != "Toronto")' users.json
This will check to see if a condition doesn’t evaluate to true
Jq also has several string-matching functions that let you quickly evaluate strings. For example:
jq '.[] | select(.name | startswith("A"))' users.json
This will select those records where the name starts with “A”. Other string functions are:
endswith(string)
contains(string)
If-Then-Else Statements
We can extend jq’s functionality even further. By incorporating if-then-else statements, we can choose to display values in a certain way. So far, we’ve always displayed the entire record whenever a condition evaluates to be “true”. But using the if-then-else statement, we can choose to display only a single field. For example:
jq '.[] | if .age > 28 then "Adult: \(.name)" else "Young: \(.name)" end' -r users.json
Here you can see that if the age is greater than 28, then we choose to display only the name of the person with a prefix of “Adult” or “Young”. Here’s the output:

For this, you can see that the if-then-else statement can be used to format the contents of a JSON file and present the results in a human-readable manner. It’s very useful while parsing the contents of a long JSON file to extract the information.
Extracting JSON Elements with map(filter)
Finally, jq allows us to filter records in such a way that the output contains only an array of the remaining elements. This uses the “map” syntax. While kind of similar to ” .[].select(…)”, the “map” command lets you create a new JSON file from an existing one. For example:
jq 'map(select(.age > 28))' users.json
This returns only those records in users.json where the age is greater than 28, but as a JSON file in its own right. Here’s the output:

You can parse this output into a file of your own, and it’ll be a regular JSON file. You can even choose the records you want to include in the new file:
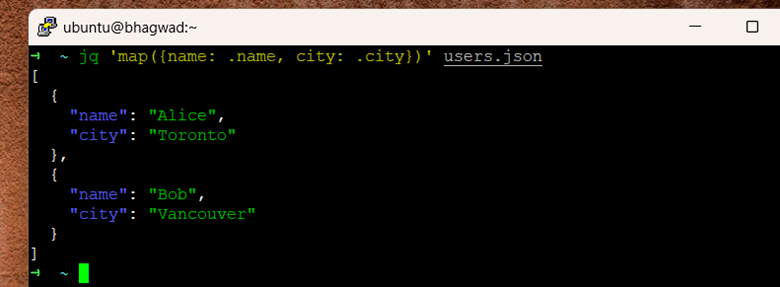
jq 'map({name: .name, city: .city})' users.json
This will extract only the name and city fields of the original JSON, like this:
And we can even combine the two:
jq 'map(select(.age > 28) | {name: .name, city: .city})' users.json
Giving:

This lets you transform JSON files easily using flexible criteria.
Conclusion
JSON files are widely used for standard data interoperability. Using the jq command, we can manipulate JSON so that we extract only those parts of it that are valid for our needs. With complex filtering and conditional criteria, jq is a Swiss army knife for JSON files!

I’m a NameHero team member, and an expert on WordPress and web hosting. I’ve been in this industry since 2008. I’ve also developed apps on Android and have written extensive tutorials on managing Linux servers. You can contact me on my website WP-Tweaks.com!
Leave a Reply