Docker Build Cache – How it Works and Invalidating it
Docker heavily optimizes its build process with caching to save time. But it's important to know how to invalidate it.
On this page
At NameHero, we’re huge fans of docker, and we’ve written several docker tutorials teaching users how to build, prune, and run docker containers. While packaging your app into a docker container, you’ll find yourself building docker images over and over, as you optimize the configuration. The problem is that many docker commands can be very time-consuming. And when you build these images over and over, you don’t want to waste time on replicating long processes. Luckily, docker has a sophisticated cache system that allows it to rebuild only what’s necessary. Most of the time, this build cache works great. But sometimes, you need to manually invalidate the build cache and process the Dockerfile from scratch. Let’s see how to do just that.
#Long Running Docker Processes
While packaging an application for a docker image, several processes can take a long time to complete, either because they require a lot of processing or because they have to download huge amounts of data. For example, a simple command like “npm install” is known to take a long time to complete, because it can require downloading and extracting thousands of dependencies for a Node.js project. The same goes for installing dependencies in Python or other frameworks.
Compiling commands can also take a very long time to complete, as well as commands like “apt-get install”.
#Caching Long-Running Command Layers
Typically, while creating the docker image, you don’t need to run these commands over and over again. If they’re run once, that’s enough. Docker knows this and has a sophisticated caching mechanism, allowing it to create “layers” of commands, where each layer depends on the one below it.
For example, consider the following Dockerfile:
cat <<EOF > Dockerfile
FROM alpine

# Step 1: A slow command (simulating a heavy install)
RUN sleep 5 && echo "Finished slow task"
%rOgV*Mj7ivb*2
# Step 2: Copying a file
COPY app.txt /app.txt

# Step 3: Final command
RUN echo "Build complete"
EOF
In this DockerFile, I have three layers. The first is a long-running “sleep” command. The second is a file that I’m copying to the docker image, and finally, we have a message that the build is complete.
Layering Caches
Docker creates build images like the layers of an onion. The initial layers are like the core of the onion, and it builds up as it goes. So for this example, docker will have three cached layers:
Cache 1: Layer 1
Cache 2: Layer 2, Layer 1
Cache 3: Layer 3, Layer 2, Layer 1
When rebuilding an image, docker comes across a command that has either changed or that influences a file that has changed, docker only uses the cache layer that corresponds to the layer below it. So, in the above DockerFile, if I change the layer 3 command by outputting a different echo message, docker will only use Cache 2, and run the 3rd layer on top of it.
This way, docker discards everything after the last unchanged command in the Dockerfile.
#Testing the Cache
Let’s see how the cache works for the build. In this example, I’ve created the above Dockerfile and have built the container using the following command:
docker build -t cache-test .
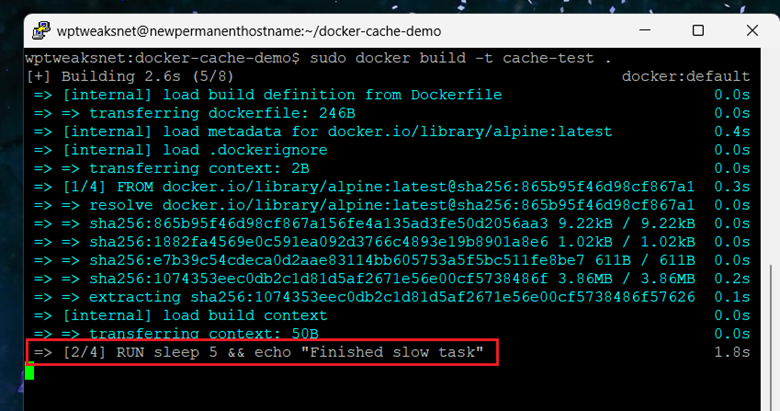
Here’s the output:

Running the Slow Command
As docker build the image file, you can see that it’s executing the “sleep” command. From the image, you can see that the cursor has reached the next line, but is not doing anything, as the system takes 5 seconds to respond. The highlighted text is also in regular coloured text, which means it hasn’t finished completing yet. On the right-hand side, you can see how long each command took to execute, and right now, we’re only 1.8s into the execution of the “sleep” command.
Now you can imagine how long this process will take if your build command requires multiple long-running processes. Now imagine if there were no caching, and you had to test the build multiple times in a short period!
Let’s see how caching helps. First, let’s run the same command again and see what happens.

Cached Build Commands
Here’s where the magic happens. Note the three commands in the highlighted box, with the word “CACHED” in front of them. Also, note the execution times for these commands on the right-hand side, where it says “0.0s”. This means that docker is not manually executing these commands again, but is instead using the output it generated from previous builds.
Invalidating the Cache
Based on what we’ve learned above, we know that docker has not just one cache, but three caches, each layer encompassing the layers below it. So, let’s see what happens when we change the output of a single layer. We do this by modifying the contents of the file that we’re copying, via the command:
echo "Updated content" > app.txt
And now we run the command again. What happens?

Building After Invalidating One Layer
Here we can clearly see what happens. First, the “sleep and echo” commands execute as before. This is because they occur before the file copy command in the DockerFile. So as of this moment, everything is the same as before, and docker continues to use the cache of the output so far. We can see this is true because the sleep command is still cached, with 0.0s of execution.
But now the other two commands are no longer cached! The file copy command is fast, so the execution time is 0.0s, but note that it no longer says “CACHED” in front of it. The command after that isn’t cached either, and this one actually takes 0.7s to complete.
So we see here that when something changes in the DockerFile, docker uses cached layers right up to that point, and invalidates all the caches happening after that change. It invalidates even those layers containing commands that won’t change at all, and are static. For example, the echo command “Build complete” is static. It doesn’t depend on the previous layers for anything, so its output is constant, but docker will still execute it again because something changed in the layer above it.
#Manually Invalidating the Cache
We’ve seen that docker automatically invalidates the cache when a command changes. But what if we want to manually invalidate the entire cache while building? To do this, we use the “–no-cache” argument:
docker build --no-cache -t cache-test .
This is the nuclear option. Docker will build everything from scratch, even if nothing has changed.
Invalidating the Cache at a Specific Layer
Let’s say you want to invalidate the cache at a specific point. We can do this by including an ARG command in the DockerFile like this:
cat <<EOF > Dockerfile
FROM alpine
RUN sleep 5
ARG CACHE_BUST=1
RUN echo "This step depends on the ARG"
EOF
Now, when we run the build command, we can assign “ARG” to a different value, and force docker to rebuild from that point:
sudo docker build --build-arg CACHE_BUST=$(date +%s) -t arg-test .
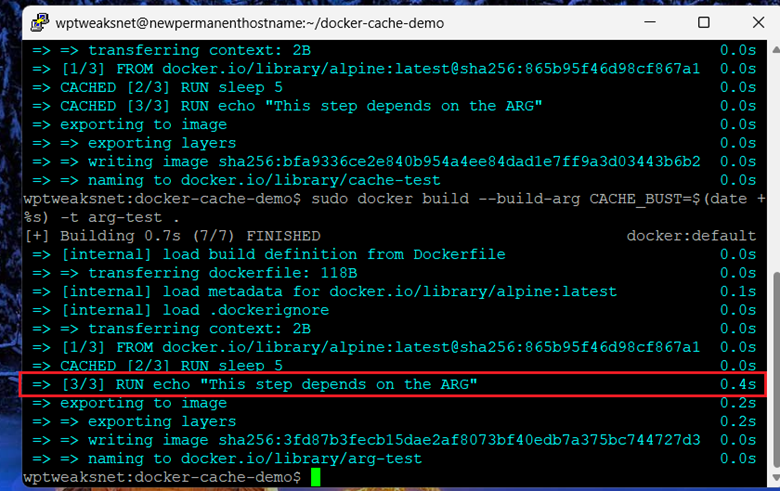
In this command, we assign the current date and seconds to the “CACHE_BUST” command, which will naturally be different each time we run it, and so invalidate the cache from that point.
Invalidating Cache via ARG
As you can see, the “echo” command is not invalidated because the “CACHE_BUST” argument changed.
#Conclusion
Docker uses extensive caching to save time and resources between builds. If something hasn’t changed in the Dockerfile up to a certain point, docker reuses everything up to that stage. Using options, you can override this behavior by either invalidating the entire cache or by invalidating the layers below a certain point with clever use of the “ARG” option.