
At NameHero, we’re big fans of docker, and have multiple docker tutorials to help you get started. However, there can also be too much of a good thing, as it’s very easy to download a docker image and then forget about it after testing it for a while. Because docker images can replicate entire systems and OSs, it’s not unusual to find them running to hundreds of megabytes, or even gigabytes. Even the run-of-the-mill images that have a basic operating system can consume significant space on your server. As a result, it’s sometimes necessary to “prune” these images.
Pruning images in docker refers to the process of examining which images you no longer want on your system and then getting rid of them. Here’s how you do it.
Pruning Docker Images
Before permanently removing images in docker, I like to see which images are currently available. I do this using the command:
docker images
And here’s what I have on my test system:

As you can see, even with just three images, I have several hundred megabytes of images on my system, because of the one serious application – namely, MySQL. In this regard, a docker image acts very much like a separate system package. It’s usually a big application that uses up lots of space. This can include web servers, alternative operating systems, and more.
Now that we have the list of images, we can see which ones we want to remove.
Dangling Images
In docker, the best candidates for the automatic removal of images are called “dangling images”. These are images that are both:
- Not part of any container
- Untagged
To be clear, a stopped container or one that has exited still references the image that it contains. In order for a container to be “not part of any container”, the container itself needs to be removed. But even then, we’re not done. For an image to become a candidate for pruning, it needs to be untagged. And in general, this isn’t something you can do manually without removing the image itself.
The most common way in which an image becomes untagged is when it’s replaced by another image with the same tag, usually in the process of rebuilding the image. So, for example, the following two commands:
docker build -t myimage .
docker build -t myimage .
Will create a dangling image, because the “myimage:latest” tag points to the new one rather than the older image. To remove dangling images, we use the following command:
docker image prune
This will remove all dangling images. It’s also the safest command to use because not only are these images not part of other containers, but they’re also probably outdated.
Removing ALL Unused Images
Unfortunately, the above command is perhaps a bit too safe. There aren’t many images that are both unused as well as untagged. If you want to be a bit more aggressive, then the best command is to prune the images, but remove the tagging requirement. We do this using the following command:
docker image prune -a
The “-a” flag tells docker to not only remove all dangling images, but also to remove all images that are unused by still tagged. Most of the time, when you’re looking to clean up your system by pruning docker images, this is the command you want to use.
It would be nice if we could have a command that automatically showed us all images that are unused by docker containers, but that are still tagged. Unfortunately, such a command doesn’t exist. We can, however, make do by combining the output of a few separate commands and then running them through a loop like this:
used_image_ids=$(docker ps -a --format '{{.Image}}' | xargs docker image inspect --format '{{.Id}}' 2>/dev/null | sort | uniq)

docker images --format '{{.Repository}}:{{.Tag}} {{.ID}}' | while read repo_tag image_id; do
  if ! echo "$used_image_ids" | grep -q "$image_id"; then
    echo "$repo_tag ($image_id)"
  fi
done
The above command gives the following output in my situation:
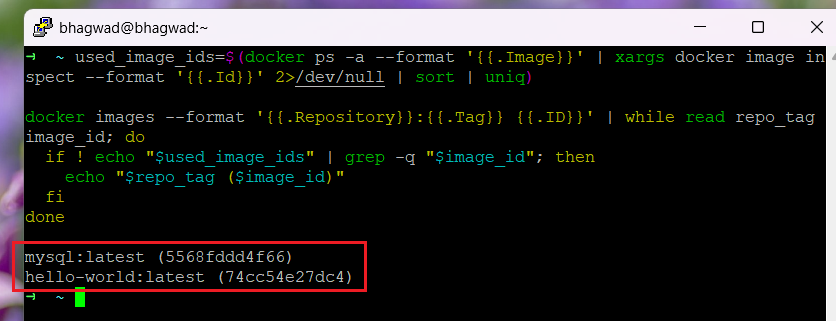
As you can see, it gives me two images that are both unused. Note, though, that both of these are tagged, which means they won’t be pruned using the earlier “docker image prune” command.
But when we run:
docker image prune -a
Here’s what we see:
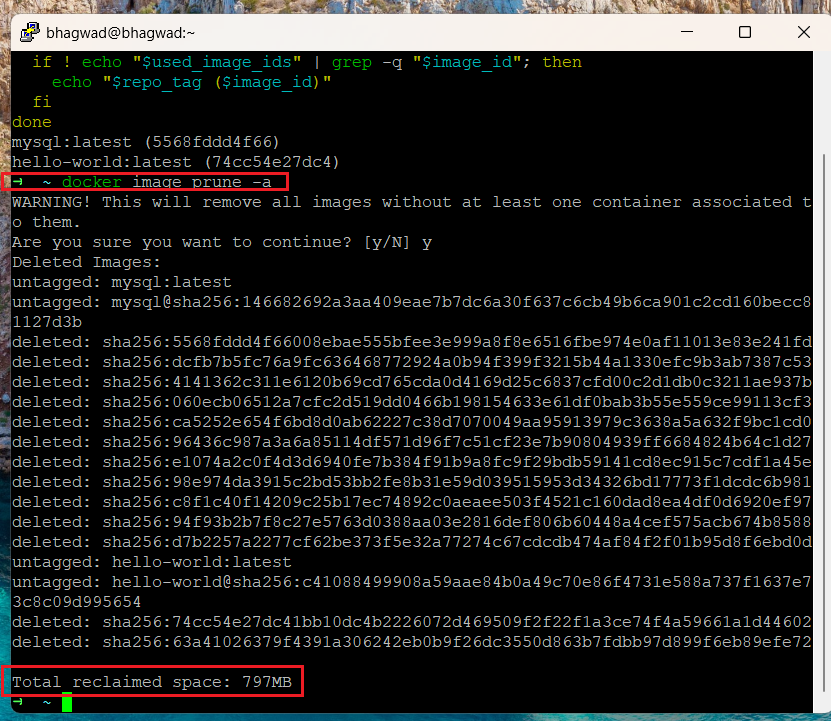
As you can see, docker first gives us a warning that all images not associated with at least one container will be removed. The output shows what’s happening in the background. Docker first untags the images, then deletes them. The total space reclaimed is shown at the end – in this case, almost all of it is due to the deletion of the MySQL image.
If you’ve been using docker for a long time, try the above commands to first see the unused images, and then consider removing them. You might be surprised by how much clutter accumulates.
How Does Docker Accumulate Clutter?
In the absence of an explicit garbage collection mechanism, it’s up to us to constantly monitor what docker uses and discard what we don’t need. To do this effectively, it helps to have an idea of the kinds of activities that result in unused or untagged images. The list below only refers to image-related clutter, but clutter can also accumulate at the container, volume, and network levels.
New Image Builds
When you rebuild an image, the old one doesn’t vanish from the server. Instead, it’s simply “untagged”, and the new one gets the tag of the older one. It’s important to note, however, that containers using the older image will continue to reference the older one. As a result, it’s possible to have a mix of older and newer builds in containers, and it’s easy to forget about the older ones after a while.
For removing these images, you must use the “-a” parameter, because without it, only images that are both unused as well as untagged will be removed.
Stopped Containers
It’s incredibly easy to stop a container and forget about it if you don’t need the service. Maybe you used a certain database container for testing, and then decided you want to use a different database instead. The stopped container will remain in the “exited” state forever unless you do something about it.
It’s important to note that this exited state persists even after a reboot. While the containers won’t restart automatically, the images continue to be referenced by stopped containers, contributing to clutter if they’re not necessary.
Clutter During Testing
Developers working on images and containers, either explicitly or as part of a larger workflow, are constantly instantiating and pulling new images and containers, given how easy it is. This ease of use is a major reason why clutter accumulates. Something is intoxicating about the ease of pulling and starting a new service with minimal configuration.
If done carelessly, though, images can easily build up, and if they’re large applications like databases or web servers, they can eat through your server space very fast.
Conclusion
The ease with which we can build and pull images in docker, contributes to the high clutter rate when we forget to perform basic housecleaning measures. Use the “docker image prune” and “docker image prune -a” commands to regularly sweep out unused or untagged images for a pristine development environment.

I’m a NameHero team member, and an expert on WordPress and web hosting. I’ve been in this industry since 2008. I’ve also developed apps on Android and have written extensive tutorials on managing Linux servers. You can contact me on my website WP-Tweaks.com!
Leave a Reply