
The first time you truly grasp the potential of git, it seems like magic. It seems that this is a structure for projects that goes beyond just coding, but one that can be applied to any evolving set of text-based files, like documents, meeting notes, and more. Those just starting with git tend to be a little too liberal with the “commit” feature. They start to create new commits for every little change – even typos. In their zealousness, the git history becomes messy and no longer reads like a set of important changes in a project. Over a period of time, this interferes with the purpose of git, which is to show a clean project history and overview for those who want to get a bird’s-eye view of its evolution.
And that’s where git rebasing comes in. It’s different from a regular git rebase command, because the interactive mode allows you to change a project’s commit history, move some of them up and down, change the commit messages, and choose which commits to merge into others. In the process, we’ll be using commands like squash and fixup. Let’s see how it works.
Working Example of a Project in Need of Rebasing
To illustrate how git rebase interactive works, I’m going to perform the following steps:
- Create a new git project
- Create a new branch
- Make some commits to the branch, including some frivolous ones
- List the commits
- Use git rebase –interactive to merge the frivolous commits
Initial Project Setup
To create the new git project, I use:
git init
echo "Project Start" > README.md
git add README.md
git commit -m "Initial project setup"
Here’s the completion of the project setup:

Create a Separate Branch
The next step is to create a branch, into which we’ll develop some new feature. We already know how to create a new branch and merge it into the main project. Let’s use the following commands for this:
git checkout -b feature/login-form
echo "<h1>Login Form</h1>" > index.html
git add index.html
git commit -m "WIP: Added basic HTML structure"
echo "<p>Please log in below.</p>" >> index.html
git add index.html
git commit -m "Fix: Added a missing paragraph tag"
echo "<input type='text' placeholder='Username'>" >> index.html
echo "<input type='password' placeholder='Password'>" >> index.html
git add index.html
git commit -m "Feature: Implemented username and password fields"
This will create three commits as shown here:

Now let’s get an overview of all the commits we’ve made:
git log --oneline
This shows us:

What’s Wrong with These Commits?
Looking at the history of our short git project, we note that after the first project creation, we have three commits that are overkill:
- Feature: Implemented username and password fields
- Added a missing paragraph tag
- Added basic HTML structure
In truth, we only need one of these to exist, particularly given the trivial edits we made. We don’t need future reviewers to know that we added a missing paragraph tag to the code, nor that we added the basic HTML structure of just one line. These three commits all serve the most important purpose of implementing username and password fields. If the coder had to write a record of the work they did that day, they’re not going to mention adding an extra paragraph!
Using Git Rebase Interactive to Clean up the Commits
Based on the above, we use the following git rebase command to clean up the last three commits:
git rebase -i HEAD~3
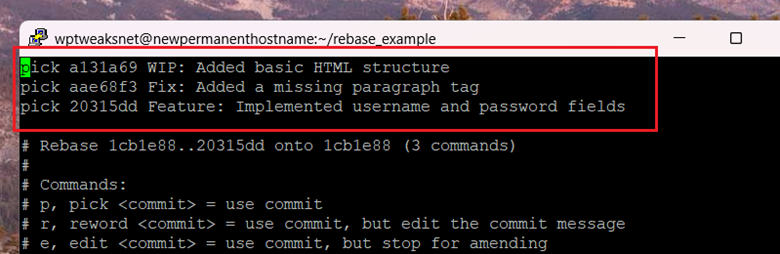
The “-i”, or “–interactive” options tell git to open a text editor, from where we can make the changes to the commits. Using “HEAD~3” means we are telling git that we only want to rebase the last three commits. Here’s what we get:
Alternatively, we can also use a command that lets us rebase all the commits after a specific commit, for which we need that commit’s ID. So for us, that would be:
git rebase -i 1cb1e88
The first three lines refer to the last three commits in chronological order. So we have the oldest commit first, and the newest commit last. For our purposes, we want to merge the last two commits into the first one. For this, we use the “squash” keyword. So we keep the first commit as is, and for the other two, we change the phrase “pick” to “squash” as shown here:
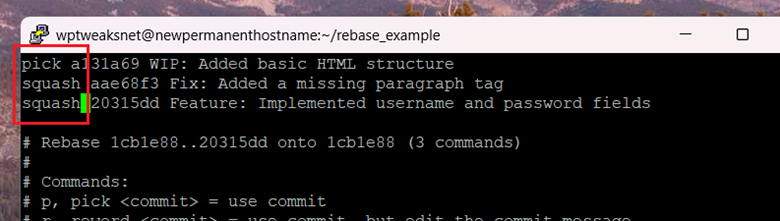
Here, “squash” means you want git to merge that particular commit into the one above it. And if we use them successively as above, it means that they all get squashed into the first “pick” commit directly above them.
Git opens this text in a regular text editor. For me, that’s vi or vim. So save your changes like you would any other text file. Because we’ve squashed these commits, git needs to know what the new commit message is going to be for these squashed commits. So after saving the file, it’ll open a new text editor, allowing you to write the new commit as shown here:

What we want is to simply write the new commit message. Lines starting with a hash (#) will be ignored. So if you want, you can simply delete everything and write the new message, or you can only delete the lines above the instructions. Here’s what I chose to do:

In the above screenshot, I’ve just deleted everything above the instructions and written my final commit message. As before, this is opened in a regular text editor, so just save your changes the regular way, and you’re done!
If everything went smoothly, the command should exit, and you should get a success message like the one shown here:

This gives you the date and time when the commits were merged, and shows you the changes made. Now, when you view the project’s git log, you should see only the two commits like this:

This is much cleaner! Instead of trivial commit messages, the history now shows the important steps of the project, allowing you to get a better overview of its progression.
Don’t try to Rebase Public Shared Git Repos
The right time to use the git rebase -i command is when it’s still on your local machine as a private branch in development. While it’s still local, you can rebase your commits to your heart’s content. A problem arises, however, if you try to modify commits that have already been pushed to a public branch. Other people might have checked out your repo and would have based their work on some of the old commits. If that’s the case, then they’ll get unpredictable results when they try to merge their changes into the public branch because git rebase changes commit hashes.
To avoid this, keep public commits as they are if there’s a chance that others will be working on them.
Conclusion
The git rebase –interactive option lets you change commit history so that the record of the project is cleaner and not snowed under by trivial commits. Inexperienced developers often use git in this manner, and when the project grows beyond a point, the log no longer reflects a neat history of the project’s important moments. Just make sure that you rebase early while the feature is still on your local machine, and you don’t accidentally change commits that are on a public branch.

I’m a NameHero team member, and an expert on WordPress and web hosting. I’ve been in this industry since 2008. I’ve also developed apps on Android and have written extensive tutorials on managing Linux servers. You can contact me on my website WP-Tweaks.com!
Leave a Reply