Git Rebase vs Merge vs Cherry-Pick: When to Use Each
Git has many tools for merging branches and commits. Rebasing, merging, and cherry-picking all have their uses.
Git is a Swiss-Army knife for dealing with large, sprawling projects. When you start using git, the “merge” tool is the most useful for development. As soon as the project goes beyond a certain size, however, you realize that the requirements are a lot more complicated than simply merging a feature branch into the main branch. For example, if the feature branch has been in development for a while, what if the main branch has changed in the meantime? How do you know the feature branch will work with the new changes? What if, while developing the feature branch, you notice a critical bug that needs fixing in the main branch, too? How do you deal with that workflow? For situations like these, git has “merge”, “rebase”, and “cherry-pick”.
Let’s see the differences between them.
#Git Merge – the Classic
Git merge is the easiest to understand, and the first tool you use while getting used to the git workflow. Here’s a tutorial on NameHero on how to use git merge. The concept is simple. You start work on a new feature, for example, by creating another local copy, developing the feature, and merging it back into the main branch when done. Easy.
Here are the defining characteristics of the “git merge” command.
History Preservation
The key thing to remember about the git merge command is that it preserves history. With the merge command, you will see all the previous commits of the main branch, as well as the feature branches. Nothing is lost.
In this example, I’ve created a git project and made some commits. Then I’ve created a new branch and made a commit. Finally, I’ve merged the branch into the main branch. When I run the following command:
git log --oneline --graph
Here’s what I see:
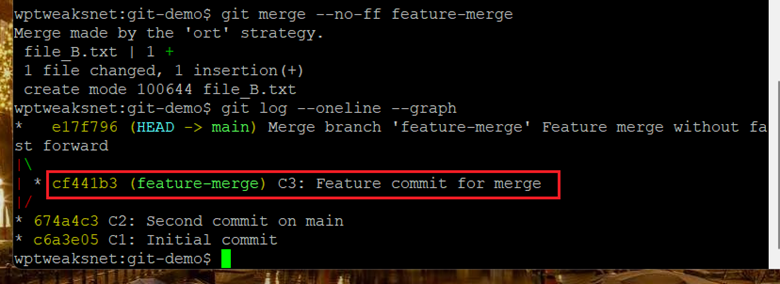
History Preservation with Git Merge
Note the “diamond shape” commit structure. The final commit number “e17f796” has two parents – the commit from “feature-merge” and the one from the commit before the feature branch was created.
In this case, I had to force the merge to create this structure via the “–no-ff” flag, because in my example, since the main branch hadn’t seen any changes since the feature branch, git would simply create a “fast-forward” commit, where it moves the pointer of the branch to the latest commit on the feature branch.
As you can see, the entire commit history is preserved with no changes. Someone viewing this history would get all the details about how the project evolved.
The Problem with Git Merge
The main problem with “git merge” is readability. In the above example, the feature I created and merged was a trivial one. It really didn’t need a separate commit all to itself. If we did want a separate commit, was a feature branch the best way to do it? If, over the course of a long-running project, we see lots of these little “merge bubbles” (as they’re called), does that impact the readability of the history?
The community is divided on the value and usability of these merge bubbles. For some, it’s just clutter and makes the git log hard to read. Others feel they have useful information. It comes down to preference.
But for those who think that you don’t need a full merge for every little commit on every feature branch, there are other tools.
#Git Rebase
The alternative tool you can use instead of “git merge” is “git rebase”. This is another tool, whose usage we had covered in an earlier git rebase NameHero tutorial. In that, I’d talked about squashing together trivial commits in a branch to make the history cleaner. While that’s certainly one use for the rebase command, it has another, more important role.
Making the Branch “Current”
Let’s say you’re developing a new feature by branching off from the main line of development, and you’ve been working on it for a while. At the same time, you might also be working on the main branch of the project. Or if not you, then someone else has, and the project keeps moving ahead as the feature branch develops.
Even if you’re the sole developer on the project, such a situation is extremely common. You might make changes to the main branch, fix bugs, and perform routine development work, while also working on a side branch the whole time. Let’s say the feature is ready. Now what?
Even if you’ve exhaustively tested all the functionality of the feature branch, that was when it had branched out from the old main branch. The current main branch isn’t the same one. So, while it might work on your development machine, how do we test the feature with the current main branch?
The answer is git rebase.
When used for this scenario, the “git rebase” command adds the commits on the main branch that happened after your feature branch was started. It then takes all the commits of the feature branch and adds them after the main branch commits. The result? Your feature branch is now sitting at the end of the actual main branch, not the old one with which you started.
If you’ve checked out the feature branch, then the command:
git rebase main
Will do just that. Here’s a screenshot:
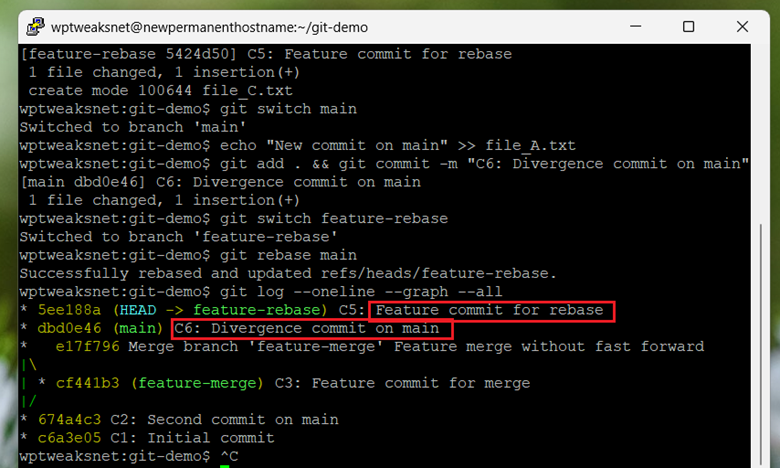
Git Rebase
Here we see that after the “git rebase main” command, the “C5” commit appears after the “C6” commit.
Now your feature branch is fully up to date, and you can test it and be confident that you’re working with the current copy of the project.
#Git Cherry-Pick
Finally, we address another common scenario while developing a feature branch. Let’s say you’re working on a new feature, and in the process of testing it, you find a critical bug that exists not on the feature branch, but on the main one! Let’s say you fix the bug on the feature branch and continue development, but later you want to go back and also fix the bug on the main branch.
What are your options? Do you manually copy and paste the bug fix on main? That sounds inefficient, and it might also introduce other bugs if you don’t copy/paste perfectly. Besides, you might have also deleted some files or changed other things that aren’t easy to replicate. Instead, you use the “git cherry-pick” tool to apply just a single commit.
If you’re on the main branch, a command like:
git cherry-pick <C7-HASH>
This will take only the commit hash of C7 and apply it to the main branch. This ensures that the bug is fixed on main, while you continue your work on the feature branch. If you want, you can also choose to cherry-pick a range of commits like this:
git cherry-pick A..B
Where the commits between A and B are committed (A is not included, but B is). So if your bug fix consists of more than a single commit, you can just commit that specific range, and you’re done!
#Conclusion
As you can see, you’re not restricted to just the “git merge” tool. There are several scenarios where you need something more nuanced, and git can address them all. Software development isn’t a linear process, and you need ways to transfer commits back and forth between the feature and main branches for it to proceed smoothly.