
In an earlier article, I had explained the difference between curl and wget. We saw that, unlike wget, we don’t use curl to download entire websites. Instead, we get a response from the server in our stdout, and we can use that output to process it further. We can also use curl to send data via POST requests. In this article, we’ll look at how to use curl for more sophisticated functions, such as sending extra headers to customize the server’s response, how to use cookies so that you can maintain identity beyond a single request, and an overview of the various authentication methods curl uses.
Sending Extra Headers with Curl
When you use curl to send a request to a server, it sends a few headers by default. These are sent silently, and you can’t see them on a regular request, but we can use the “verbose” flag -v” with our curl command see what’s being sent using:
curl -v https://example.com
And here’s the output:

This is the clipped output from the above command. The “>” signs show us what headers curl is sending. Here are the headers that curl has sent:
GET: This is the protocol curl is using because we’ve just requested a webpage from the server.
Host: This header contains the name of the website from which we’ve requested the webpage
User-Agent: Curl sends this header with the current version of curl. This is important because it tells the target server what kind of tool is being used to connect to it. We’ll see how to change this.
Accept: This is a wildcard header telling the server that we accept whatever it’s willing to give us. Sometimes we only want a specific kind of response, and we can specify that here.
How to Use Curl to Send Custom Headers
We can change the headers that curl sends, or add new ones using the “-H” flag. For example, consider the following command:
curl -v https://example.com \
     -H "User-Agent: Mozilla/5.0 (Windows NT 10.0; Win64; x64) Chrome/120.0.0.0" \
     -H "Accept: application/json" \
     -H "X-My-Custom-Header: LearningCurl"
This is a multi-line command, and I’ve formatted it for easy reading. For each new or changed header, I’m using the “-H” flag
I have three changes:
User-Agent: I’ve changed the default user-agent from the curl version number to one that looks like a traditional Chrome web browser. Some servers might refuse to serve certain user-agents, so we can choose to bypass them like this. Note that since it’s so easy to change this, it’s not a very good security measure on the part of the target server.
Accept: This changed new header tells the server that it only wants to receive JSON output.
And here’s the relevant output:

As you can see, curl has correctly changed two headers and sent a new third one.
Headers are Suggestions
Note that despite sending the above request, I get an HTML response as shown here:

This is because sending a custom header is a request, not a demand. In this case, the server probably doesn’t have a JSON response to send, and the only thing it can respond with is an HTML document. Sending a header for situations like this is more like a “Could you please send me this if possible?” If the server can comply, it probably will.
To test this, let’s send a request to a server that can process JSON. And then we’ll filter the output by “content-type”, which is the response header the server sends with the content:
curl -v https://jsonplaceholder.typicode.com/todos/1 \
     -H "Accept: application/json" \
     -H "User-Agent: Learning-Cognito-Assistant" \
     2>&1 | grep -i "content-type"
And here’s the output:
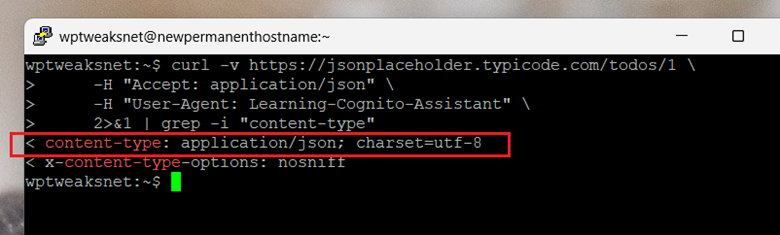
In this case, the server can process our request for a JSON response, so that’s what we see in the “content-type” header it sends back.
Basic Authentication with Curl
In addition to sending GET and POST requests, curl is also capable of authenticating a client with a server. There are many different types of authentication, but the most basic one is with a username and password, like this:
curl -u "myusername:mypassword" https://api.example.com/user/profile
The “-u” flag indicates the following string is a username:password combination
Curl will then send the username and password to the site, and use the “Authorization” header to send an encoded string. You can see the header in the curl request:

This is an encoded string containing the username and password. It’s important to note that this isn’t an encrypted string in the sense that it’s trivially easy to decode. Curl only encodes it for convenience. It’s why you should never use this form of authentication over an insecure HTTP connection.
Using Cookies with Curl
By default, you need to send the username and password for authentication each time curl connects to the server, even when it’s in close succession. Obviously, this is inconvenient, but there’s a greater cost. The server won’t recognize consecutive connections from curl as belonging to the same “session”. This is a problem, because many interactions with a website aren’t stateless. If you add items to a shopping cart, you expect the server to remember that you added them and maintain the items in that cart for the next page load. If the server keeps forgetting that you just connected and treats you as a new person each time, e-commerce sites would be unusable.
We solve this problem via “cookies”. Once a server recognizes you, it sends back a text file called a cookie, and for subsequent requests, your browser or clients sends the cookie file to the server, letting it know that the request belongs to a single session. By default, curl discards any cookies that the server sends back. But we can change this behavior.
We can tell curl to save any cookies it sends using the “-c” command like this:
curl -c cookies.txt -d "user=admin&pass=123" https://example.com/login
The “-c” flag ensures that curl will save the cookies sent by the server in the filename specified. The follow-up flag “-b” ensures that curl will send these cookies to the server in a request so that the server knows that the request belongs to an existing session:
curl -b cookies.txt https://example.com/dashboard
With this, there’s no need to send the username:password for each request, and you can maintain session continuity as well. In fact, you should use both of them at the same time. Like this:
curl -u user:pass -b cookies.txt -c cookies.txt https://example.com/api
This way, for each request, curl will send whatever cookies it has, and then if the server sends back cookies that are different from the ones it already has, curl will merge its copy with the server’s response, and thus maintain a live, interactive session.
Curl also has the means to conduct authentication via other means, such as OAuth and bearer tokens. But those are more complicated to set up and require the target server to offer the services, so that’s a topic for another day.
Conclusion
As you can see, curl is more than just a tool to get a response from a server. With the proper options, it’s a fully interactive tool that lets you send custom headers, as well as send authentication credentials with full reading and writing support for cookies. In its most basic form, curl is a quick and easy-to-understand tool, but with the appropriate flags, it comes closer to being a browser.

I’m a NameHero team member, and an expert on WordPress and web hosting. I’ve been in this industry since 2008. I’ve also developed apps on Android and have written extensive tutorials on managing Linux servers. You can contact me on my website WP-Tweaks.com!
Leave a Reply