
At NameHero, we’ve looked intensively at git, and what an amazing tool it is for all kinds of projects – not necessarily, but primarily for coding. Last week, we saw how to clean up git commit history using rebase, and while we’re on the subject of commits, this is a good time to look at the “git bisect” tool. Git provides this tool as part of its regular toolset, and it’s very useful to catch bugs when you don’t know which commit introduced it.
Bugs Introduced by Older Commits
As projects get large, you can’t test all features before every single release. A release might introduce a hidden bug that’s only visible on close inspection, and it’s possible for several cycles of release to pass by before you realize that a bug even exists. Many features are used only occasionally, and most users will simply ignore a bug unless it’s serious enough to get them to write up a bug report.
The problem arises when trying to find the source of the bug. Not all bugs are easy to isolate, and sometimes it’s very helpful to get an idea of what changed in a project before starting the debugging process. If you’re lucky, it won’t be a major release, and the commit that introduced the bug will be a minor change, allowing you to quickly narrow down the source of the problem.
But how to find which commit? That’s where git rebase comes into play. Git rebase lets you mark commits as either “good” or “bad”, and git will automatically use a binary search algorithm to quickly narrow down the culprit commit.
The Power of a Binary Search
A binary search is a search where each step reduces the number of candidate items by half. For a chronological commit system like git, a binary search looks at the commits halfway between a “good” and a “bad” commit to discard the ones that didn’t have the bug.
The math of a binary search makes it so that you’ll only have to search a list of X items log₂(X) times. This means that if you have a million commits to search, a binary search will require at most 20 comparisons. That’s fast! Of course, regular projects will have far fewer commits between a “good” and “bad” commit, so you should be done even more quickly. Here’s how it works.
Setting up a Buggy Project
First, let’s set up a buggy project. In this, I create a Python file to print numbers from 1 to 5 and then commit it to a git project using this code:
for i in range(1, 6):
    print(i)
Nothing fancy. Here’s the output.

Once I’ve committed the changes, I then deliberately introduce an error into the file by changing “6” to “5”. Now the script will only print 1 to 4:

As before, I add the file to the git and commit it with a message:

Finally, I introduce three more commits after the one that introduced the error. These changes are minor, adding comments, improving the formatting, etc. At the end, the git changelog looks like this with five commits – the initial commit, the one that introduced the error, and the three ones after that:

Let’s say it’s only after the last three commits that we’ve even realized that there was a bug in the first place! In this simple script that only does one thing, it’s unrealistic, of course. But in a large project, such things can easily go unnoticed for a very long time. So now we have to find out where the bug came from.
Identifying the Buggy Commit
So what we have is a project with a bug, and we don’t know which commit introduced the bug. Here’s where we use “git bisect”. We start with typing:
git bisect start

Here we see the output. What git is waiting for us to provide is a “good” commit and a “bad” commit. Once it has those two, it can start eliminating commits chronologically between these two points via a binary search.
Since the project is buggy in its current state, we tell git that, as things stand, we are in a “bad” commit via the command:
git bisect bad
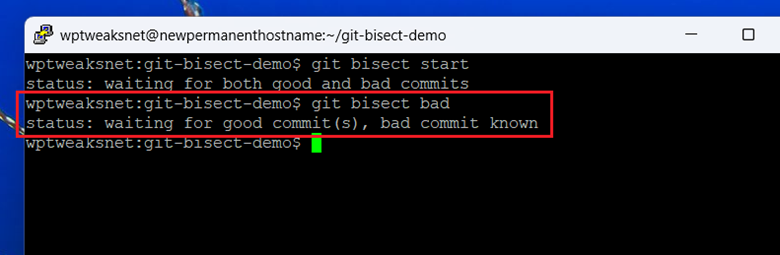
Now git knows that the current commit is “bad”, meaning that the bug was introduced before this commit. The next step is to tell git that an earlier commit was “good”. We do this by using the “git log –oneline” command and getting the hash value of a commit where we know it was working properly. In this example, let’s set that as the very first commit of the project when it was created.

In this screenshot, we see that the hash of the very first commit is “c32f04c”. So we pass this hash value to “git bisect” like this:
git bisect good c32f04c
Now that git has the start point and the end point, it can begin to bisect the commit history and provide us with project versions that fall between them. You can see that it tells us that there’s just one revision to test after this. Of course, we only have five commits, but you can already see how efficient this is turning out to be.
Run the Project to See if the Bug Still Exists
When git creates a midway point, it puts the project in a previous state. We need to tell git whether or not the bug was still occurring at this point. So let’s run it and see if the bug persists.
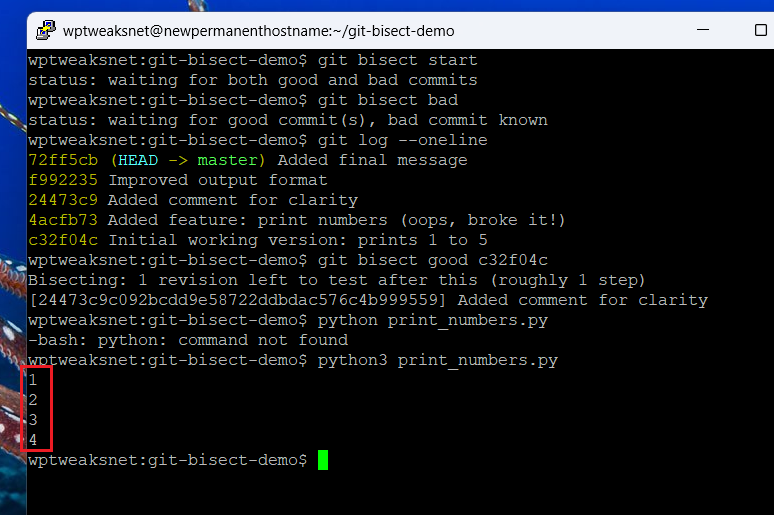
We’ve run the script, and we see that it’s still printing only four numbers instead of five. So the bug still exists in this version. So we mark it as “bad”.

We’ve told git that the middle commit was bad, so now it bisects the remaining commits and provides us with yet another version of the project. Once again, we run the script and tell git that it’s either “good” or “bad”. In this example, it’s still “bad”.
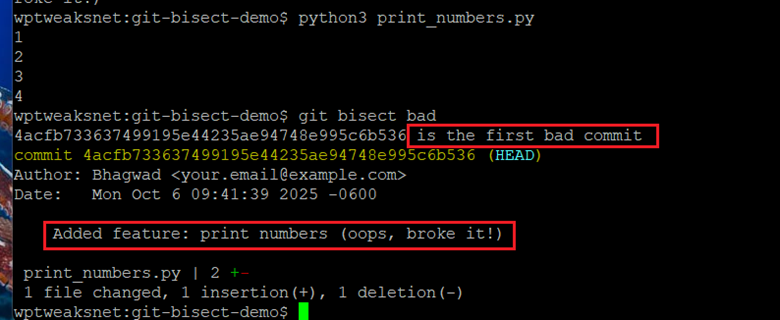
But now git has enough information to tell us which commit was the one that introduced the bug. You can see from the screenshot that it says “xyz is the first bad commit”. And looking at the commit message for our test project, we see that this was indeed the case!
Now that we know which commit caused the error, we should reset our project to how it was before the bisects happened:
git bisect reset
Once we’re back to where we started, and we have the information about which commit caused the problem, we can easily go back and identify which part of the commit caused the issue, since git keeps a detailed record of what changed during each commit.
You can see that using just two bisects, we were able to isolate the first commit that introduced a bug. As mentioned earlier, this is a highly efficient algorithm.
Conclusion
Git bisect is a valuable tool for figuring out which commit in a project’s history introduced a bug, particularly if it’s a bug that’s gone unnoticed or unreported for a long time. In a large project, where you can’t test every little feature between releases, git bisect helps you go back in time and see when an error was first introduced.

I’m a NameHero team member, and an expert on WordPress and web hosting. I’ve been in this industry since 2008. I’ve also developed apps on Android and have written extensive tutorials on managing Linux servers. You can contact me on my website WP-Tweaks.com!
Leave a Reply