


Margin and padding are two properties that adjust the alignment, position, and size of elements. They are important when it comes to customizing your site’s design and layout. Although these properties often get mixed up, there are fundamental differences between them.
In short, the margin refers to the area outside an element whereas the padding controls the space between the element’s border and content. This means you’ll often use margin and padding in different situations. Plus, margins support negative values and automatic settings.
In this post, we’ll take a closer look at the differences between margin and padding. Then, we’ll discuss common use cases before showing you how to add margin and padding in CSS. Let’s get started!
Margin vs Padding Explained
Both margin and padding can be used to de-clutter your web design and establish continuity across your pages. However, they are separate properties with different relationships to page elements.
The margin describes the space surrounding the element while padding is the space between an element’s border and the element’s content. It can be easier to think of the margin as controlling the outside space whereas padding changes the space inside an element.
Margin is essentially used to push other elements away to create whitespace. You’ll usually find automatic settings to adjust the margin and you can enter a negative margin value. This makes it useful for maintaining an equal difference between elements or overlapping items.
While padding also forms gaps, it does this from inside the element. It will either increase the element’s size or shrink the content inside the element. That’s why it’s often used to stop text from getting too close to the border. But it doesn’t support negative values, and it can inherit the styling of other elements (unlike margin).
When to Use Margin vs Padding
Now that you know the difference between margin vs padding, here are some scenarios to help you decide when to apply margins or padding:
- If you want to change the size of an element (like a button), you’d use padding to expand the space around it.
- If you want to change the position of an element, you’d use margin. It’s often used to center an element horizontally or position it to the left or right of a page.
- If you want to increase whitespace on your website, you can use padding to increase space between content and its border box.
- If you want to de-clutter your page design, you can use margins or padding to create additional space.
- If you want to set the distance between adjacent elements (e.g. multiple images on a page), you’d use margin.
- If you want to make sure your web pages adapt seamlessly to different screen sizes, you can use margin and padding (using percentages rather than fixed values).
- If you want to overlap elements with one another, you’d use margin. More specifically, you’d use a negative margin value.
Once you understand when it makes sense to use margin vs padding, you can start learning how to use these properties with your site’s CSS files.
How Does the CSS Box Model Work?
Before we explain how to add the margin and padding properties in CSS, you need to understand the CSS box model. CSS is a programming language that handles all styling information like color.
The CSS box model shows that every HTML element is contained within a layered box that begins with content at its heart:
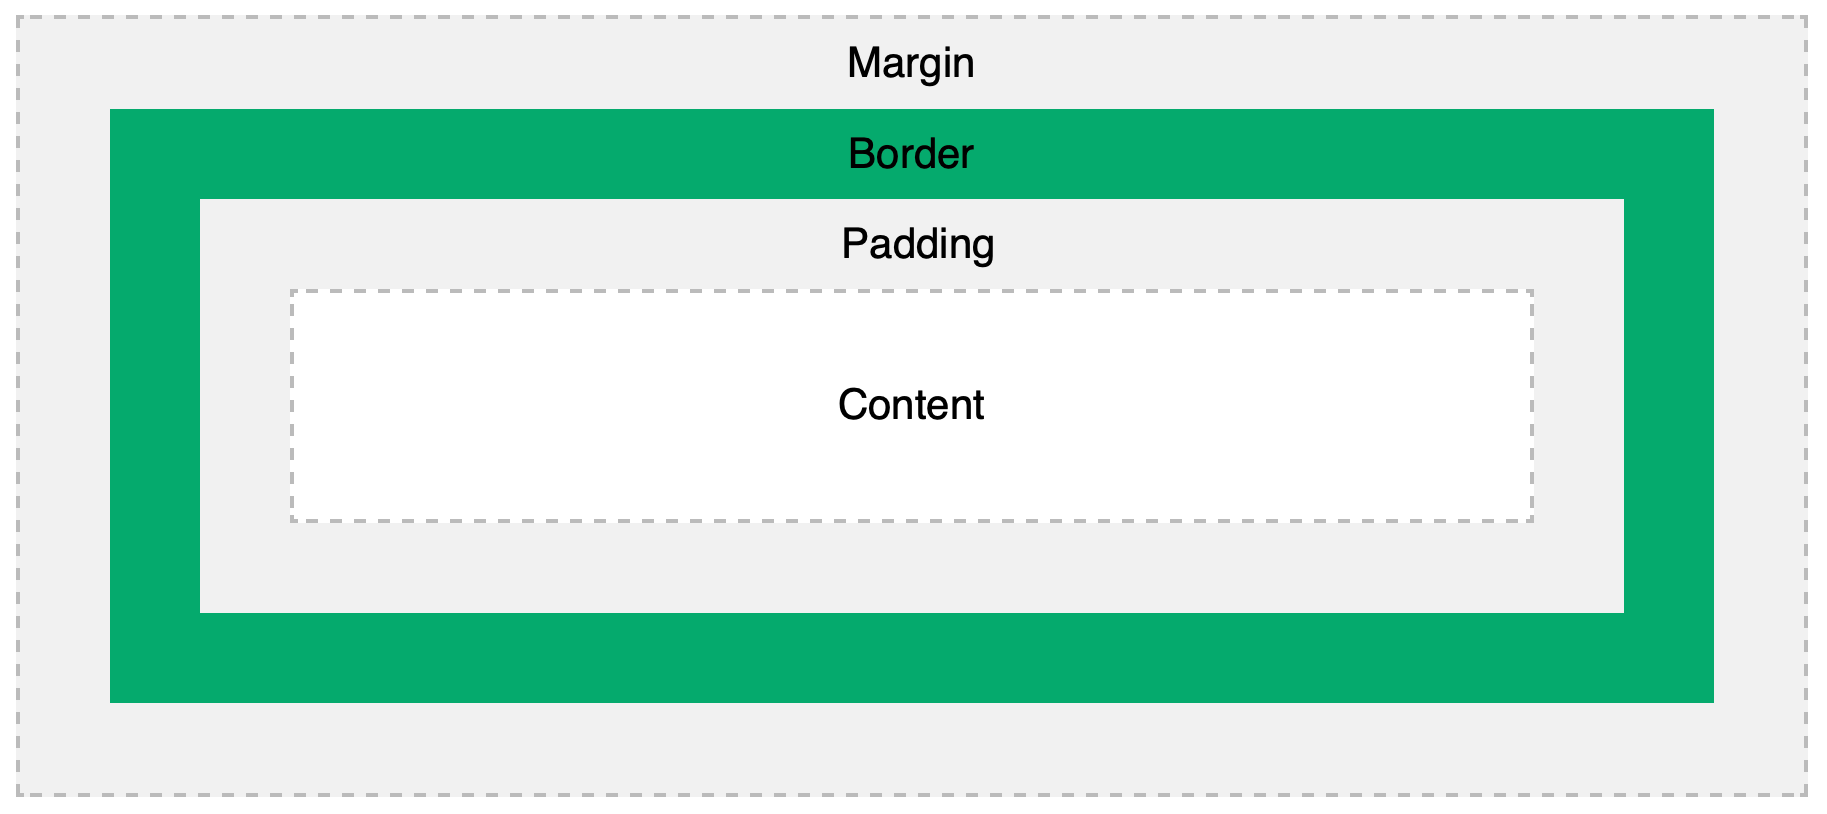
After that, you get the padding, which is wrapped by the border. Lastly, the margin surrounds the whole thing, separating the HTML element from other components.
Having a good grasp of this model can help you make changes to your design and layout without encountering issues. For example, you’ll know how to correctly change the position, size, and alignment of elements on your website.
How to Add Margin in CSS
You can add margin CSS directly to the HTML code of the web page, but it’s better to create a separate CSS file to store this information. This means you don’t have to manually edit each web page that you want to use it on.
To get started, choose the element you want to add margin to (like a heading, button, or similar). Then, you’ll use CSS to set the margin. Note that every HTML element contains four margins that you can format:
- margin-bottom
- margin-top
- margin-right
- margin-left
If you want to set each margin to the same amount on all sides, you don’t need to specify the individual sides. Let’s say you want a section of your website to have a margin of ten pixels all around. In this case, you’d use the following CSS snippet:
{margin: 10px;}
However, you may only wish to format one margin. For example, if you want to create more space between an element and the bottom of the page, you’ll only need to edit the bottom margin. Therefore, you’ll need to specify this with the following CSS code:
{margin-bottom: 10px;}
Additionally, youcan apply more than one margin value to the same element. However, the CSS will be applied at different rates. Currently, CSS loads and displays in the following way:
- One margin value means the same margin will be applied to all sides at once.
- Two values apply to the top and bottom first, and to the right and left second.
- Three values set the top margin first, the right/left sides second, and the bottom margin third.
- Four values apply individually in the following order: top, right, bottom, left.
Using multiple margin values enables you to control exactly how your web layout loads for visitors.
How to Add Padding in CSS
Like margins, you can use the padding property along all four sides of an element. Let’s say you want to set an element’s padding to all sides simultaneously to create more whitespace. In this instance, you’d use the following CSS snippet: {padding: 10px;}
However, you can also define the padding of individual sides of an element, using the following properties:
- padding-bottom
- padding-top
- padding-right
- padding-left
Again, as is the case with margin, you can assign multiple values when defining an element’s padding. The system works exactly as it does for the margin property which we described above. So, if you want to add more than one padding property, visit the previous section to find out how to do this.
How to Add Margin and Padding in WordPress
Typically, your WordPress theme will define the margin and padding for HTML elements. However, if you’re not satisfied with the layout, you can override these settings within the WordPress dashboard.
If you use a block-based theme, you’ll need to open the Full Site Editor by going to Appearance > Editor. Select a template and choose an element on the page. Then, use the Block settings to switch to the Stylestab and scroll down to the Dimensionssection:
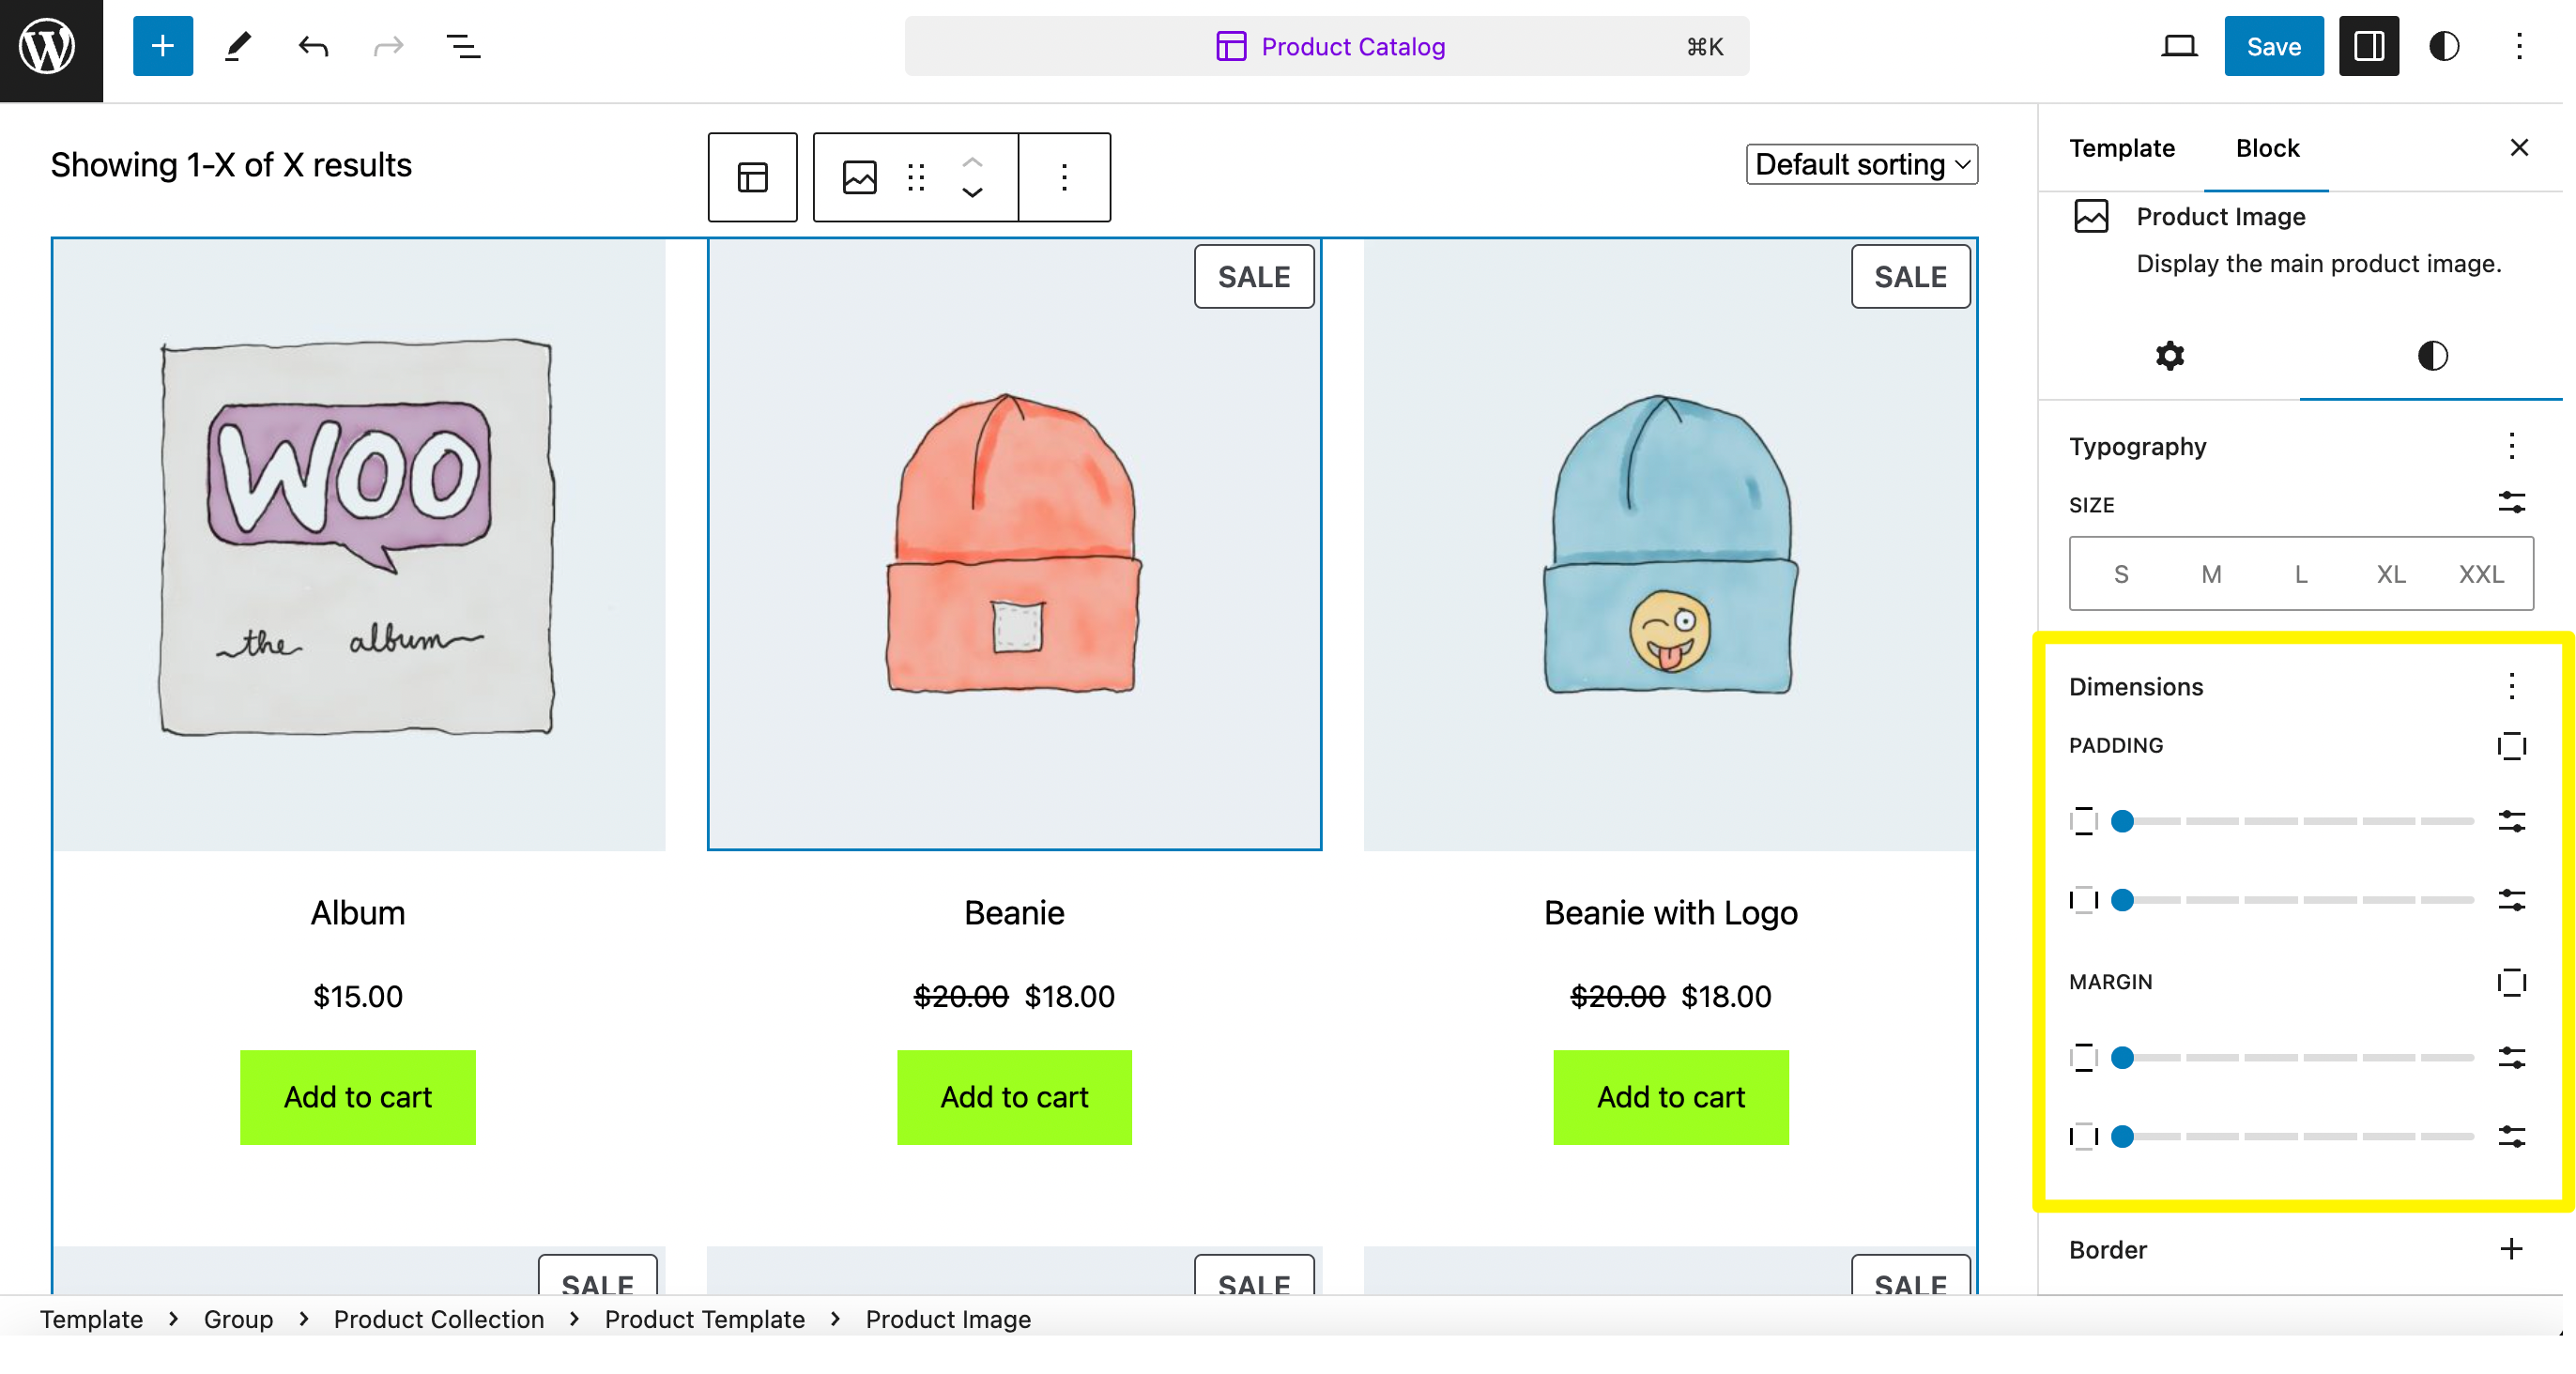
By default, you can adjust the top-bottom and left-right pairs of sides using the Padding and Margin sliders. If you want to format each side individually, click on the Padding Options icon or the Margin Options icon next to each property label.
If you use a classic WordPress theme, you can still change the margin and padding, but you’ll use the WordPress Customizer. To access this, go to Appearance > Customize and select the Additional CSS tab:
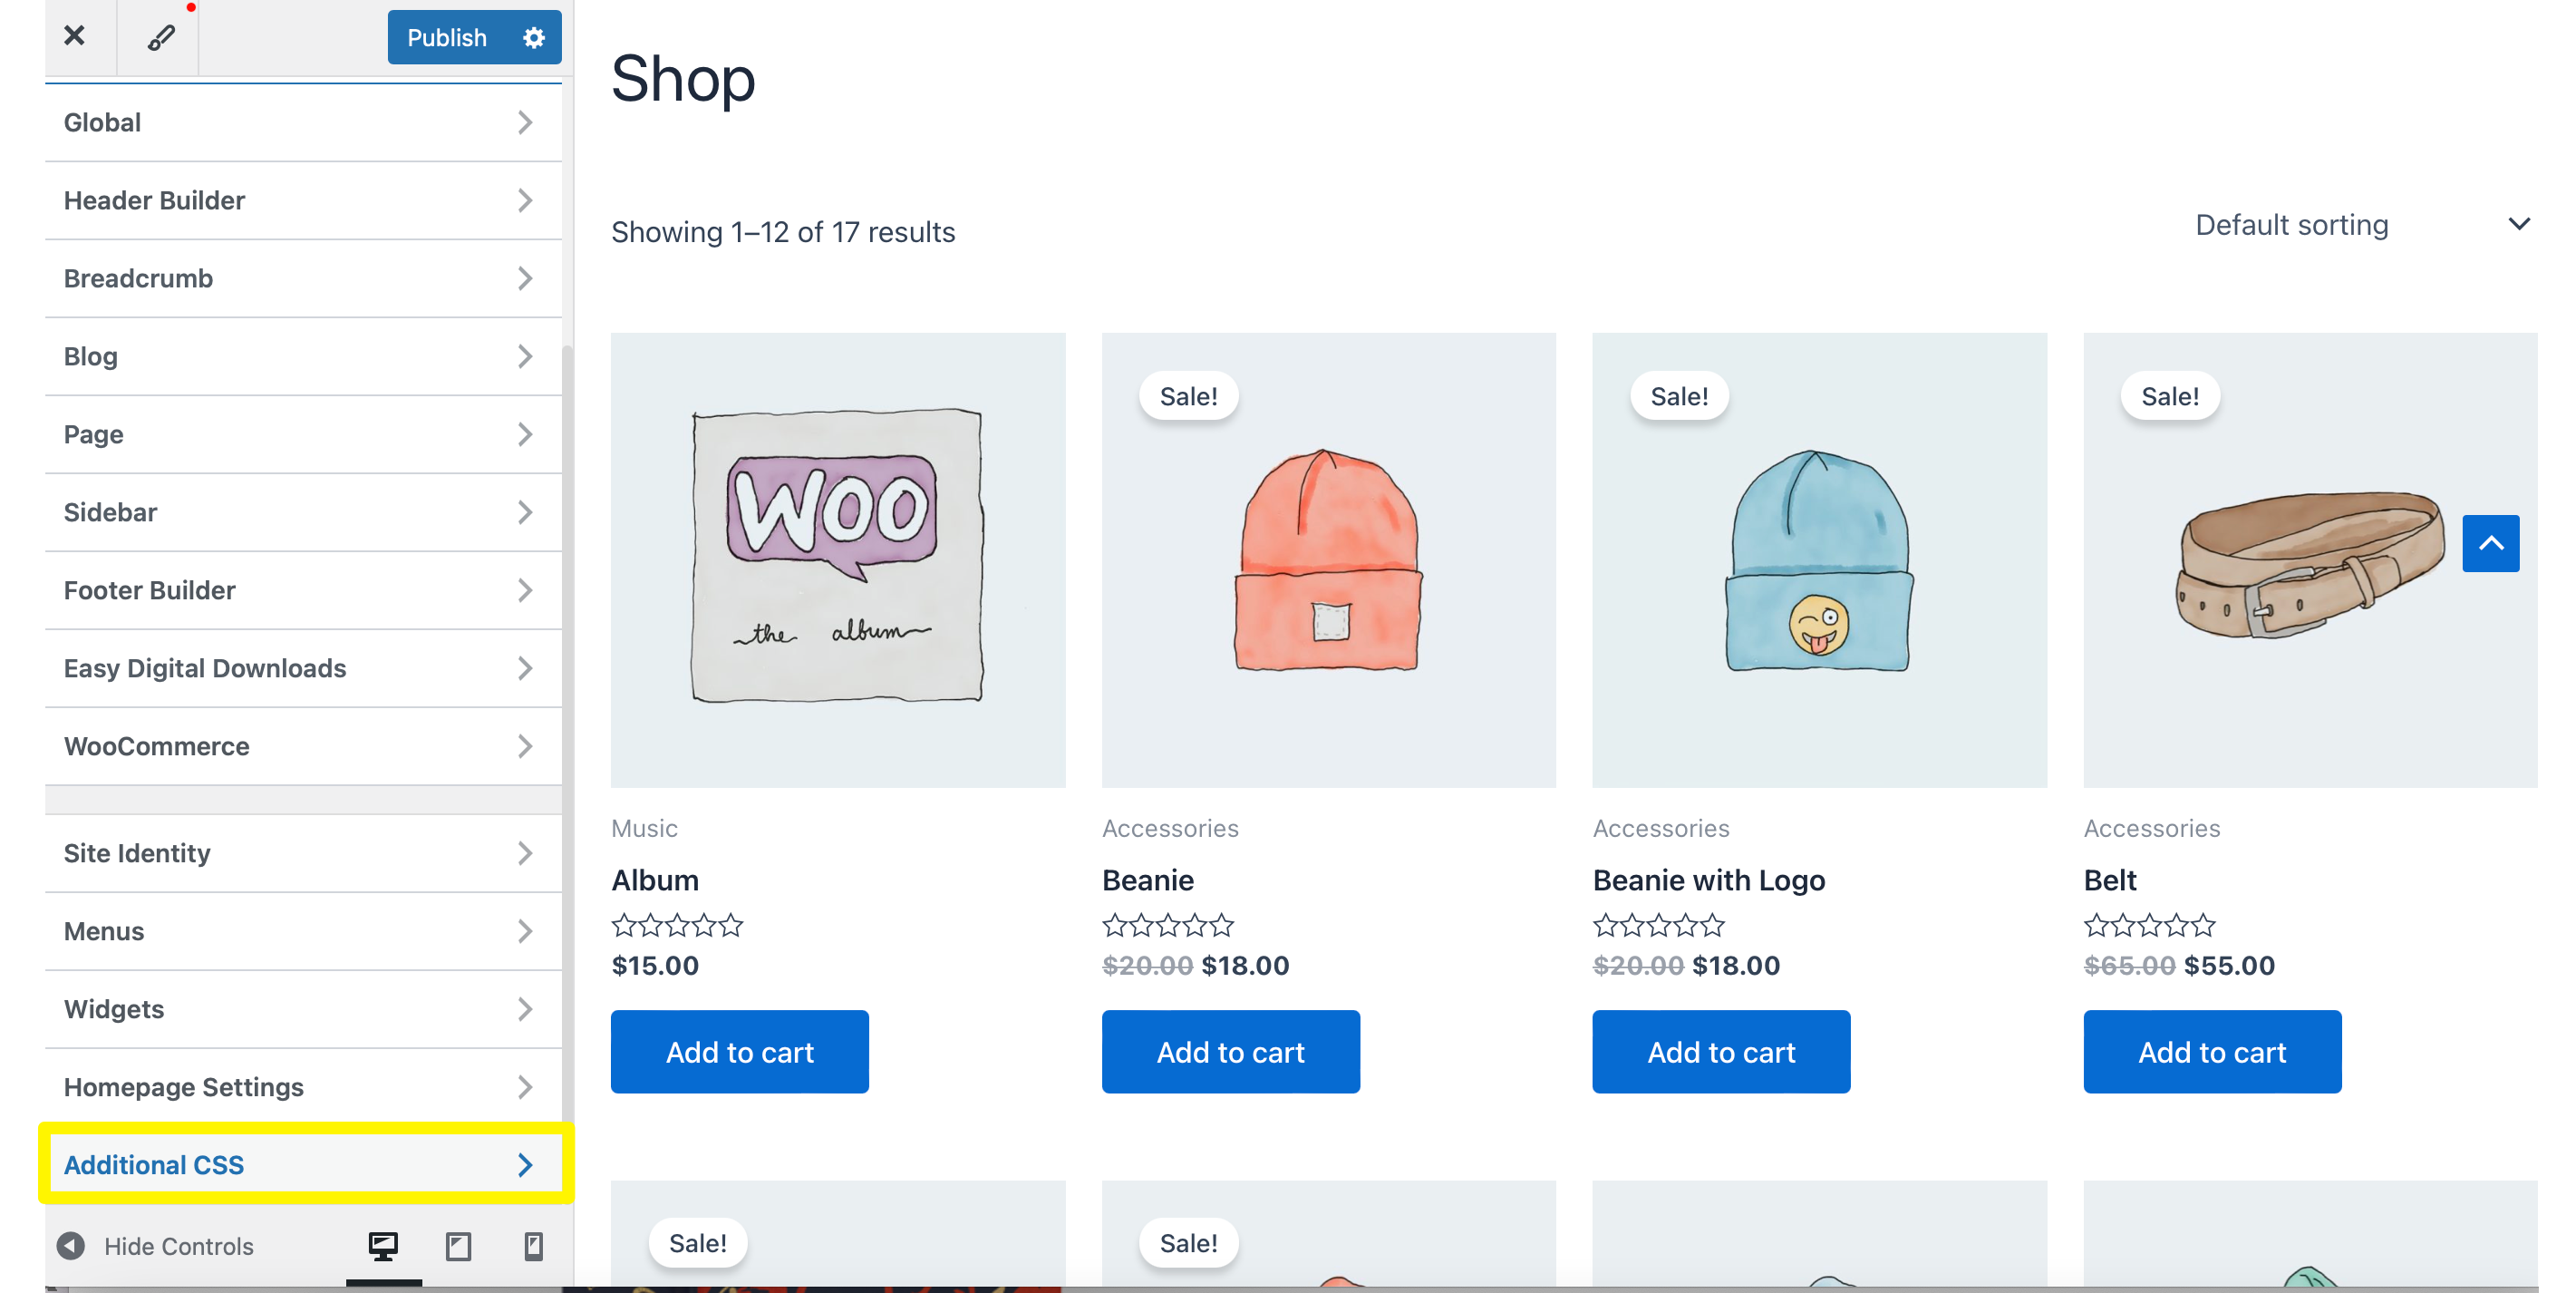
In the text field, you’ll first need to define the name of the element you want to edit (e.g. my-heading or my-paragraph). You can find this information by right-clicking on the element and selecting Inspect Element.
Then, write your CSS code for the WordPress block, contained within curly brackets. It might look something like this:
my-paragraph {padding: 10px;} my-paragraph {margin: 10px;}
Note that not all themes allow CSS editing. In this case, you might need to install a separate plugin or create a child theme to carry out your changes.
Conclusion
You can set padding and margin to determine how much space an element has on your web page. These properties are important for making changes to your web design and layout, but they work in different ways.
Margin concerns the space outside the element while padding refers to the space inside the element (between the content and border). If you want to change the size of an element or increase whitespace, use padding. But margin can change the position, and control the distance between elements.
If you’re new to websites, you’ll need a web host to house key site files. NameHero is a great option since you can get a free domain name, a free SSL certificate, and a whole suite of security features. Check out our plans today!

Sophia is a staff writer at WordCandy.co, where she produces quality blog content for WordPress plugin and theme developers, hosting providers, website development and design agencies, and other online businesses.
Leave a Reply