
In Linux, Tmux stands for “Terminal Multiplexer”, and we use it to run multiple commands from a single SSH session. Using tmux, we can have several windows open at the same time, running different tasks, and borrow some of the useful multi-tasking features from Windows. We’d written an earlier article on the basics of using tmux, but this one will go a bit deeper into the weeds.
There’s also another command-line tool called “screen,” which was very popular, but tmux is now preferred because it has a more modern interface, is easier to use, and is easier to configure, among other things.
Installing tmux
The default availability of tmux varies depending on the distribution of Linux and the preconfigured options. On NameHero, the VPS server comes installed with tmux, but you might not find it automatically on other systems. Here’s how to install tmux on various Linux distros:
- Ubuntu/Debian: sudo apt install tmux
- Fedora/Red Hat: sudo dnf install tmux
Once you’ve installed tmux, here’s how to use it.
Opening Two Windows using tmux
To quickly give you an idea of how to use tmux, I’m going to show you how to display two panes side by side. To start with, let’s create a new tmux session:
tmux new -s demo
This creates a new tmux session called “demo”. The “-s” parameter specifies that you want to create a named session. You can also create a throw-away unnamed instance of tmux using:
tmux
or
tmux new
These commands will create a new tmux session using an auto-generated name. If you’re working with tmux regularly, it’s a good idea to get used to naming your sessions so that you don’t get lost.
Running the above-named tmux creation command will give me this:

As you can see, this opens a new tmux window. Unlike a regular bash terminal, this one is named, as you can see below – we’ve given it the name “demo”, and it also gives the name of the creator as well as the time and date at which it was created.
Splitting a tmux Window
Now we can “split” the above window using the command:
Ctrl+b then %
The above command will create a vertical split in tmux and present you with two panes side by side as shown here:

If you want, you can also split the window horizontally, instead of vertically, using:
ctrl+b then "
To move between these panes, you type:
ctrl+b followed by an arrow key
Ctrl+b is the keyboard shortcut instructing tmux that you’re about to enter a command that affects tmux. Using the navigation keys, you can now run two separate sessions in each pane like this:

In this example, I’ve run the command “top” in the left-hand pane, and am doing my regular work in the right-hand pane. You can see how useful this might be, to have a continuously running command on one side so you can keep an eye on it, while going about your regular work in another pane. This way, you won’t have to constantly interrupt yourself to check the output of a command – you can just glance at the other pane – in this case, you can check and see if any particular process is misbehaving.
Detaching and Re-attaching to a tmux Terminal
While tmux is useful for displaying panes side-by-side, the real power comes from our ability to detach from these panes and reconnect them at a later date. This is super useful when executing long-running commands. Let’s say you have some backup command, and you want to ensure that it remains running even if you disconnect. You can use tmux to survive disconnections and pick up where you left off.
Of course, you can use the nohup command to survive disconnection, but nohup lacks many features that make tmux more useful. We’ll talk about tmux alternatives like nohup and screen below, but now let’s see how we can detach from a tmux session and re-attach.
To disconnect from a tmux session, type:
ctrl+b then d
This will return you to your shell prompt as shown here:
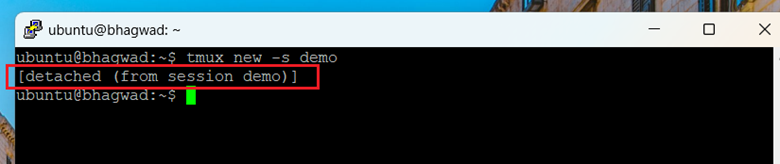
As you can see, it gives you the name of the session from which you detached – in this case, “demo” – and you can continue working on other stuff. In the meantime, the tmux session still exists in the background, and processing is still going on.
Listing all tmux Sessions
You can see the list of existing tmux sessions with the following command:
tmux ls
This gives the following output:

As you can see, tmux gives us the details of which sessions are currently running. The line starts with the name of the session – here “demo” – and tells us how many windows there are in the session, and when it was created.
In the time I took to write this article, I exited my SSH session and resumed it two days later. And when I returned, the tmux session was still going on in the background:

As you can see, today’s date is two days after the tmux session was created, and it’s still going! This shows you that it will continue running until you shut it down.
Re-attaching to a tmux Session
With “tmux ls”, you can get the names of all running tmux sessions. When you want to re-attach to one of them, you use the command:
tmux attach -t demo
And this will bring you back to the tmux session where you left off, like this:

As you can see, it’s the same. The screen hasn’t been cleared, and the “top” command is still running. I’ve included today’s date as the most recent command, so you can see that it’s today.
And that’s the basic usage of tmux. You can see that you can break up your work over multiple sessions, disconnect from SSH (even accidentally), and you won’t lose your work. It’s probably a good idea to always work within a tmux session in case you get disconnected for some reason, and you end up with a mess because of a broken workflow.
How tmux Differs from screen
A popular package similar to tmux is “screen”. Tmux was actually created as a replacement for screen, which was created in 1987, 19 years before tmux came along. Both tmux and screen serve similar purposes, but tmux has many more features than screen, and is easier to use. But since screen has such a history, many admins continue to use it. Here’s why tmux is better than screen, though.
In terms of workflow, tmux has panes, which makes working in side-by-side sessions much easier. With tmux, you can also script the creation of a repeatable dev workflow, so that you can start working ASAP with your preferred setup. Tmux also lets you restore panes and sessions in ways that screen simply can’t.
In short, if you have no experience with either tmux or screen, then I strongly suggest you start with tmux, since you’ll have an easier time working with it, and can take advantage of the easier and more intuitive workflow.
Conclusion
Tmux is a replacement tool for the older “screen” package, which allows you to disconnect from an SSH session and get back to where you left off. Using tmux, you can create side-by-side panes that act like “tabs”, and also separate windows – all of which can be restored after a disconnection.

I’m a NameHero team member, and an expert on WordPress and web hosting. I’ve been in this industry since 2008. I’ve also developed apps on Android and have written extensive tutorials on managing Linux servers. You can contact me on my website WP-Tweaks.com!
Leave a Reply