
Regardless of whether you’re just getting started with Linux or if you’ve been using it for a while, you already know what cron jobs are. At NameHero, we’ve already written a number of tutorials, including on how to list cron jobs and how to create repeating cron tasks. But in addition to creating cron jobs, we often need to track their operations. Cron jobs can sometimes run for years without interruption, and over this time, they can become redundant, outdated, or start using inordinate amounts of resources. Cron job logs are how Linux systems keep track of their operations. Or at least, it’s one of the ways. These days, we have new systems in place that I’ll explain further below.
But cron job logs are still entrenched enough that you should know what they are, how they operate, and how to read them.
Modern Systems Use Journal
A while back, Ubuntu systems started moving over from cron job logs to the more updated journalctl system. These days, Linux systems have overwhelmingly moved over to journalctl, thanks to the widespread adoption of systemd over the more traditional syslog. This didn’t make much of a difference to how cron jobs were created or run, but logging is completely different.
There are still some Debian forks that use cron job logs, so you should know how they work if you’re on one of these. In addition, there are plenty of stand-alone Linux installations that have their own way of working, and if you need to work on one of these, then you should know how cron job logs work.
Testing Cron Job Logs to See if they Work
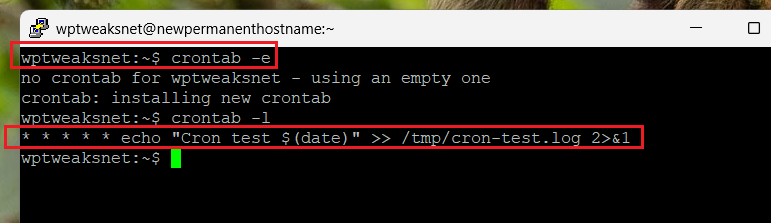
Let’s add a cron job, run it, and see how it shows up in the logs. Run the following command:
crontab -e
The above command opens an editor (-e stands for “edit”), which allows you to add cron jobs for the current user. Once inside, paste the following:
* * * * * echo "Cron test $(date)" >> /tmp/cron-test.log 2>&1
This command will run once every minute. It’ll print the date. Save your changes. To verify that the cron job has been added, use the following:
crontab -l
It should show you the new command like this:
After running it for a while, you can also check to see whether the command is writing to the file as expected:
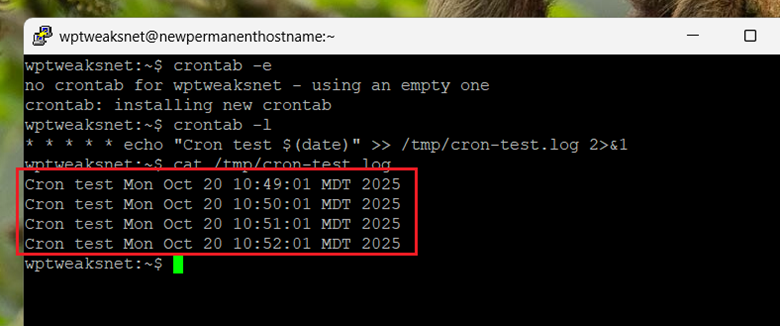
So everything’s working as expected. Of course, in this case, we’re sending the output to a file, so we know when it ran. But what if we didn’t have access to this file, or if the cron job ran silently? Where is the proof that it ran?
With cron job logs, we can verify that previous cron jobs ran by using the following:
sudo grep "wptweaksnet" /var/log/cron.log
Here, /var/log/cron.log contains the list of times the cron job has run. I’m grepping “wptweaksnet” because that’s my username, and I want to narrow the list down to the entries for which I am responsible. Here’s the output:
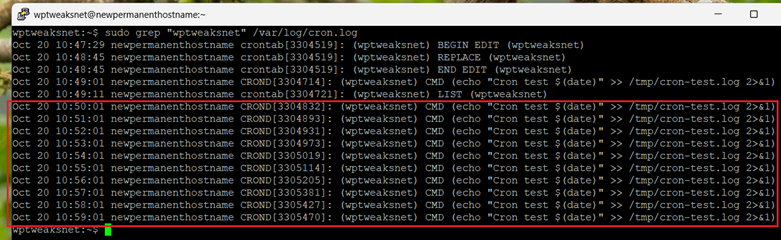
As expected, you can see that the cron job is running. Thus, even if I lose the logging file that I explicitly set, it’s still possible to see which command was run under which user, and at what time. This kind of information is invaluable for troubleshooting and performance monitoring.
The Output of a Cron Job Log
As you can see from the above screenshot, the cron job log has a certain structure.
It starts with the date on which the cron job ran, which is self-explanatory. The second entry is the hostname – in this instance, “newpermanenthostname”, which gives the name of the machine on which the cron job ran.
The next entry is the process name generating the log. In this case, “CROND” is the cron process daemon. It’s in upper-case because the cron job was initiated by me, a user. If it were initiated by a system-driven event, it would have been in lowercase.
After that comes the process ID (PID). You can use this ID to troubleshoot cron jobs where you’re not sure why a job is hanging, so you can trace it back. After that, you have the username – in this case, wptweaksnet.
Action Entry
This is the interesting entry in the cron job log. You can see several action entries in the screenshot:
- CMD
- BEGIN
- REPLACE
- END
The cron job log is more than just a repository for which cron jobs were executed. It also shows us the control actions that the user made. In the above example, when a cron job executes, it runs with the action entry of “CMD”. So most such entries will be “CMD”. However, there’s more.
Whenever you open the crontab to make changes or save your changes, an entry is added to the cron job logs. As expected, “BEGIN” indicates that a cron job entry was started, “REPLACE” means that the file was updated (saved), and “END” means that the crontab editing stopped.
Using these indicators, you can have a complete record of the history of cron actions the user took since logging began. For example, if the cron problems started after a certain date, you can examine the logs for the last updates before that date.
As you can see, the cron job log is a one-stop destination for all things cron-related. With it, you can reconstruct everything the cron system went through since its inception.
Replacing the Cron Job Log with jouralctl
As mentioned earlier, starting in 2015 with the introduction of systemd, cron job logs were replaced by journalctl entries. This was done for several reasons.
Integrated Locations
First, cron job logs can be scattered over multiple locations. For example, /var/log/syslog and /var/log/cron are two different locations for log files. Different systems might have their own cron log files. Log files might be emailed to a separate location. In short, there was no standardized way for a user to see all the cron logs of a system. Instead, journalctl via systemd offers a different solution.
Better Storage and Indexing
Traditional cron job log files are text files that are not easily accessed for consumption. You’ll need to use tools like “grep” and “awk” to get the information you want. Neither are these files automatically indexed, so they’re also slow to access.
But journalctl entries are stored with a lot of indexed metadata, allowing you to devise complex filters to view log files for your user. Size is less of a constraint, and searching is extremely fast and resource-optimized.
Because of the improvements in storage, you can filter journalctl entries over time periods, process ID, process priorities, and a lot more. Cron job logs, on the other hand, rely on text matching, which doesn’t expose all the metadata you might need for advanced troubleshooting.
Log Management
In addition to the centralization, journalctl has advanced options for log management, so you can clear up disk space for all log files with a single, standardized command, using exactly the parameters you want. In contrast, doing this with multiple, scattered cron log files would be a nightmare.
Conclusion
Cron job logs are easy to understand. Once they’re set up, they’re nothing but a set of files that you can easily access and consume. However, if you want advanced filtering and a standardized system, it’s best to rely on the updated journalctl system, powered by systemd.

I’m a NameHero team member, and an expert on WordPress and web hosting. I’ve been in this industry since 2008. I’ve also developed apps on Android and have written extensive tutorials on managing Linux servers. You can contact me on my website WP-Tweaks.com!
Leave a Reply