


A valid Secure Sockets Layer (SSL) certificate is a key component of your site’s security. Without it, your website will be vulnerable to data breaches and fraud. Therefore, it’s vital that you learn how to renew an expired SSL certificate.
Fortunately, the process is easier than you might think. In fact, you can set your certificate to auto-renew so you won’t have to worry about any security issues. Plus, even if your certificate expires, renewing it shouldn’t be a difficult task.
In this post, we’ll take a closer look at SSL certificates and how they work. Then, we’ll discuss the importance of configuring this digital certificate to auto-renew. Finally, we’ll show you how to renew an expired SSL certificate. Let’s dive right in!
An Introduction to SSL Certificates (And How They Work)
Secure Sockets Layer (SSL) is an encryption security protocol. It adds a layer of security between your site’s server and the user’s web browser.
When SSL is enabled on a website, any data exchanged between the server and the browser is encrypted. This prevents malicious actors from stealing sensitive information like credit card details and passwords.
Websites with SSL certificates are served through the HTTPS protocol, which is the secure version of HTTP. Additionally, they’ll have a padlock next to the domain. This shows users that the website is secure:

SSL certificates are issued by Certificate Authorities (CA). These are organizations that validate the ownership details of web servers and assign them a cryptographic code. Each website owner is issued a unique digital certificate.
Many reputable web hosts like NameHero include a free SSL certificate in their plans, which you can access from your hosting account. This way, you won’t have to purchase and manage it separately.
Why You Need to Auto Renew Your SSL Certificates
Typically, SSL certificates need to be renewed every year. If they’re not renewed, your website will no longer be secured and anyone who tries to access it will see a warning:
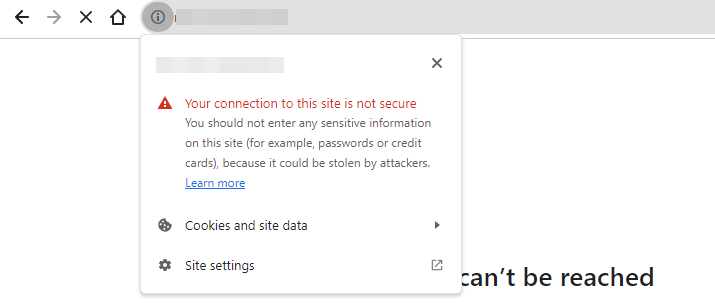
This ominous message can drive visitors away. If you have an online shop or ecommerce site, this can result in lost conversions and fewer sales.
Plus, search engines like Google mark any sites with an expired SSL certificate as insecure. This can have a negative impact on your search engine rankings, and you could potentially experience a significant drop in web traffic.
As a website owner, you likely have several things to take care of. For example, you’ll need to renew your hosting plan, domain name, and any premium subscriptions for plugins and themes. Therefore, it’s easy to overlook an expired SSL certificate.
The easiest way to avoid any SSL certificate errors is to set it to auto-renew. If you used a CA like Let’s Encrypt to get this digital certificate, you’ll likely be able to enable auto-renewal from your account:
If the SSL certificate was included in your hosting plan, your web host will likely renew it for you automatically. You might even be able to configure this option from your account.
While SSL auto-renewals are standard practice in the hosting industry, not every service provider offers it. Therefore, learning how to renew an expired SSL certificate can come in handy.
To avoid any security issues, you’ll want to renew your certificate at least a week before it’s due to expire. This can also enable you to resolve any unexpected SSL problems before the expiration date.
How to Renew an Expired SSL Certificate (In 3 Steps)
If you purchased your SSL certificate from a CA, you’ll likely receive an email when it’s time to renew it. This will contain instructions on how to renew your expired certificate through your account.
If your SSL certificate is included in your hosting plan and the web host doesn’t offer automatic renewals, you’ll need to renew it yourself from your service account.
Don’t worry – we’ll show you what to do when your SSL certificate expires.
Step 1: Log Into cPanel and Generate a New CSR
First, you’ll need to log into your hosting account and launch the control panel. This is a dashboard that lets you access various aspects of your website, including the SSL certificate.
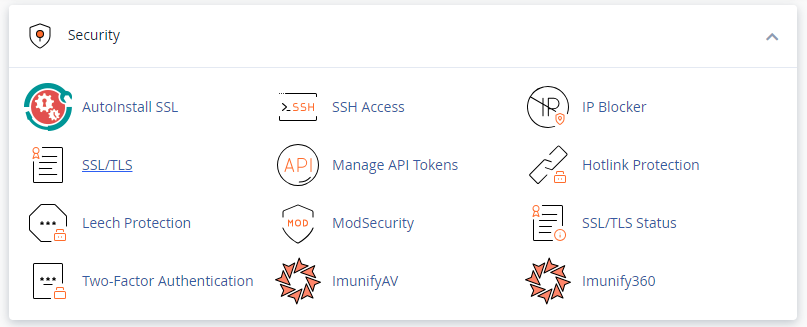
The most common control panel software (by far) is cPanel, so we’ll use it for our tutorial. Inside cPanel, navigate to the Security section and click on SSL/TLS:
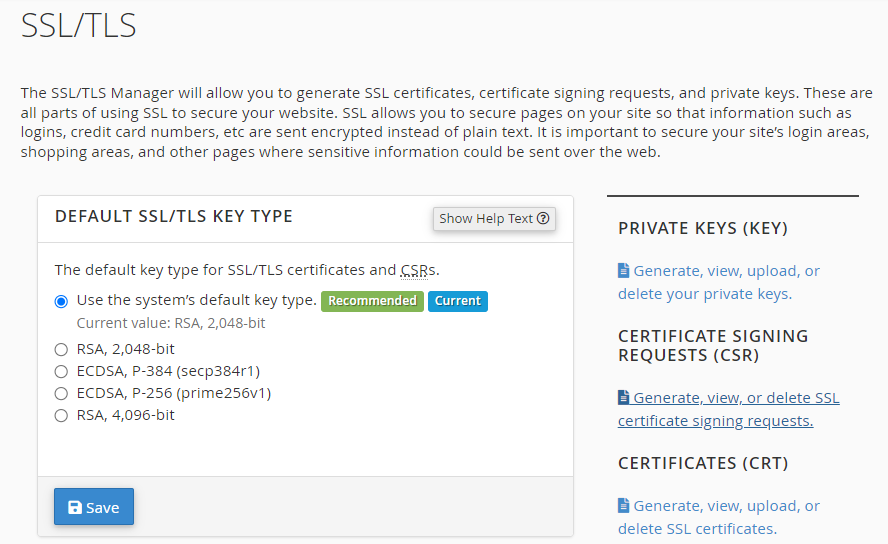
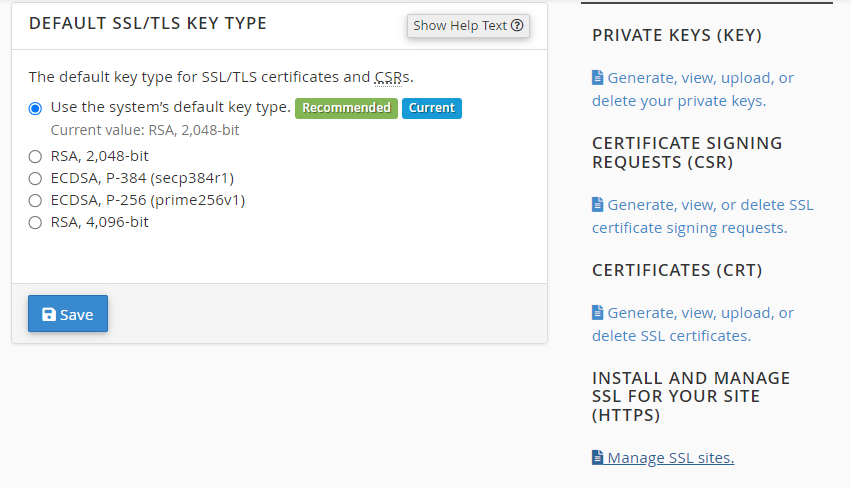
On the next page, you’ll need to generate a Certificate Signing Request (CSR). Look for the link that reads Generate, view, or delete SSL certificate signing requests and click on it:
Next, you’ll see a form for generating a new CSR. Here, you’ll need to enter the domain that has the expired SSL certificate, as well as your personal details.
Once you’ve done that, your host will give you a CSR code. You’ll then need to copy this code, as you’ll need it to renew your certificate.
Step 2: Activate and Validate Your SSL Certificate
In your hosting account, you’ll find a list of all the products in your plan. These will include things like SSL certificates and domain names.
If there’s an expired SSL certificate, you should see an option to activate it. By selecting it, you can start the renewal process.
All you need to do is enter the CSR code you generated in the previous step, and confirm that the renewal information (including the domain name) is correct.
Then, you can enter your email address to confirm ownership of the SSL certificate. This needs to be the email that’s associated with your domain (e.g. [email protected]).
After that, you should receive a validation email with a link to download your new certificate files. Go ahead and save the .crt file to your device.
Step 3: Install Your New SSL Certificate
Finally, you’ll be uploading the contents of the .crt file you’ve just downloaded to your site’s server. To do this, you’ll need to return to cPanel and go to the SSL/TLS section (as shown in step 1).
Here, look for the option labeled Manage SSL sites and give it a click:
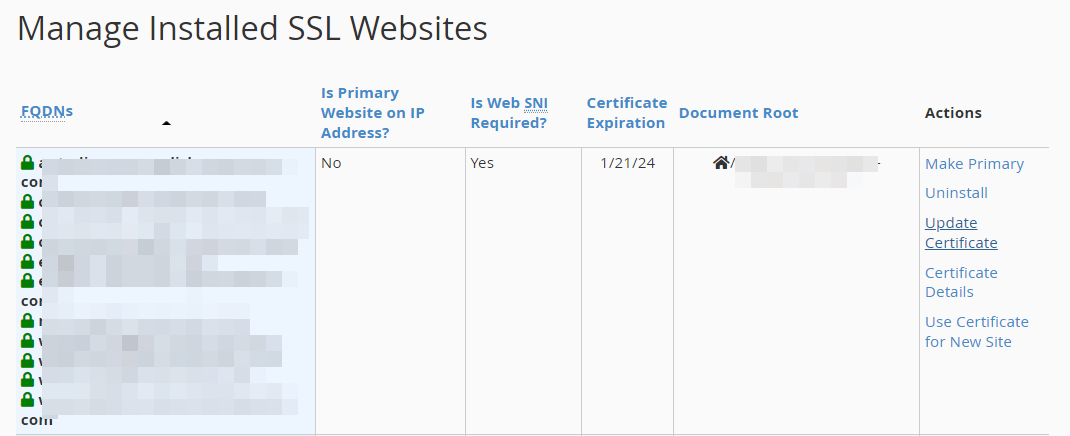
On the next page, you’ll see a list of all your domains. In the Actions column, you’ll find an option to update the certificate:
Click on the Update Certificate link and you’ll be directed to a form:
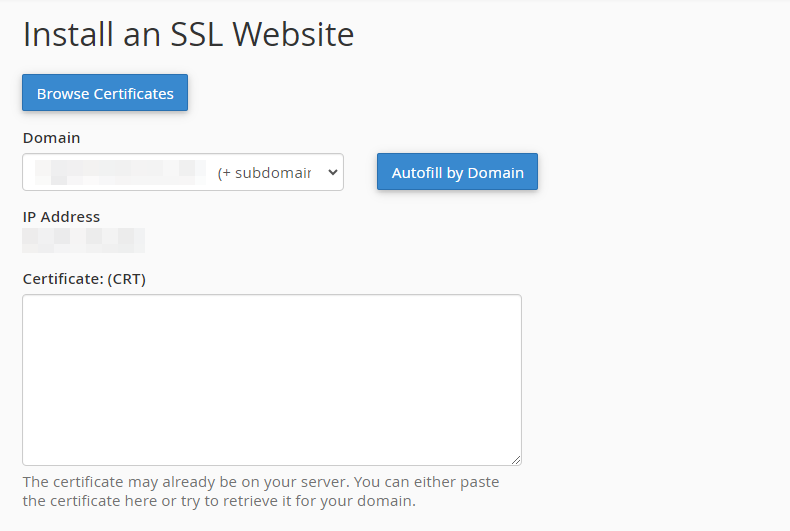
Start by clicking on the Autofill by Domain button. This will automatically fill out the Private Key (KEY) and Certificate Authority Bundle fields:
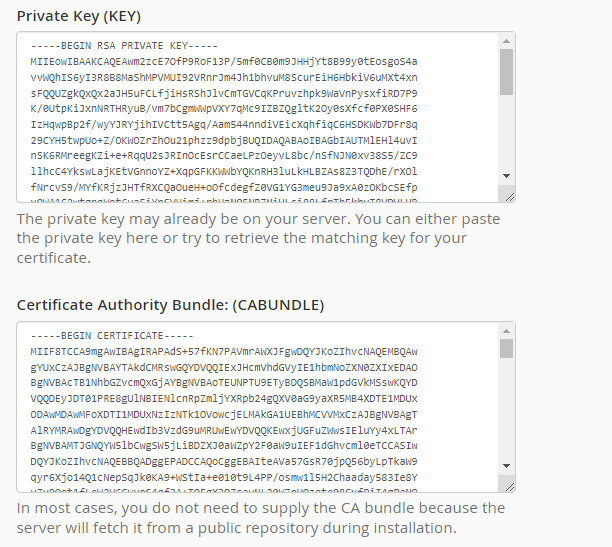
Now, open the file you downloaded and copy its contents. Next, paste them in the Certificate (CRT) field. Then, when you’re ready, click on Install Certificate.
That’s it – you should now have a valid SSL certificate on your site.
To check this, open your website in a browser. If you see a padlock next to the domain and there’s no security warning, your expired SSL certificate has been successfully renewed.
If you run into problems during the process, you might want to reach out to your hosting provider for assistance.
Conclusion
An SSL certificate helps provide a secure connection between your site’s server and the user’s browser. This is typically included in your hosting plan and your web host will automatically renew it for you. If your hosting provider doesn’t offer this service, you might need to renew your SSL certificate manually.
To recap, here’s how to renew your SSL certificate:
- Log into cPanel and generate a CSR.
- Activate and validate your SSL certificate.
- Install your new SSL certificate.
Do you have any questions about what to do when your SSL certificate expires? Let us know in the comments section below!

Sophia is a staff writer at WordCandy.co, where she produces quality blog content for WordPress plugin and theme developers, hosting providers, website development and design agencies, and other online businesses.
Leave a Reply