


- What is the kernel ring buffer?
- What is the dmesg command in Linux?
- Basic syntax for the dmesg command in Linux
- Options for the dmesg command
- Adjusting dmesg timestamps for readability
- Using grep with the dmesg command in Linux
- Using less with the dmesg command in Linux
- Monitor new messages from the kernel buffer in real time
- Use dmesg to check for usb related messages
- Use dmesg to check for kernel related messages
- Use dmesg to check for network related messages
- Conclusion
What is the kernel ring buffer?
The Linux kernel is the “brain” and core piece of the Linux operating system and the kernel’s main function is to serve as an interface between the hardware and software components of a Linux computer system.
During the boot cycle of a Linux system various information is displayed within the console about devices, hardware, Linux kernel modules, and startup processes for the operating system.
However while the system is booting up there are some daemons such as syslog or rsyslogd which are not yet fully online to store and log messages so in order for the console messages to be saved they are sent into a space of memory called the kernel ring buffer for safe keeping.
The kernel ring buffer itself is made of up memory and houses these system messages about devices, hardware, kernel modules, drivers and so on.
Once the console information has reached the kernel ring buffer it is stored until the logging daemons have come online then it is outputted into the dmesg log on the file system in the /var/log/dmesg log file.
In order to review these logs from the kernel ring buffer most effectively we would want to review the dmesg output.
What is the dmesg command in Linux?
The dmesg command is an extremely valuable tool when you’re troubleshooting issues with device drivers, hardware, complications during the boot process and more.
Dmesg (display message or driver message) allows for you to display messages from the kernel ring buffer which contains information on hardware, device drivers, software components, and kernel modules such as during the boot process of the Linux system.
This information mentioned above is logged to the /var/log/dmesg log file which you can review much easier if using the dmesg command.
Overall the dmesg command is very useful for reviewing and troubleshooting kernel events, device failure, hardware errors or other critical messages.
Within this article we will go over the basic usage of the dmesg command to get you started and use for future reference.
Note: Through out the article we’ll be showing Linux command examples using ‘sudo’ in the beginning of each command.
If you are running these commands as the root user feel free to disregard using ‘sudo’ as it is only required for non root users with ‘sudo’ privileges.
Basic syntax for the dmesg command in Linux
The basic syntax when using the dmesg command to display messages from the ring buffer is the command itself followed by a desired option.
Such as in the following command we see the basic syntax:
$ sudo dmsesg [option_name]
Options for the dmesg command
You can view all available options for the dmesg Linux command by using the -h option such as in the following:
$ sudo dmesg -h
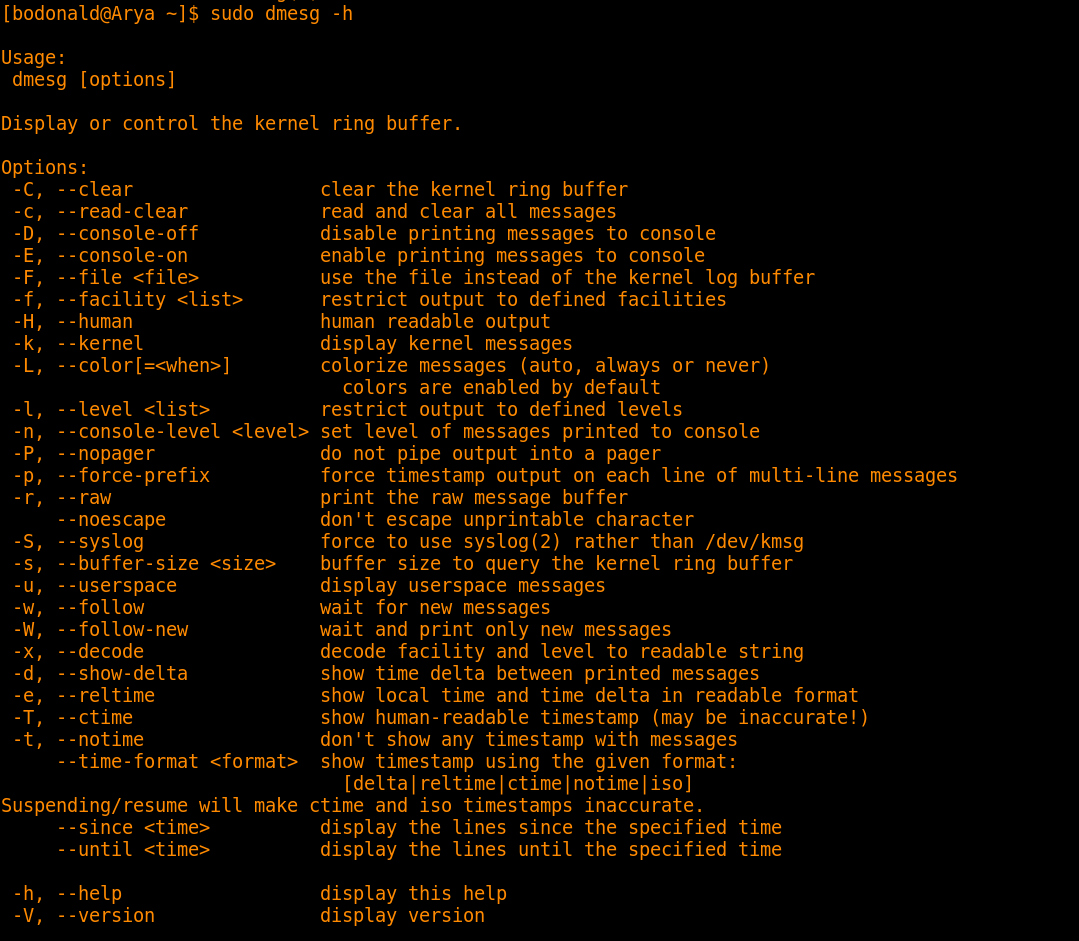
Above we see all options available with the dmesg Linux command and we’ll show some further examples of them in the following sections of this article.
Adjusting dmesg timestamps for readability
Utilizing the -H option with dmesg
In order to make timestamps in dmesg a more human readable output you may want to utilize the -H option when using the dmesg command.
$ sudo dmesg -H

When using -H it will show a timestamp of each minute with a date/time and then every other event during that minute will be logged in seconds/nanoseconds such as we see here:
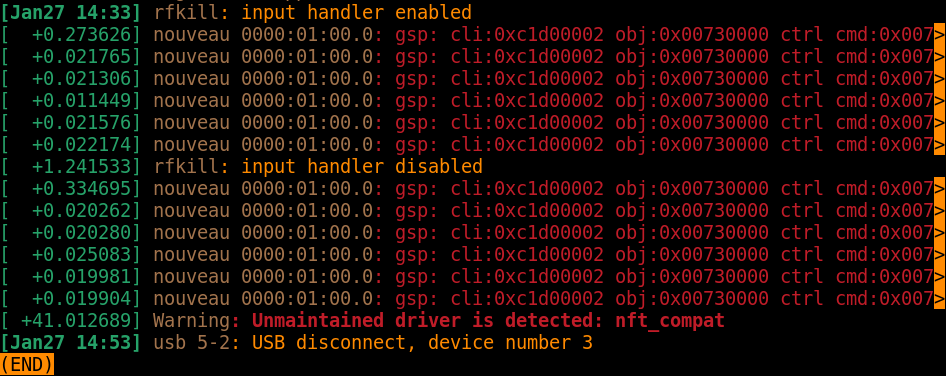
Notice all of the other events that take place after Jan27 14:33 and how they are being measured in seconds/nanoseconds.
At the end of each minute we would see a new timestamp of the Day, Hour, Minutes followed by other events measured in seconds/nanoseconds during that minute timestamp.
Utilizing the -T option with dmesg
One step further to achieve human readable timestamps we can use the -T option ( -T actually stands for human readable where as -H stands for human).
This can be done such as in the following command:
$ sudo dmesg -T

After executing the above command we would see output look something like this:
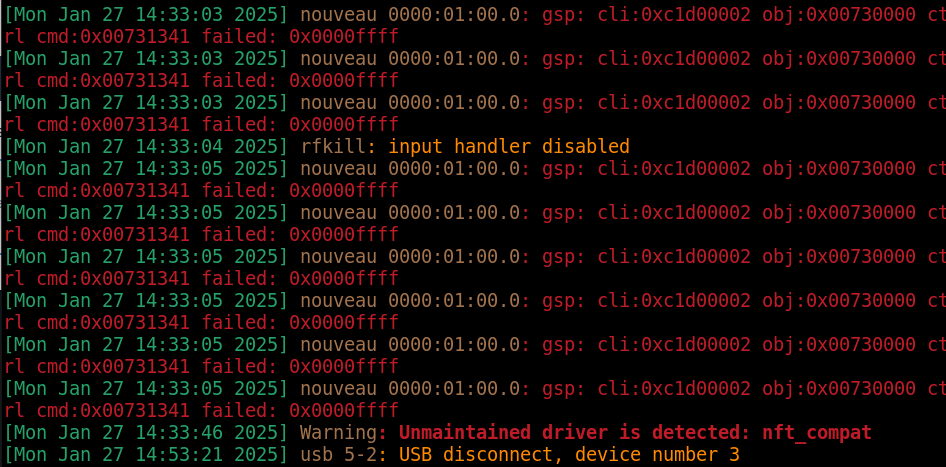
Notice how much easier it is to read the timestamps shown above when using the -T option.
This method would be preferred if you’re not needing to the timestamp to be measured super exact down to the nanosecond.
Using grep with the dmesg command in Linux
Piping other commands into dmesg is a great way to focus the output on search specifics and filter dmesg output.
In the following example we’ll pipe in the grep command to filter dmesg output and retrieve messages from the /var/log/dmesg log file:
$ sudo dmesg | grep memory

With the above example we’ll be grepping through the dmesg log file for any items in reference to memory.
Using less with the dmesg command in Linux
The less command is also a very useful tool if we pipe it into a dmesg command. This will allow us to scroll through the output by using the space bar or our middle mouse scroll:
$ sudo dmesg | less

Or from the above section we can also use less along side grep to make that output easier to follow along with such as in this example:
$ sudo dmesg | grep memory | less

Monitor new messages from the kernel buffer in real time
You can also use dmesg command in Linux to display logs in real time such as if you were using a ‘tail -f’ command on a log file.
To do so you would just use the following command example in your command prompt:
$ sudo dmesg --follow

Running the above command displays the kernel ring buffer messages in real time and will display new messages as they come in all in real time.
Use dmesg to check for usb related messages
To search for device related messages such as a usb device you can use the following command:
$ sudo dmesg | grep usb

Make this output easier to follow along with by piping in ‘less’ at the end such as here:
$ sudo dmesg | grep usb | less

Using the above will find all messages related to the desired device you’re searching for.
Use dmesg to check for kernel related messages
You can also view kernel messages using the dmesg command in Linux.
In order to view kernel messages you would use the following dmesg and grep command which we will also pipe in ‘less’ to make the output more manageable:
$ sudo dmesg | grep -i kernel | less

Using the above will find all messages within the ring buffer in relation to the kernel.
Use dmesg to check for network related messages
Having an issue with a networking interface such as when your system reboots one of the network interfaces is not coming online?
Use the following dmesg command to review ring buffer messages in reference to the interface experiencing issue.
In this example we’ll be using the eth1 interface in our dmesg command:
$ sudo dmesg | grep eth1

As before we can also pipe in ‘less’ to make the output easier to review:
$ sudo dmesg | grep eth1 | less

Using the above will find all messages related to the specific network interface which were logged to the kernel ring buffer during boot.
Conclusion
The dmesg command is extremely useful for system administrators when they are troubleshooting boot related issues, problems with devices or drivers, network interface issues, or even conflicts with kernel modules.
Using dmesg allows for you to output information from the logs containing kernel ring buffer messages in order to seek out error messages which pertain to the issue you’re trying to resolve.
Overall learning how to utilize dmesg and pipe in other commands to review such informational messages from the kernel ring buffer is vital for determining the cause of an issue and then to resolve it.
Leave a Reply